Importing picked horizon into internal format
![]()
![]()
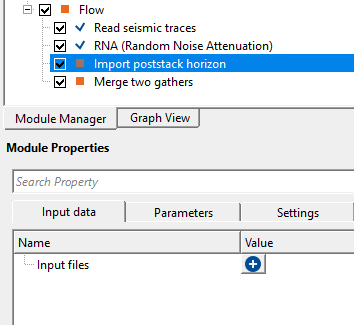
The Import poststack horizon module reads one or more horizon picks stored in plain-text (ASCII) files and converts them into g-Platform's internal horizon format. The input files may originate from any external interpretation software that can export horizons as X, Y, and time (or depth) columns. Once imported, the scattered pick points are automatically interpolated onto a regular map grid so the horizon can be referenced by other processing modules such as Merge two gathers, static corrections, or depth conversion workflows.
Multiple horizon files can be loaded simultaneously; each file becomes one independent horizon layer within the output collection. The module supports both time-domain and depth-domain horizons — use the TimeScalar parameter to convert units as needed (for example, multiply millisecond picks by 0.001 to express them in seconds). After execution, the resulting horizon appears as an output data item that can be connected directly to downstream modules without leaving the workflow.
![]()
![]()
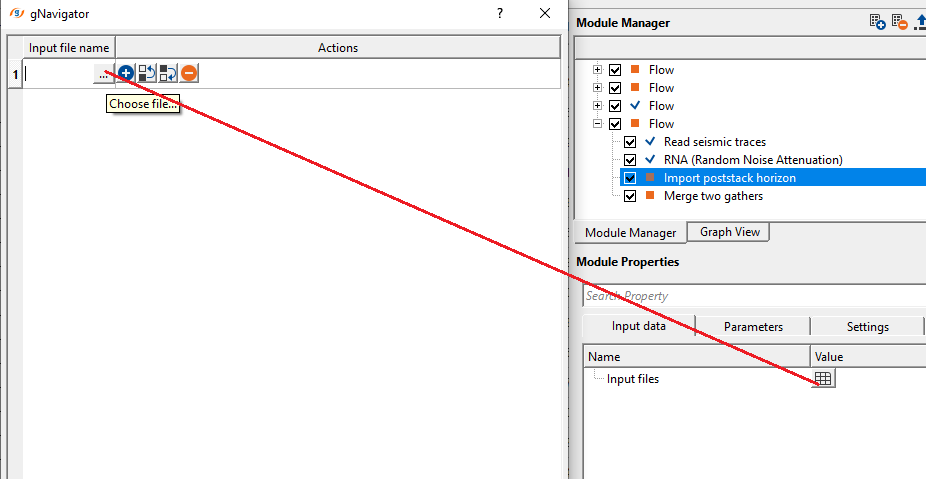
Input files - provide the ASCII/text file format horizons as an input.
A list of one or more plain-text horizon files to import. Accepted extensions are .txt or any other delimited ASCII format. Each file in the list corresponds to one horizon layer in the output. Files must contain at least the X, Y, and Z (time or depth) columns arranged in whitespace- or tab-delimited columns. Click the + button to add entries to the list, then browse to each file using the three-dot (...) button next to the filename field. At least one file must be provided before the module can execute.
![]()
![]()
TimeScalar - scale factor coefficient.
A multiplication factor applied to every Z value (time or depth) read from the input files before the horizon is stored internally. The default value is 1.0 (no scaling). Use this parameter to perform unit conversion at import time. For example, if the input file stores two-way travel time in milliseconds and the project works in seconds, set TimeScalar to 0.001. If the horizon is already in the correct units, leave this at 1.0. The scalar is applied uniformly to all files in the input list.
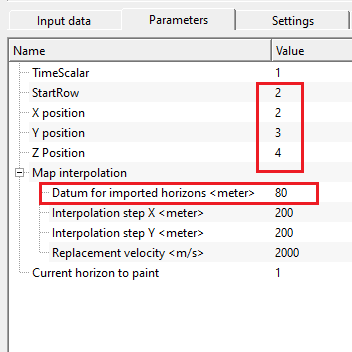
StartRow - specify the starting row position of the ascii/txt file.
The row number (1-based) at which data reading begins. The default is 1, meaning data starts on the first line of the file. If the file has one or more header lines (column labels, survey metadata, comments), increase this value to skip them. For example, if the file has a single header line followed by data, set StartRow to 2. All rows before the specified start row are ignored. The valid range is 1 to 1,000,000.
X position - specify the x-coordinate column position in the input file.
The 1-based column number in the ASCII file that contains the X coordinate (easting, in metres). The default is column 1. Inspect your input file to determine which column holds the X values and set this parameter accordingly. Columns are counted left-to-right starting from 1, and fields are separated by whitespace or tabs.
Y position - specify y-coordinate column position in the input file.
The 1-based column number in the ASCII file that contains the Y coordinate (northing, in metres). The default is column 2. Together with X position, this defines the map location of each horizon pick point. If your file organises coordinates differently (for example, Y before X), adjust both X position and Y position to match the actual column layout.
Z Position - specify Z or elevation column position in the input file.
The 1-based column number containing the horizon value — two-way travel time, one-way time, or depth — at each (X, Y) location. The default is column 3. The TimeScalar parameter is applied to this value after reading. If the file has additional columns (amplitude, confidence, etc.) these are simply ignored — only the column specified here is used as the horizon Z value.
Map interpolation - this section deals with horizon map interpolation.
After reading the scattered pick points from the ASCII files, the module interpolates them onto a regular rectangular grid for use in downstream processing. This group of parameters controls the grid geometry, the reference datum, and the velocity used for any time-to-depth conversion embedded in the horizon map construction.
Datum for imported horizons - specify the datum value of the imported input horizon
The reference datum elevation (in metres) used when constructing the interpolated horizon map. The default is 0 m. This value is used internally during the layer interpolation step to correctly position horizon pick points relative to the project datum. If your survey uses a non-zero datum (for example, a floating datum above mean sea level), enter the appropriate elevation here so that the imported horizon aligns correctly with other data in the project.
Interpolation step X - horizon map is interpolated. Specify the interpolation size in X direction. By default, 200m step size.
The grid node spacing in the X (easting) direction of the interpolated horizon map, in metres. The default is 200 m (minimum 1 m). A smaller step produces a denser, smoother map but increases memory usage and computation time. Set this value to be comparable to the average inline spacing of your seismic grid or to the spatial density of your horizon picks. For sparse picks, a larger step avoids over-fitting noise; for dense picks in a fine 3D survey, a smaller step captures more detail.
Interpolation step Y - specify the horizon map interpolation step size in Y direction. By default, 200m.
The grid node spacing in the Y (northing) direction of the interpolated horizon map, in metres. The default is 200 m (minimum 1 m). This should be set consistently with Interpolation step X and should match the crossline spacing of your seismic survey for best results. For 2D surveys where picks are only available along specific lines, use a step comparable to the spacing between the 2D lines.
Replacement velocity - provide the replacement velocity value. By default, 2000 m/sec
The constant velocity (in m/s) used in the map parameter setup during horizon interpolation. The default is 2000 m/s. This velocity is applied when the module constructs the internal horizon map and is typically set to the near-surface replacement velocity or the average velocity above the horizon. Providing a value close to the true average velocity ensures that the internal representation of the horizon is geophysically consistent with the seismic data to which it will be applied.
Current horizon to paint -
When multiple horizon files are loaded simultaneously, this parameter selects which horizon layer is displayed in the interactive Vista QC panel. Enter the 1-based index of the horizon you want to inspect (e.g., 1 for the first file, 2 for the second, and so on). The default is 1. Changing this value updates the Vista display immediately without re-executing the module, making it convenient to verify each imported horizon in turn. All horizons are always exported regardless of which one is currently painted.
![]()
![]()
Number of threads - One less than total no of nodes/threads to execute a job in multi-thread mode. Limit number of threads on main machine.
Controls how many CPU threads are used during the horizon map interpolation step. The module uses multi-threading (EPROCEDURE_DETAILS_MT) to fill the interpolated grid in parallel. Increasing the number of threads can speed up execution when importing large horizons with many pick points or when using a fine interpolation grid. Set this value based on the number of available CPU cores on the machine, leaving at least one core free for the operating system.
Skip - Skip - By default, FALSE(Unchecked). This option helps to bypass the module from the workflow.
When checked, the module is bypassed entirely during workflow execution — no files are read and no output horizons are generated. This is useful for temporarily disabling the import step while testing other parts of the workflow without removing the module from the graph. By default this option is unchecked (the module executes normally).
![]()
![]()
PostStack Horizon - outputs poststack horizon as an output item.
A single poststack horizon output item carrying the raw (X, Y, Z) pick point data read from the corresponding input file. This item is primarily used for display and as a lightweight reference in situations where only one horizon is needed. When multiple input files are loaded, the currently painted horizon (controlled by the Current horizon to paint parameter) is reflected here.
Output horizons collection - outputs output horizons as a collection
A collection of all imported horizon layers, one per input file. Each element in the collection stores the raw (X, Y, Z) point vector for that horizon. Connect this output to modules that can accept a horizon collection — for example, modules that process multiple stratigraphic layers simultaneously. The order of items in the collection matches the order of files in the Input files list.
Output horizons - generates output horizons which can be used as a reference/connection to other modules.
The primary output of this module — an interpolated horizon object (GHorizonPickingItem) containing all imported horizon layers as a fully gridded, internally formatted g-Platform horizon. This is the output to connect to downstream modules such as Merge two gathers (Horizon item parameter), depth conversion, static computation, or any other module that requires a gridded horizon reference. The horizon is stored in time domain with the interpolation grid defined by the Map interpolation parameters.
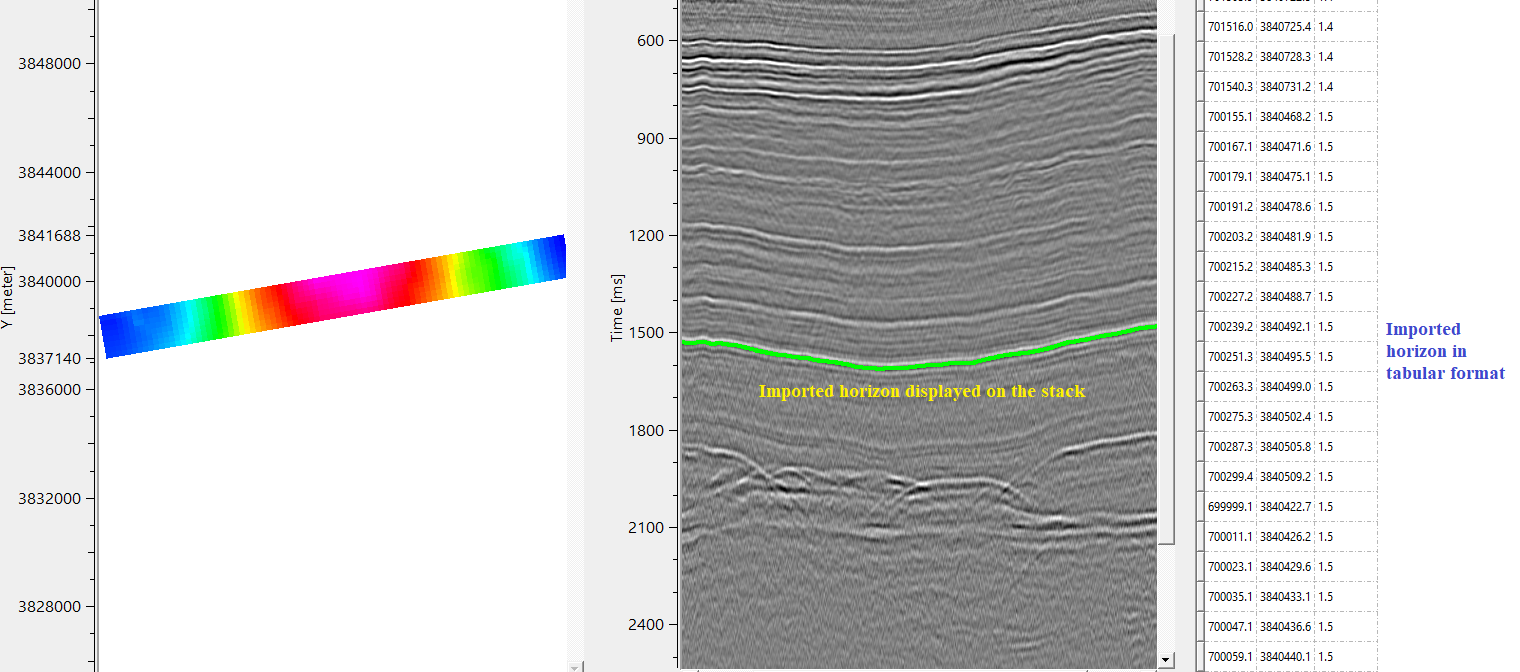
GVistaTableItem - generates the imported horizon information in a tabular format.
A table display in the Vista QC panel listing the raw X, Y, and TIME values for every pick point in the currently selected horizon layer. Columns are labelled X, Y, and TIME. Use this table to quickly verify that coordinates and time values have been read correctly after setting the column positions and TimeScalar. If values look wrong, check the StartRow, X/Y/Z position settings, and the TimeScalar.
There is no information available for this module. So the user can ignore it.
![]()
![]()
In this example, we import an ASCII/Text format horizon to the Import poststack horizon module. This horizon might have generated in any other software. We import the same horizon by using this module and convert it into internal format horizon. Later, we can use this horizon.
Click on ![]() icon. It will pop-up a new window. Click inside the Input file name field. Click on 3 dots (...). Browse for the input file in ASCII format. Click OK.
icon. It will pop-up a new window. Click inside the Input file name field. Click on 3 dots (...). Browse for the input file in ASCII format. Click OK.
Let's say our input ASCII file is like this with 4 columns. Starting row is having the header information.
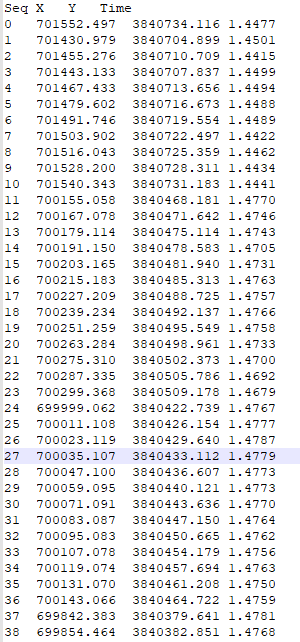
Now the user has to specify the X,Y&Z column positions in the parameters as per the input ASCII file.
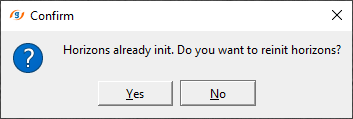
Execute Import post stack horizon module. A pop-up window comes up if the horizon is already initiated. Just click Yes.
That's all. It successfully imported an ASCII format horizon into g-Platform internal format. Now this horizon can be used for any other module.
This module doesn't produce any vista items for visual QC.
To check whether the imported horizon is corrected or not, we can use Merge two gathers module and connect/reference the Output horizons from the Import poststack horizon to Horizon item parameter of Merge two gathers module.
As we can see in the below image, we make the connection/reference of Output horizons to Horizon item.
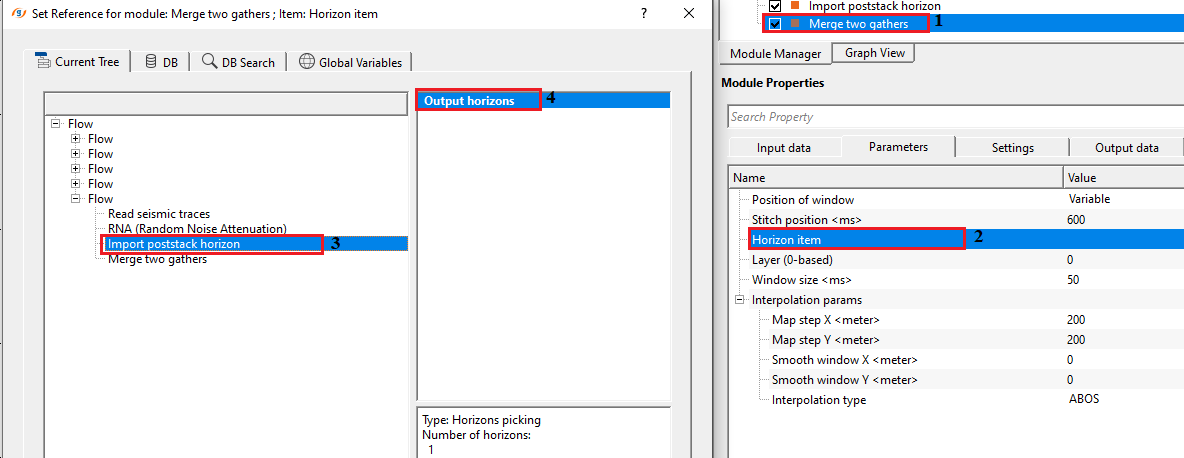
Execute the module. It will display the output horizon on the stack section.
![]()
![]()
There are no action items available for this module.
![]()
![]()
YouTube video lesson, click here to open [VIDEO IN PROCESS...]
![]()
![]()
Yilmaz. O., 1987, Seismic data processing: Society of Exploration Geophysicist
 * * * If you have any questions, please send an e-mail to: support@geomage.com * * *