Updating existing velocities
![]()
![]()
Update Velocity Picking is a velocity-analysis utility that modifies, refines, and validates existing velocity picks without re-running the entire velocity analysis. The module allows users to edit auto-picked or manually picked velocities, enforce continuity, apply smoothing and constraints, and regenerate a clean, geologically consistent velocity function for further processing such as NMO, stacking, or migration.
![]()
![]()
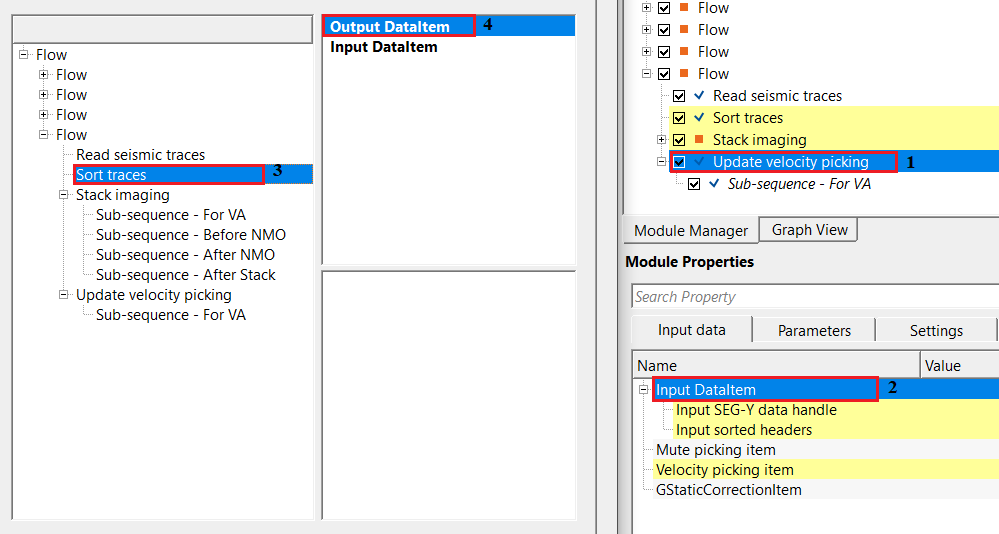
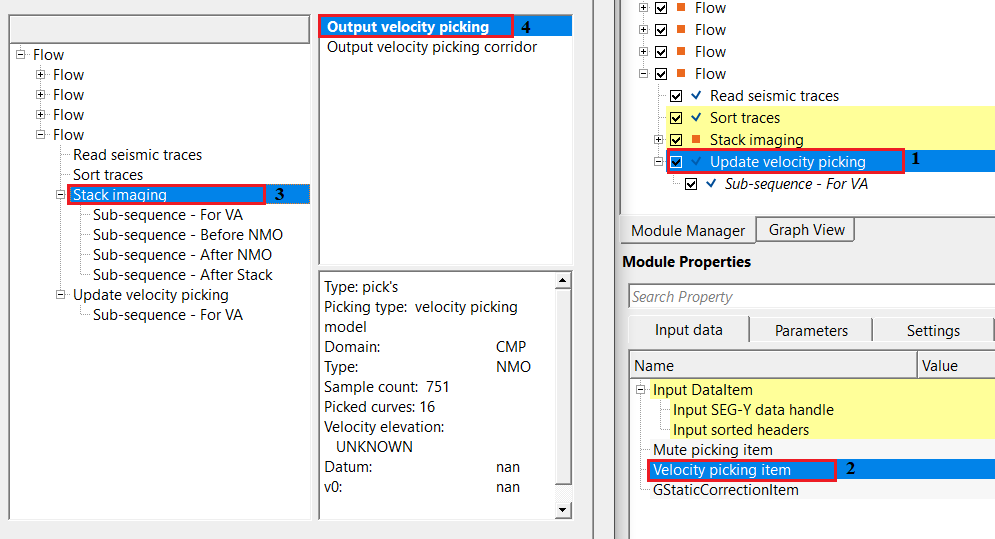
Input DataItem
Input SEG-Y data handle - connect/reference to the Output SEG-Y data handle. This input gather could be any dataset.
Input sorted headers - connect/reference to the Output sorted headers. Sort the data in CDP/OFFSET or INLINE-CROSSLINE/OFFSET domain.
Mute picking item - not mandatory however if the user wants to apply mute function (not of stretch mute) then provide the mute picking item from Stack Imaging module.
Velocity picking item - provide the velocity picks as a picking item from the Stack Imaging module.
GStaticCorrectionItem - this is also not mandatory. If the user wants to apply statics corrections to the velocity picks then provide the static correction item.
![]()
![]()
V0 - Specify the replacement or near surface velocity value for datum shift.Set this value prior to beginning of the velocity picking. By default, 0.5 m/sec
Velocity analysis - this is the main component of creating the semblance display. Inside the Velocity analysis, the user should define various parameters to generate the semblance, NMO stretch factor etc.
Start velocity - specify the starting velocity value for creating the semblance. By default, 1000 m/sec
Ending velocity - specify the end velocity value for creating the semblance. By default, 6000 m/sec.
Velocity increment - specify the the velocity increment step size. By default 50 m/s.
Semblance smoothing window - this value defines the smoothing of the semblance display. Higher window makes the semblance more smooth which is not ideal an ideal scenario but it depends on the input data quality. Default parameter value of 50ms works good.
Stretch factor - this parameter determines the NMO stretch factor. By default 50. If the user changes this value then the user can to observe the changes in the Velocity analysis window (Semblance display), Current NMO Seismogram display. Once the user executes the Stack Imaging module with the updated Stretch factor then the stack will be created using user defined NMO stretch factor.
Smoothing parameter Y velocity - default value is 10. Define the number of vertical samples to define the velocity smoothing.
Normalization window - default 100 ms. This parameter is used for normalization of the semblance display.
Semblance resolution { High, Normal, Low } - select the type of resolution. We have 3 options, Normal (By default), Low and High. By meaning of the Low and High, it decreases/increases the semblance resolution. Depending upon the input data quality the user can select the appropriate semblance resolution.
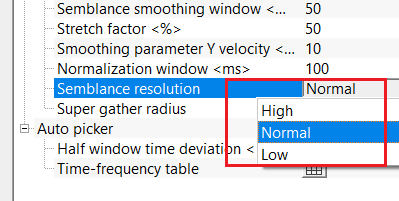
Super gather radius - by default unchecked. If the user wants to display the Common Offset (CO) gather then check this option.
Auto picker - this section deals with velocity auto-picking parameters.
Half window time deviation - it defines the maximum allowable vertical deviation from the current velocity pick. By default, 10 ms.
Time-frequency table - defines time-dependent frequency bands used for semblance computation during auto velocity picking.
![]()
![]()
Auto-connection - By default, TRUE(Checked).It will automatically connects to the next module. To avoid auto-connect, the user should uncheck this option.
Number of threads - One less than total no of nodes/threads to execute a job in multi-thread mode. Limit number of threads on main machine.
Skip - By default, FALSE(Unchecked). This option helps to bypass the module from the workflow.
![]()
![]()
Output DataItem - outputs Output DataItem as a vista item for making connections/references to sub-sequent modules.
Velocity picking item output - outputs updated velocity picking item as a vista item.
![]()
![]()
There is no information available for this module.
![]()
![]()
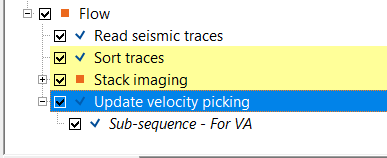
In this example workflow, we are updating the existing velocity picks by reading them back inside the module and then auto-picking using the module parameters.
For this example, we need
•any gathers (non-NMO) and sort the data in CDP/OFFSET or INLINE-CROSSLINE/OFFSET domain.
•already picked velocities as a velocity picking item. In this example, we are taking the Output velocity picking item from the Stack Imaging module.
•mute picking item is not mandatory so does the statics correction item.
Make the necessary references/connections as the per the input data requirements.
In the parameters section, the user has to provide the V0 or replacement velocity. After wards, set up the parameters for semblance calculation. In the final section of the parameters, the user should set up the Auto-picker parameters.
As we preparing for the auto-picking the velocities, the user should pay attention to the most important parameters of
Half window time deviation - this parameter is crucial for the auto-picking of the velocities. As the user specifies a certain time, it will creates a window both spatially and temporally (horizontal & vertical). Within this boundary, the program looks for the right velocity to pick/update.
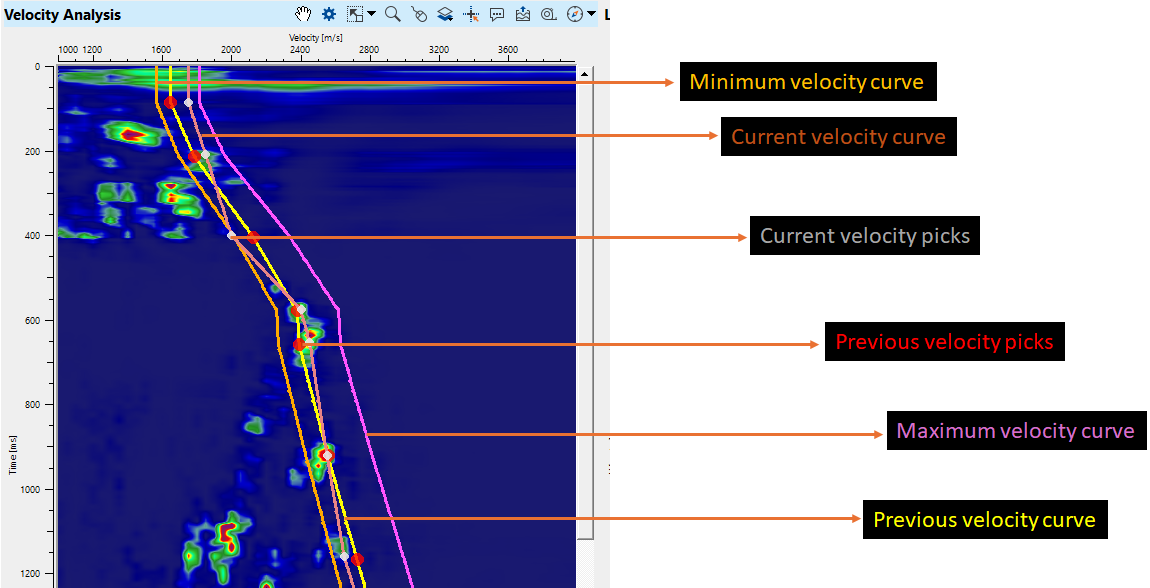
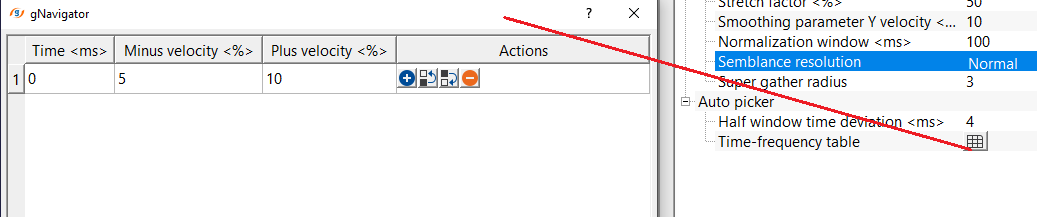
In the above image, we have defined the minimum(orange curve) and maximum(purple curve) velocity should be -5% & +10% of the existing velocity picks. Based on these value, the program will prepare the minimum and maximum velocity corridors.
Next, based on the Half window time deviation, it will search within the radius of the user defined time deviation window, it will pick the velocity (white dot).
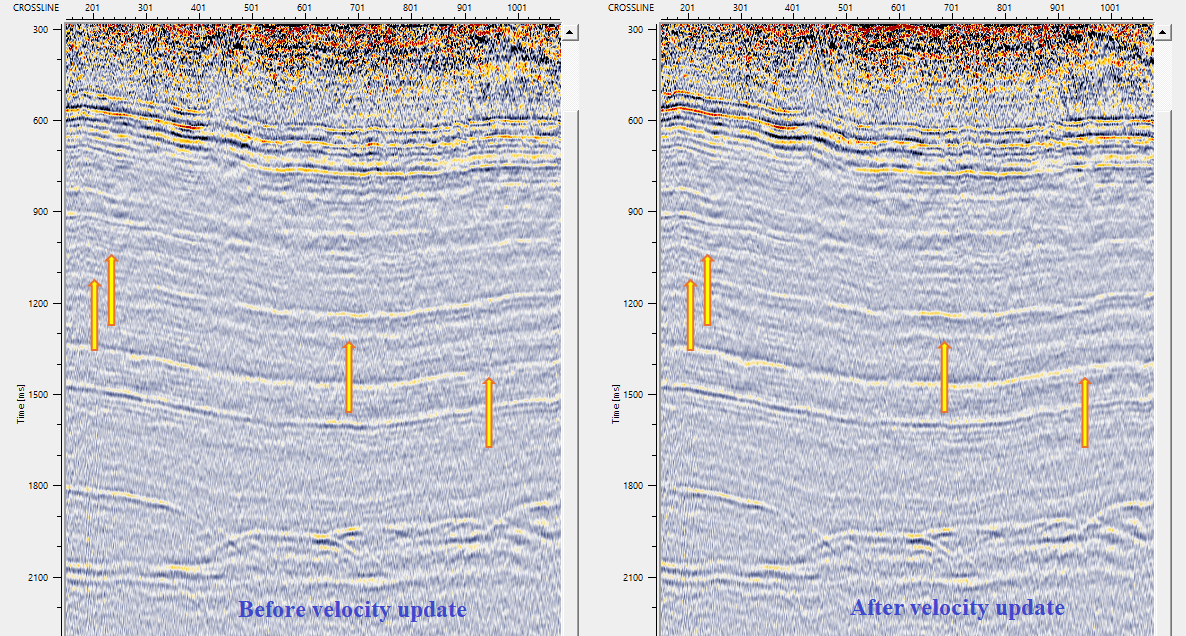
Adjust the parameters as per the data requirements and execute the module. Create two different stacks with old and new/updated/auto picked velocities and compare the stack results.
![]()
![]()
There are no action items available for this module so the user can ignore it.
![]()
![]()
YouTube video lesson, click here to open [VIDEO IN PROCESS...]
![]()
![]()
Yilmaz. O., 1987, Seismic data processing: Society of Exploration Geophysicist
 * * * If you have any questions, please send an e-mail to: support@geomage.com * * *