Selecting and excluding higher amplitudes traces
![]()
![]()
Clip Selector is used to determine the clipping value (or gain level) for seismic data display and processing. Its primary purpose is to control the amplitude scaling of seismic traces to optimize their visual representation. Clip selector works trace by trace mode.
Why is it needed? Seismic data can have an enormous dynamic range, from very weak deep reflections to very strong shallow reflections or noise bursts. If we plot this data with a fixed scale, either the strong amplitudes will saturate ("clip") and obscure all detail, or the weak amplitudes will be invisible. The clip selector automatically or manually calculates a sensible maximum value to which all amplitudes will be scaled, ensuring a balanced and geologically informative display.
Clip selector modules works like a select traces module. Whenever there are higher amplitude traces in the gather/volume, it will select these traces and exclude from the final output based on the user defined maximum amplitude value. So the user must keep in mind that the final output data has less number of traces than the input data.
![]()
![]()
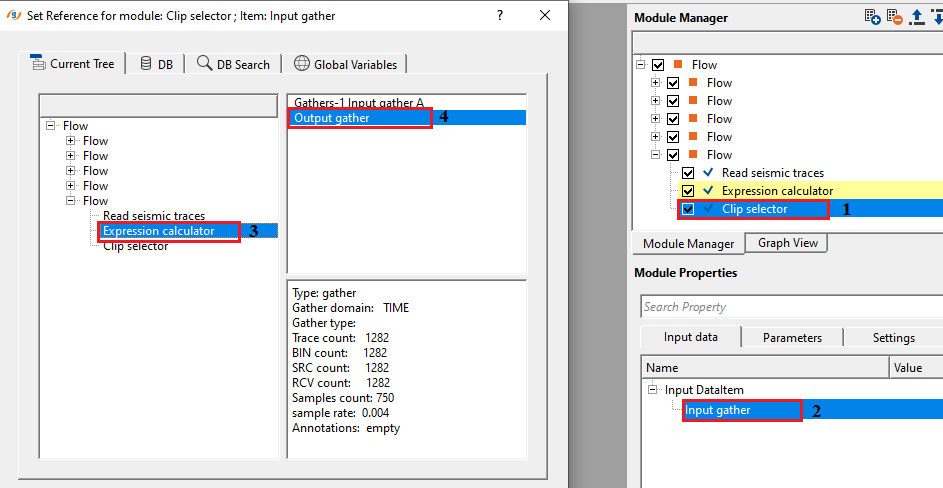
Input DataItem
Input gather - connect/reference to the Output gather that got higher amplitudes which needs to be excluded.
![]()
![]()
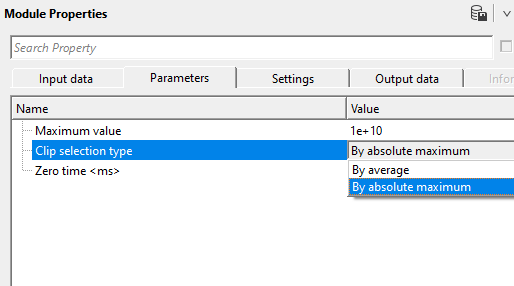
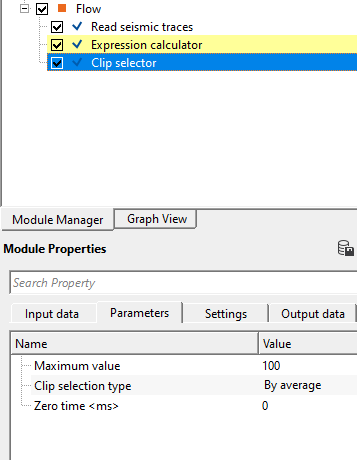
Maximum value - the amplitude threshold used to decide whether a trace should be excluded. Default: 10,000,000,000 (effectively disabled).
Any trace whose amplitude measure (either the mean absolute value or the peak absolute sample value, depending on the Clip selection type) exceeds this threshold will be removed from the output gather. The interpretation of this value differs between the two clip types: in By average mode it is compared against the per-trace mean absolute amplitude, while in By absolute maximum mode it is compared against the largest absolute sample value found anywhere in the trace. Set this value based on the amplitude scale of your data — for example, if your data is in floating-point units after gain removal, a typical threshold might be in the range of 10 to 1000 depending on the noise level. The very large default (10 billion) is intentionally set to pass all traces through unless you explicitly define a meaningful threshold.
Clip selection type { By average, By absolute maximum } - controls which amplitude measure is used to evaluate each trace against the Maximum value threshold. Default: By absolute maximum.
By average — for each trace, the module computes the simple mean of the absolute sample values across all time samples. If this mean absolute amplitude exceeds the Maximum value threshold, the trace is excluded. Because it averages over all samples, this mode is robust against isolated noise spikes: a single large-amplitude sample will have only limited influence on the per-trace average. Use this mode when you want to remove consistently high-energy traces while keeping traces that contain only occasional transient peaks.
By absolute maximum — for each trace, the module scans all time samples and checks whether any single sample has an absolute value exceeding the Maximum value threshold. If even one sample exceeds the threshold, the entire trace is excluded. This is the default mode. It is the most sensitive to outliers: a single noise burst or instrumentation glitch on one sample is sufficient to reject the whole trace. Use this mode when you want strict control over peak amplitudes and need to ensure that no sample in the output ever exceeds the specified limit.
Zero time - mute-zone detection threshold, in milliseconds. Default: -1 (disabled).
When set to a positive value (in ms), this parameter instructs the module to also check whether each trace contains any live (non-zero) samples before the specified time. If a trace has only zero-value samples from the start of the record up to this time point, the trace is considered dead or fully muted and is excluded from the output — regardless of whether it would otherwise pass the amplitude test. This is useful for automatically removing header-muted or pre-arrival zero-padded traces that would otherwise inflate the output gather.
When set to -1 or any non-positive value (the default), this check is disabled and all traces that pass the amplitude criterion are kept, whether or not they contain zero samples at the start.
![]()
![]()
Auto-connection - By default, TRUE(Checked).It will automatically connects to the next module. To avoid auto-connect, the user should uncheck this option.
Bad data values option { Fix, Notify, Continue } - This is applicable whenever there is a bad value or NaN (Not a Number) in the data. By default, Notify. While testing, it is good to opt as Notify option. Once we understand the root cause of it,
the user can either choose the option Fix or Continue. In this way, the job won't stop/fail during the production.
Notify - It will notify the issue if there are any bad values or NaN. This will halt the workflow execution.
Fix - It will fix the bad values and continue executing the workflow.
Continue - This option will continue the execution of the workflow however if there are any bad values or NaN, it won't fix it.
Number of threads - One less than total no of nodes/threads to execute a job in multi-thread mode. Limit number of threads on main machine.
Skip - By default, FALSE(Unchecked). This option helps to bypass the module from the workflow.
![]()
![]()
Output DataItem
Output gather - generates the output gather after amplitude clipping.
There is no information available for this module so the user can ignore it.
![]()
![]()
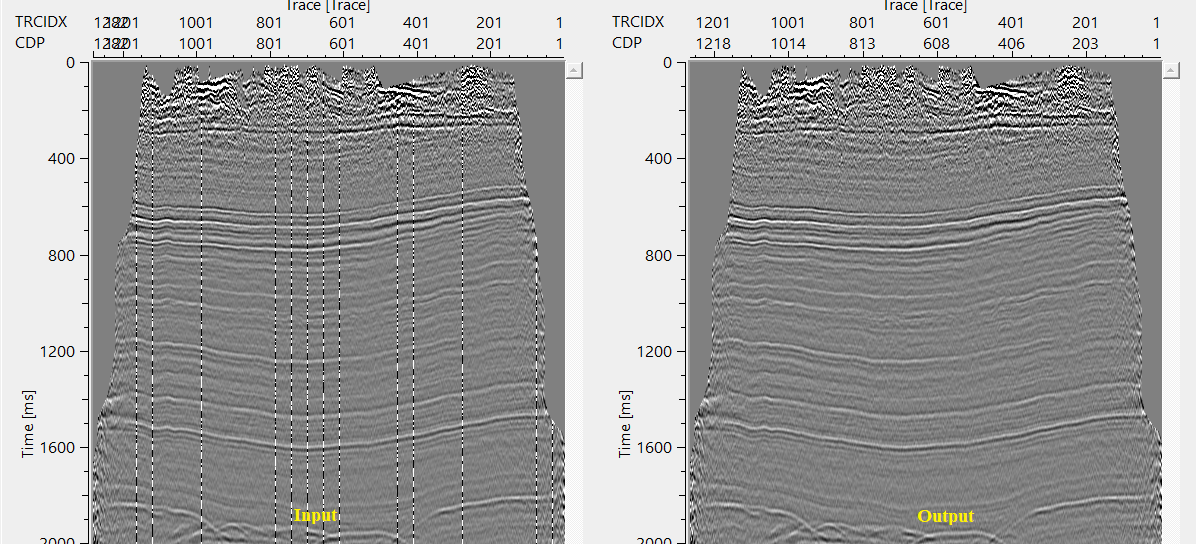
In this example workflow, we are adding some higher amplitudes to a stack gather by using Expression calculator. Later by using Clip selector, we are excluding these higher amplitudes.
If we look at the Expression calculator, it is something like this

The above output is connected/referenced to Input gather of Clip Selector. Adjust the parameters to eliminate the higher amplitudes.
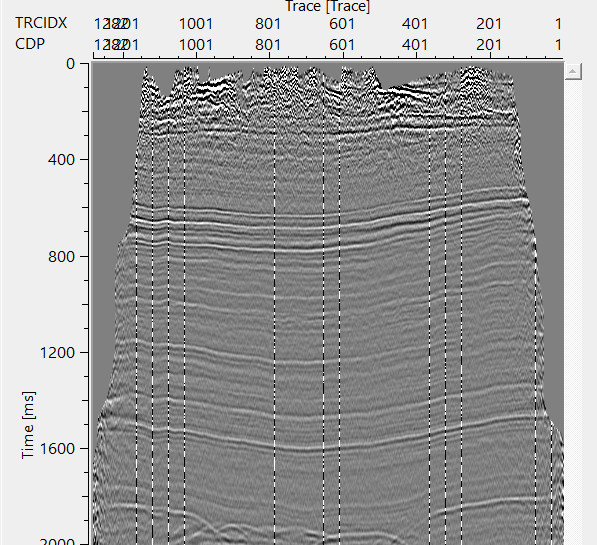
If we look at the output gather of both Expression calculator & Clip selector, they will display two different trace header information.
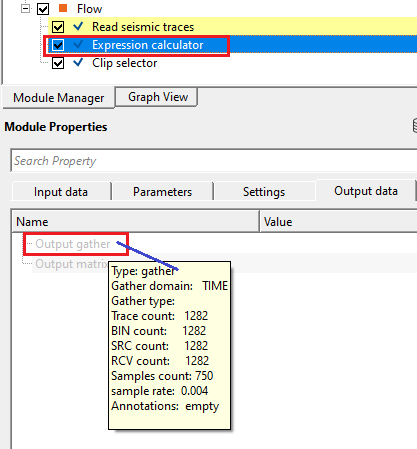
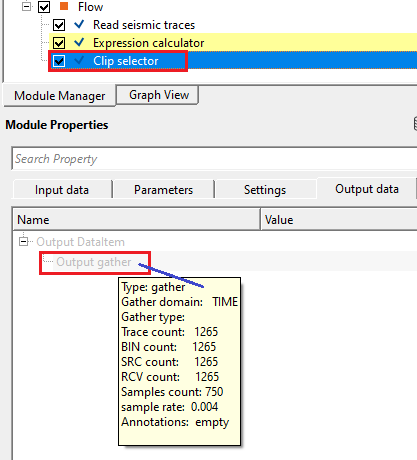
We can clearly see that there are less number of traces after Clip selector. These are the higher amplitude traces which are excluded by Clip selector module based on the user defined amplitude values.
![]()
![]()
There are no action items available for this module.
![]()
![]()
YouTube video lesson, click here to open [VIDEO IN PROCESS...]
![]()
![]()
Yilmaz. O., 1987, Seismic data processing: Society of Exploration Geophysicist
 * * * If you have any questions, please send an e-mail to: support@geomage.com * * *