Amplitude clipping
![]()
![]()
Clipping is a non-linear amplitude operation commonly used to control extreme amplitudes, remove outliers, stabilize displays, and prepare data for processes that are sensitive to large values (e.g., FK filtering, deconvolution, stacking). This module performs amplitude clipping on seismic gathers, limiting sample values that exceed a defined threshold.
Two clipping strategies are available. Amplitude clip applies the threshold directly to each sample value, hard-limiting any value that exceeds the clip level. Envelope clip computes the instantaneous amplitude (envelope) of the trace using the Hilbert transform and scales sample values so that the envelope does not exceed the clip level, preserving the wavelet shape and phase while gently reducing amplitude bursts.
The clip threshold can be determined in two ways: as a percentile of the amplitude distribution within each trace (or across all traces when Multichannel is enabled), or as a fixed absolute amplitude value when Clip by global maximum is enabled.
![]()
![]()
Input DataItem
Input gather - connect the output gather from the upstream module whose amplitudes need to be clipped. This is typically a raw or partially processed seismic gather containing spike noise or outlier amplitudes that must be suppressed before further processing.
![]()
![]()
Clip by global maximum - controls whether the clip threshold is set as a fixed absolute amplitude value (enabled) or derived automatically from the amplitude percentile of each trace (disabled). By default this option is disabled.
When enabled, the clip level is set to the fixed value specified in the Maximum value parameter. Any sample whose absolute amplitude exceeds that value will be clipped. This mode is useful when you already know the acceptable amplitude range of your data, for example when working with data that has a known instrument clip level.
When disabled, the clip level is computed from the amplitude percentile of each trace (or of all traces together if Multichannel is enabled) using the Clip value percent parameter. This mode adapts to the actual amplitude distribution of the data and is the preferred approach when the absolute amplitude level is unknown.
Clip by global maximum - true - enable this option to clip all samples exceeding a fixed absolute amplitude limit. When enabled, the Maximum value parameter becomes active and the Clip value percent and Multichannel parameters are hidden.
Maximum value - the fixed absolute amplitude threshold applied when Clip by global maximum is enabled. Any sample whose absolute value exceeds this threshold will be replaced by this threshold value (with the original sign preserved). The default is 10,000,000,000 (effectively unlimited). Set this to a value appropriate for your data's amplitude range, for example the known instrument clip level.
Clip by global maximum - false
Clip value percent - the percentile of the absolute amplitude distribution used to determine the clip threshold. The value is expressed as a fraction between 0 and 1, where 0.95 means the 95th percentile. The module sorts the absolute amplitude values of each trace and clips any sample that exceeds the amplitude at this percentile rank. The default is 0.95 (95th percentile). Lower values clip more aggressively; higher values (approaching 1.0) clip only the most extreme outliers. This parameter is only visible when Clip by global maximum is disabled.
Multichannel - controls whether the percentile clip threshold is computed independently for each trace (disabled, default) or jointly across all traces in the gather (enabled). When enabled, all trace samples are pooled together to determine a single clip level that is then applied uniformly to every trace in the gather. This ensures consistent clipping when traces in a gather have very different amplitude levels. By default this option is disabled, so each trace is clipped independently based on its own amplitude distribution. This parameter is only visible when Clip by global maximum is disabled.
Clip type { Amplitude clip, Envelope clip } - choose the clip type from the drop-down menu. The default is Envelope clip.
Amplitude clip - applies the threshold directly to each sample value. Any sample whose absolute value exceeds the clip level is replaced by the clip level (with the original sign preserved). This creates a hard limit on amplitude and may alter the wavelet shape at clipped locations. Use this option when removing spike noise, balancing traces for display, or preparing data for linear processes where large amplitudes must be strictly bounded. Note that hard clipping introduces sharp transitions that can affect the frequency content of the data.
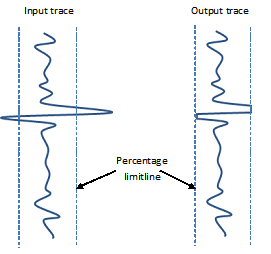
In the image above, amplitude clip cuts samples at the threshold, creating a flat top on high-amplitude events and a sharp boundary that changes the wavelet shape.
Envelope clip - uses the Hilbert transform to compute the instantaneous amplitude (envelope) of each trace. The module then scales the trace samples so that the envelope does not exceed the clip level. This preserves the phase of the signal and keeps the wavelet shape intact, producing a smoother and more geophysically gentle result than amplitude clip. Use this option when it is important to maintain the true reflection character of events while still suppressing amplitude bursts caused by noise or acquisition artefacts.
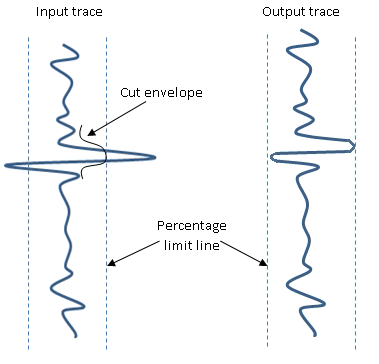
In this image, envelope clip constrains high-amplitude bursts while preserving the wavelet shape, resulting in a more natural-looking output.
![]()
![]()
Auto-connection - By default, TRUE (Checked). When enabled, the output of this module is automatically connected to the input of the next module in the workflow. Uncheck this option to prevent automatic connection and wire the outputs manually.
Bad data values option { Fix, Notify, Continue } - determines how the module responds when it encounters bad values or NaN (Not a Number) samples in the input data. By default, Notify. During testing, use Notify to detect and diagnose data quality problems. Once the root cause is understood, switch to Fix or Continue to allow production processing to complete without interruption.
Notify - halts workflow execution and reports the location of any bad values or NaN samples. Use this mode during QC to identify and diagnose data quality issues.
Fix - automatically replaces bad values or NaN samples with valid values and continues processing. Use this mode in production when bad data is known to occur but should not stop the job.
Continue - continues processing without modifying bad values or NaN samples. Use this mode when bad values are expected and acceptable, and you do not want them corrected.
Calculate difference - when enabled, generates an additional output gather containing the difference between the input and output gathers (i.e., the clipped noise). By default unchecked. Enable this option to QC the clipping result by visualizing exactly what was removed from the data.
Number of threads - the number of parallel processing threads used for multi-threaded execution. Set this to one less than the total number of available CPU cores on the processing machine to maximize throughput while leaving one core available for system tasks.
Skip - By default, FALSE (Unchecked). When enabled, this module is bypassed and its input gather is passed through unchanged to the output. Use this option to temporarily disable clipping without removing the module from the workflow.
![]()
![]()
Output DataItem
Output gather - the amplitude-clipped gather. All samples that exceeded the clip threshold have been limited to the threshold value (Amplitude clip mode) or scaled down via their envelope (Envelope clip mode). Connect this output to the next processing module in the workflow.
Gather of difference - the difference gather representing what was removed by the clipping operation (input minus output). This output is only active when the Calculate difference parameter is enabled. Inspect this gather to verify that only genuine noise or spikes were clipped and that no reflection signal was inadvertently removed.
There is no information available for this module so the user can ignore it.
![]()
![]()
In this example workflow, we are adding some random spikes/higher amplitudes a stack section by using Expression calculator and connect/reference the Output gather from the expression calculator to Clip module as an input gather.
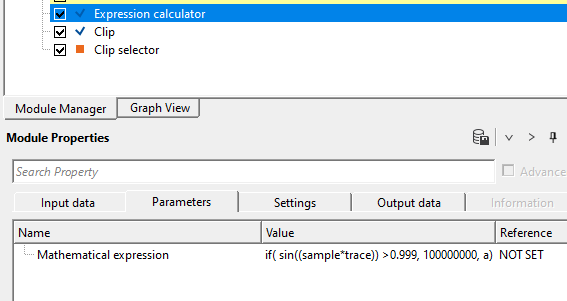
Output from this expression calculator should look like this
Make the connection/reference to Output gather of Expression calculator to Input gather of Clip module.
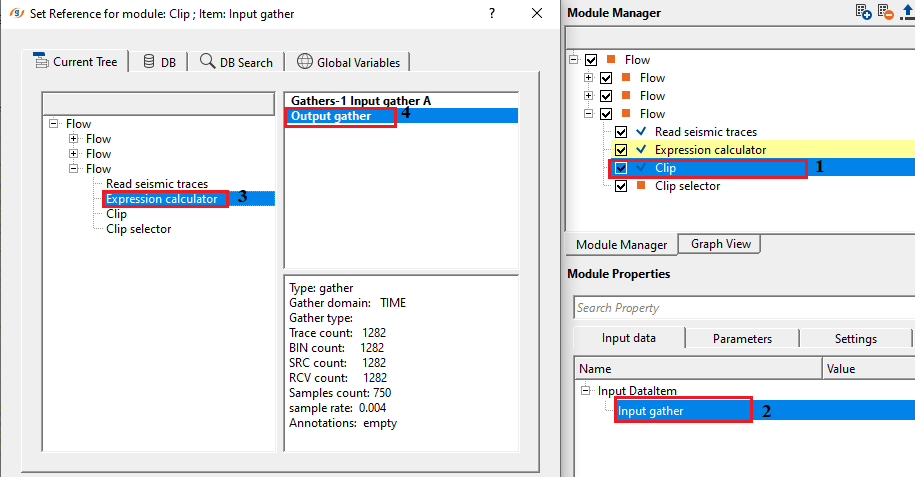
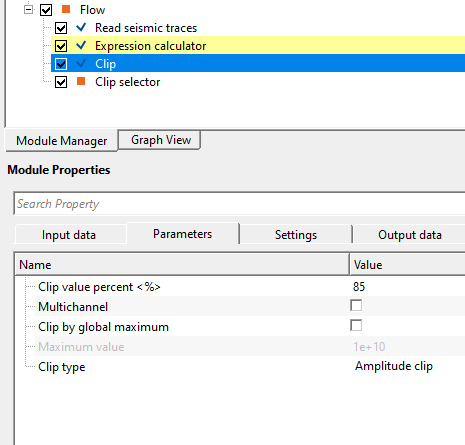
Adjust the parameter of Clip module and execute the module.
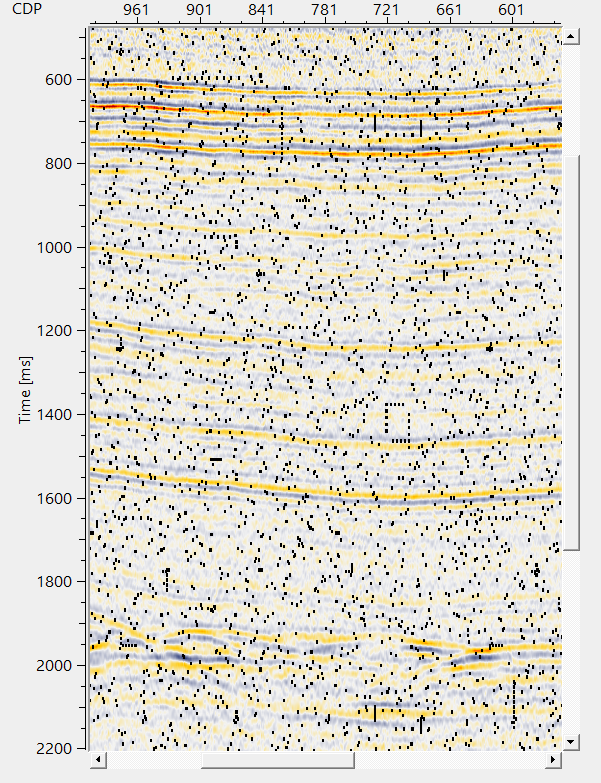
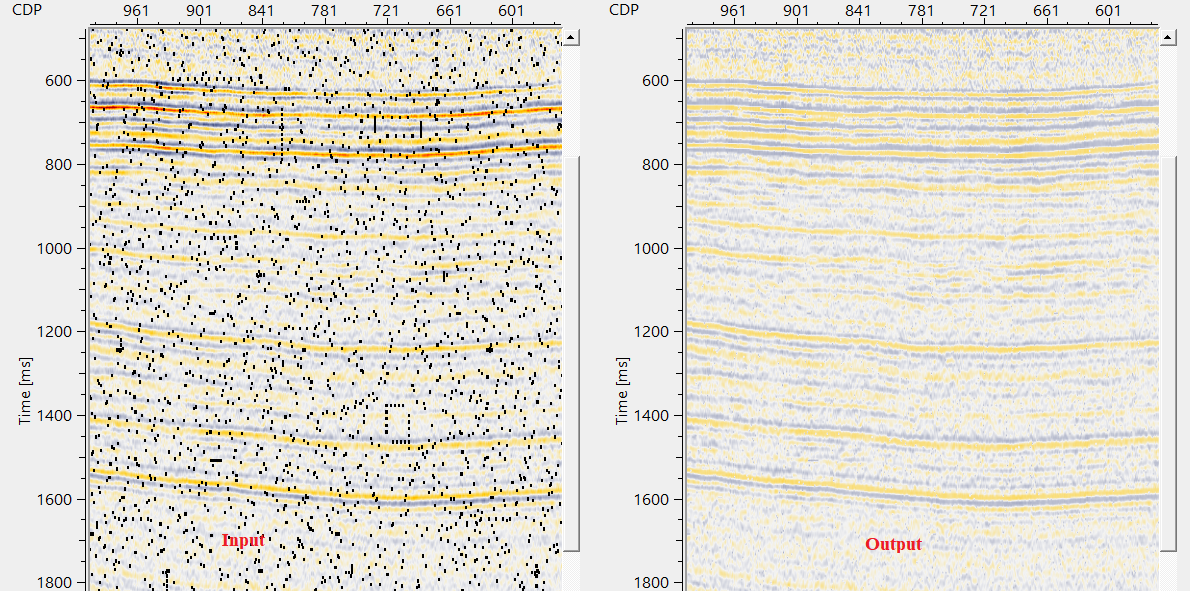
The final output looks like this
![]()
![]()
There are no action items available for this module.
![]()
![]()
YouTube video lesson, click here to open [VIDEO IN PROCESS...]
![]()
![]()
Yilmaz. O., 1987, Seismic data processing: Society of Exploration Geophysicist
 * * * If you have any questions, please send an e-mail to: support@geomage.com * * *