QC Attributes
Displays QC Attributes on a location map
Theory
The QC attributes module is designed to display color maps of various calculated attributes, alongside a frequency spectrum. The attributes are calculated inside the area defined by the analysis window and inside the noise analysis window.
How To Use:
- Connect the module to SEG-Y data handle and sorted headers. The sort you choose determines the trace group across which the analysis will be performed
- Output the vistas from the module (Location map, output , spectrum)
- On the Output gather, adjust the Analysis window and the Noise analysis window to cover the portion of the data that you would like to analyze
- You may do this by clicking on the
 icon, and turning on the interactive items for Analysis window and Noise Analysis window.
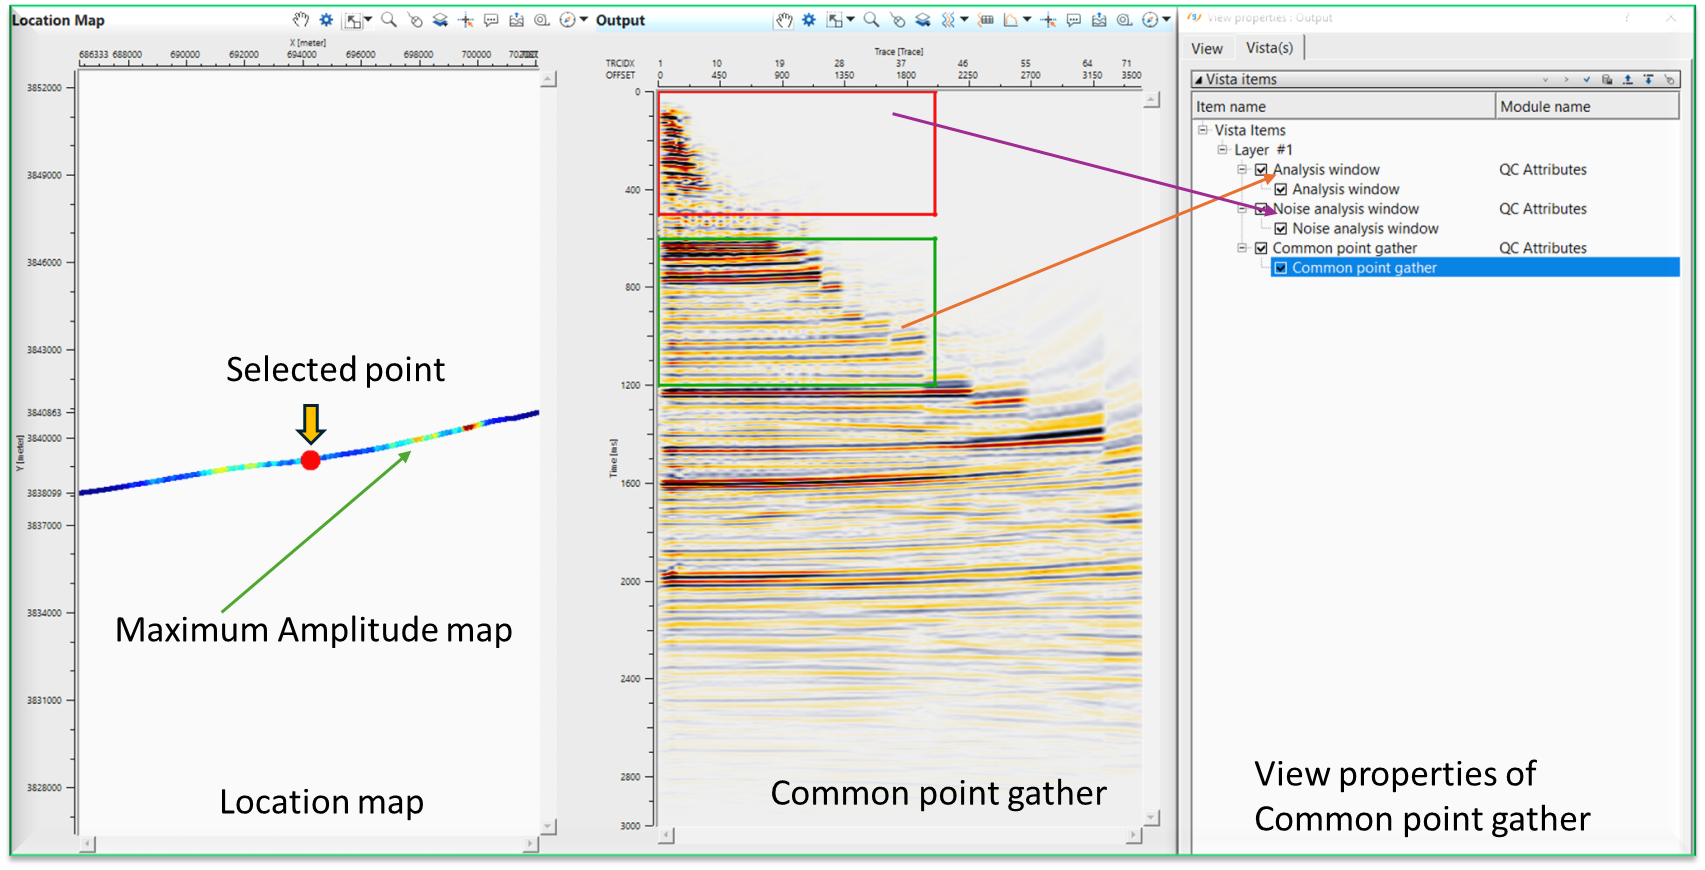
Select any one of the windows from the control item icon. Here we are showing Analysis window (Signal window).
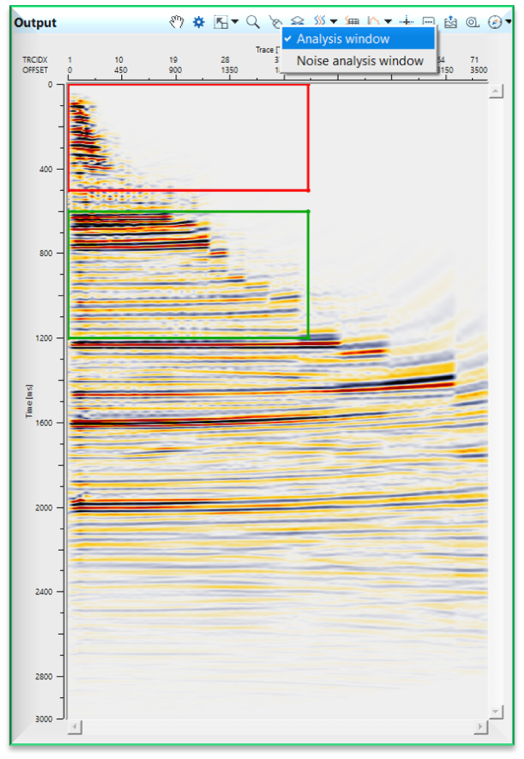
Now move/place the cursor inside the Analysis window (Green rectangle). A + icon appears. Now hold MB1 or LMB and move the window wherever the user wants to analyze the data. Now this window (Green rectangle) is the new Analysis window. Likewise, the user can perform Noise Analysis also.
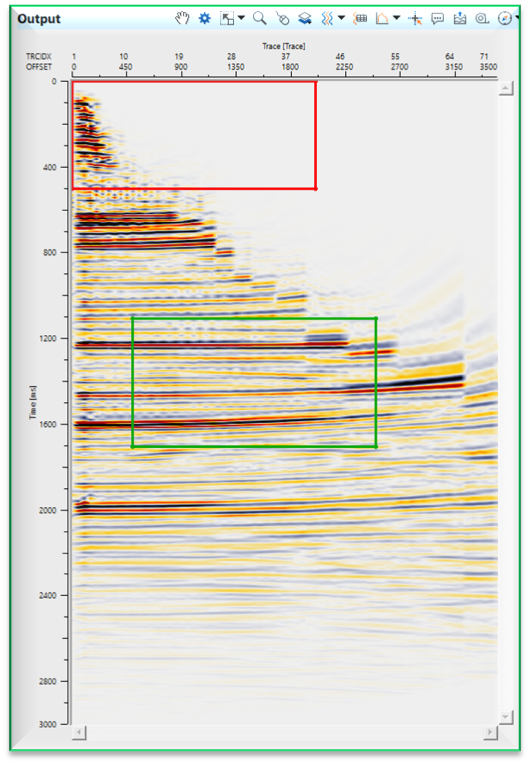
- Alternately, you may define these boxes by setting the extents for these two boxes under “Signal calculation window” and “Noise Calculation window” under the parameters tab
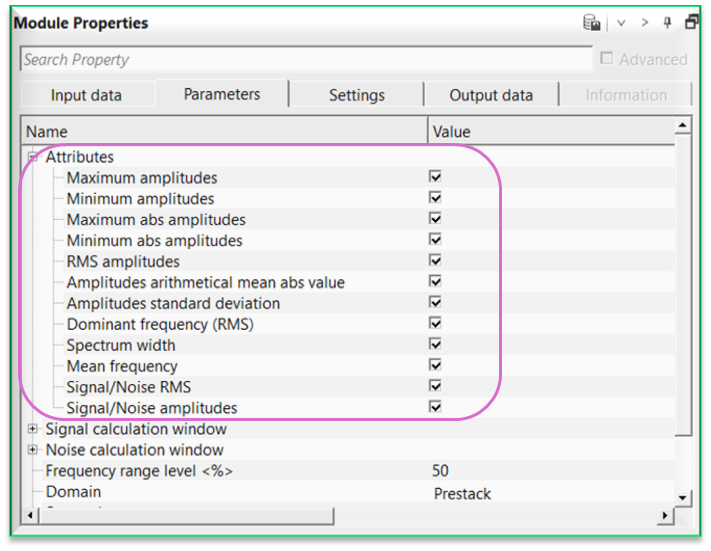
- Choose the attributes you would like to calculate by ensuring they are checked off under “attributes”
- Run the module to calculate attributes
- On the location map, open the View properties
 Choose which attribute you would like to see displayed as a color map by checking it off in the Attribute Map list:
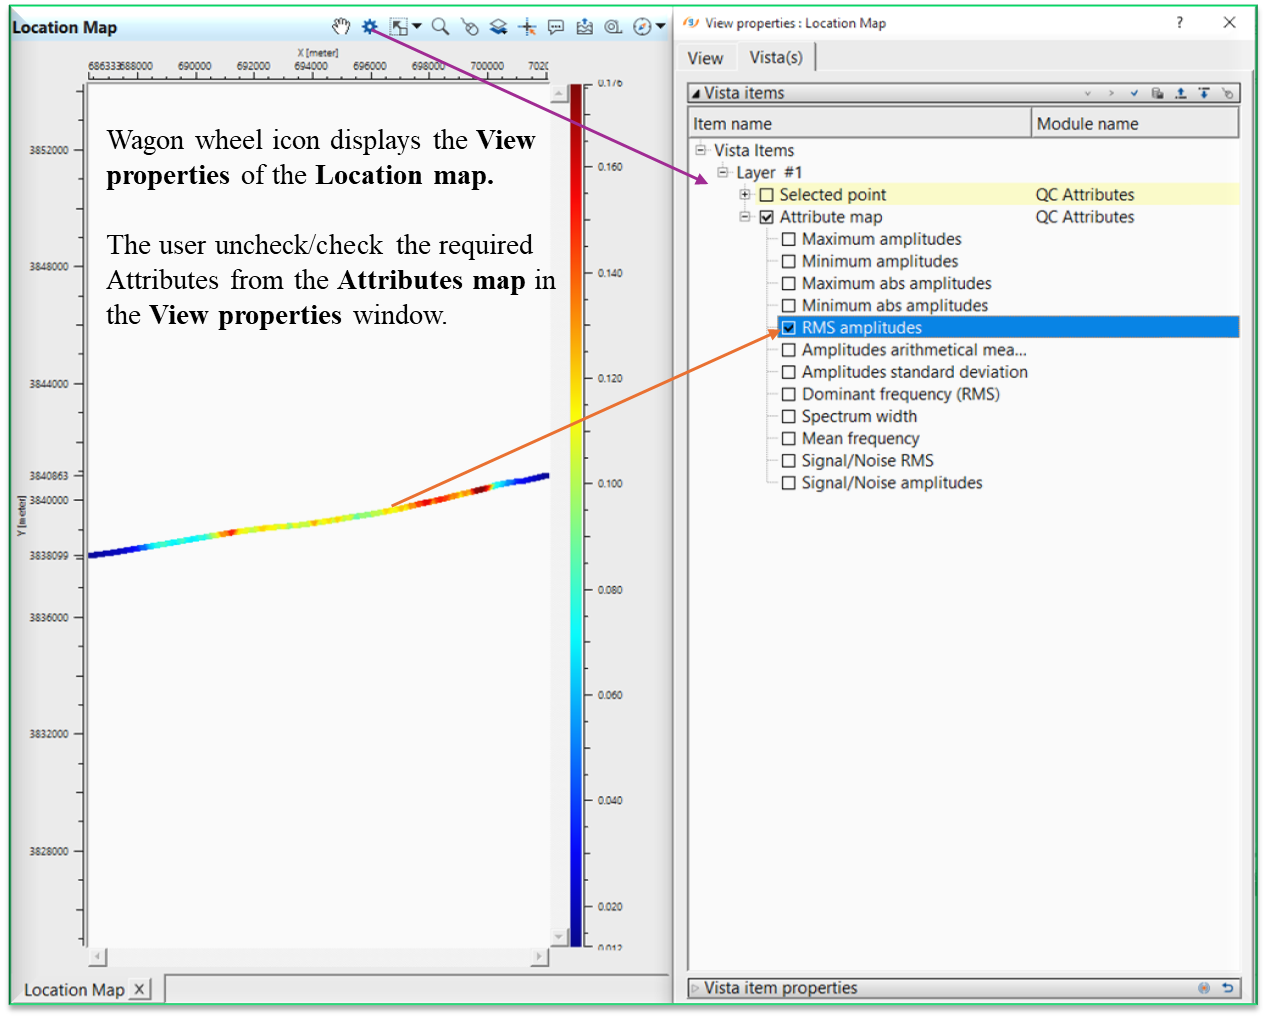
- If the user wants to see a colour bar, make sure the user turn on “colour bar enabled “ in the view properties for the location map. The colour bar will be displayed for the currently highlighted vista item.
- The amplitude spectrum of the data selected inside the frequency analysis box for the currently selected gather will be displayed in the Spectrum vista.
Input data
SEG-Y data handle
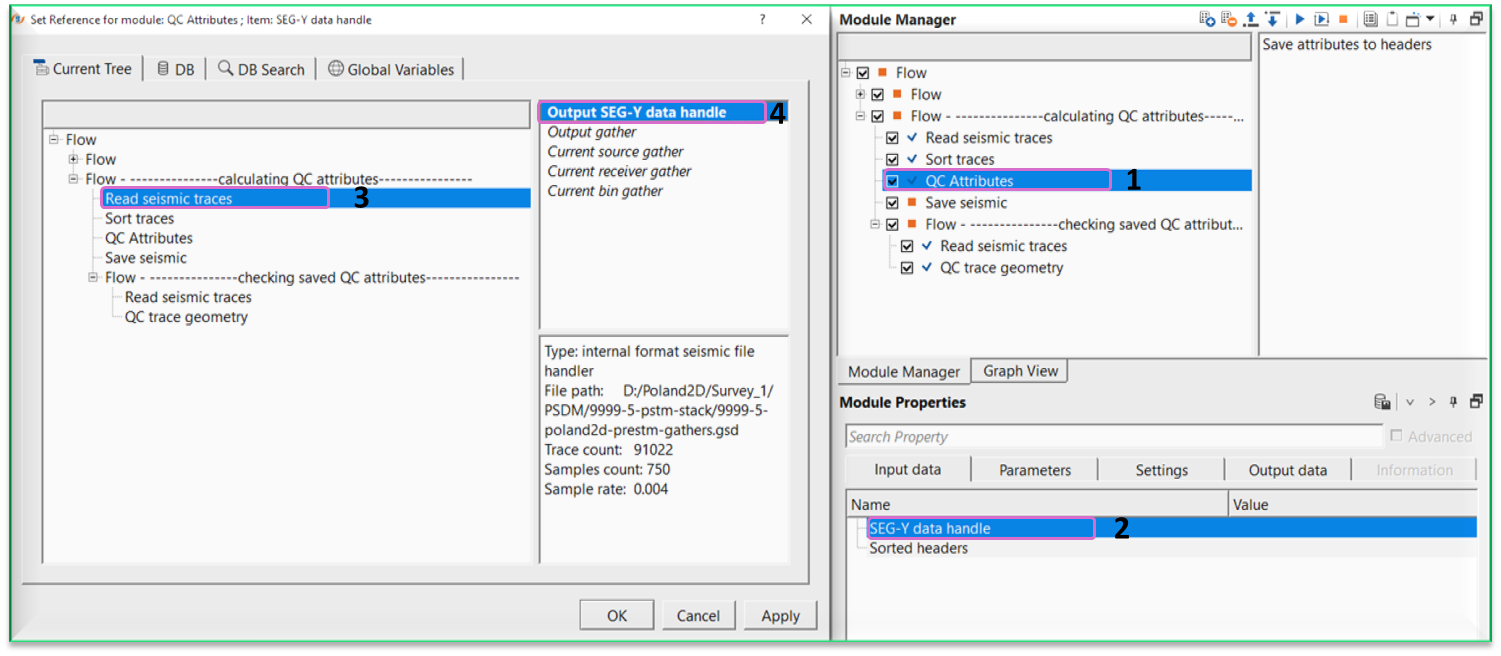
this can be a pre-stack dataset. Connect/reference to the Output SEG-Y data handle.
Sorted headers
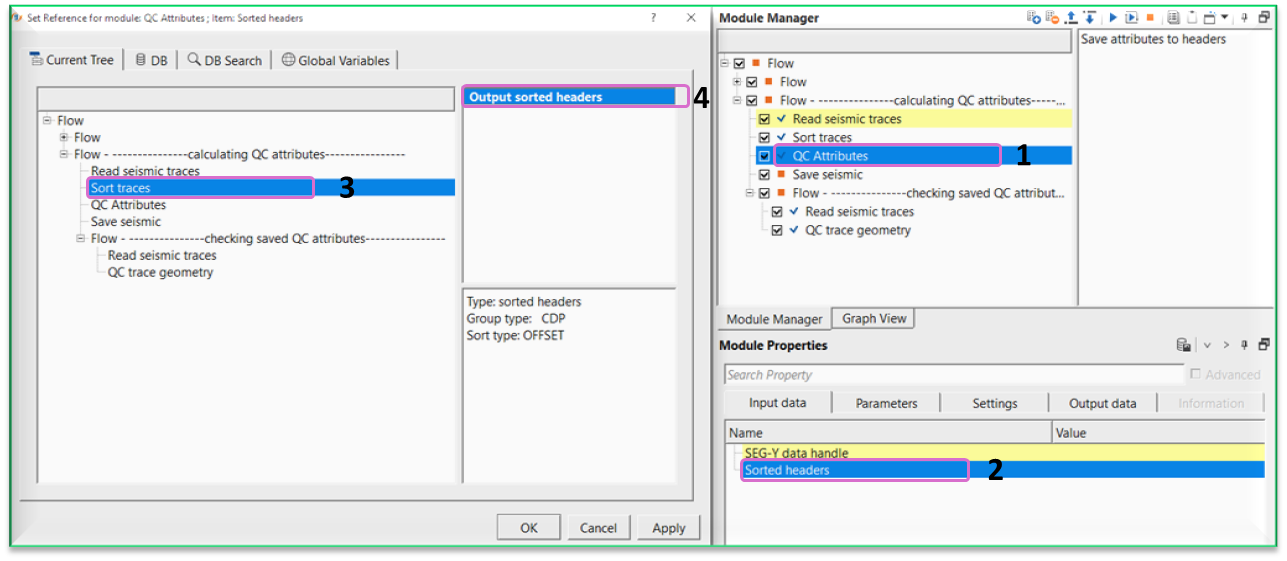
to calculate the QC attributes, the input data should be sorted. Connect/reference to Output sorted headers.
Parameters
Attributes - list of attributes that will be calculated and shown on a location map. The user has the option to calculate all the attributes at one go or select/deselect the corresponding attributes. By default, all attributes are checked (TRUE) for calculation.
Maximum amplitudes - returns the highest positive amplitude value within the selected time window. Useful for detecting strong reflections or amplitude clipping.
Minimum amplitudes - returns the lowest (most negative) amplitude value within the selected window.
Maximum abs amplitudes - returns the largest amplitude magnitude regardless of polarity. Useful for identifying extreme signal or noise spikes.
Minimum abs amplitudes - returns the smallest amplitude magnitude within the selected window. Useful for detecting dead or muted traces.
RMS amplitudes - calculates the root-mean-square amplitude within the selected window. Represents overall signal energy.
Amplitudes arithmetical mean abs value - computes the average of absolute amplitudes. Provides a stable measure of average signal strength.
Amplitudes standard deviation - measures the variability of amplitudes around the mean. Higher values indicate greater amplitude fluctuations.
Dominant frequency (RMS) - calculates energy-weighted RMS frequency of the amplitude spectrum. Represents the dominant frequency content of the trace.
Spectrum width - measures spectral bandwidth around the mean frequency. Indicates frequency spread and resolution potential.
Mean frequency - calculates the amplitude-weighted average frequency of the trace spectrum.
Signal/Noise RMS - computes the ratio of RMS amplitude inside the signal window to RMS amplitude inside the noise window.
Signal/Noise amplitudes - calculates amplitude ratio between signal and noise windows. Higher values indicate cleaner data.
Signal calculation window
Time start - defines the beginning time (in ms) of the calculation window. Samples before this time are excluded from attribute computation.
Time end - defines the ending time of the calculation window. Samples after this time are excluded from calculations.
Offset start - specifies the minimum offset (distance between source and receiver) included in the window. Traces with offsets smaller than this value are excluded.
Offset end - specifies the maximum offset included in the window. Traces beyond this offset are excluded from the calculation.
Window type { Rectangle, Hyperbolic } - selects the geometric shape of the calculation window in the time–offset domain.
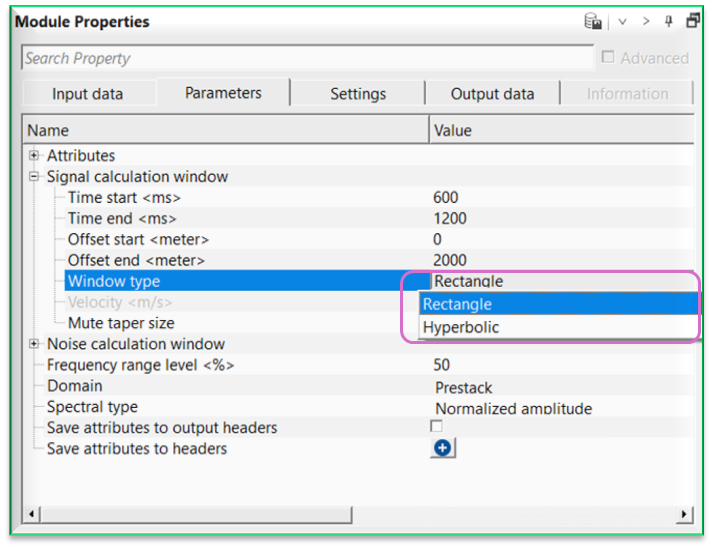
Rectangle - uses constant time limits across all offsets.
Hyperbolic - follows a velocity-based moveout curve.
Window type - Hyperbolic - defines the calculation window along a hyperbolic travel-time curve based on a specified velocity. Typically used to align with reflection events.
Velocity - defines the stacking or moveout velocity (m/s or ft/s) used to generate the hyperbolic window. Required when Window Type is set to Hyperbolic.
Mute taper size - specifies the taper length applied at the window boundary to smoothly reduce amplitudes to zero. Prevents sharp edge effects in RMS or S/N calculations.
Noise calculation window
Time start - defines the beginning time (in ms) of the calculation window. Samples before this time are excluded from attribute computation.
Time end - defines the ending time of the calculation window. Samples after this time are excluded from calculations.
Offset start - specifies the minimum offset (distance between source and receiver) included in the window. Traces with offsets smaller than this value are excluded.
Offset end - specifies the maximum offset included in the window. Traces beyond this offset are excluded from the calculation.
Window type { Rectangle, Hyperbolic } - selects the geometric shape of the calculation window in the time–offset domain.
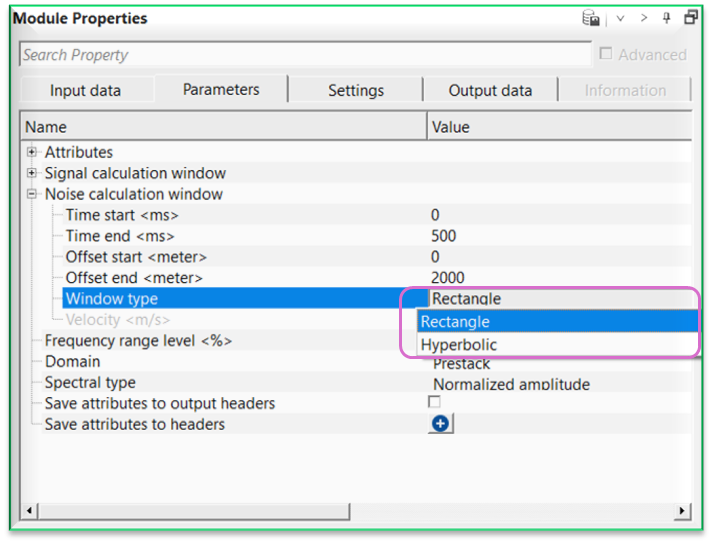
Rectangle - uses constant time limits across all offsets.
Hyperbolic - follows a velocity-based moveout curve.
Window type - Hyperbolic - defines the calculation window along a hyperbolic travel-time curve based on a specified velocity. Typically used to align with reflection events.
Velocity - defines the stacking or moveout velocity (m/s or ft/s) used to generate the hyperbolic window. Required when Window Type is set to Hyperbolic.
Mute taper size - specifies the taper length applied at the window boundary to smoothly reduce amplitudes to zero. Prevents sharp edge effects in RMS or S/N calculations.
Frequency range level - defines the percentage threshold used to determine the effective frequency bandwidth. Frequencies above this percentage of the maximum spectral amplitude (or energy) are included in the bandwidth calculation.
Domain { Prestack, Poststack } - specifies whether spectral attributes are calculated on prestack gathers (e.g., shot, CMP, offset) or on poststack stacked data.
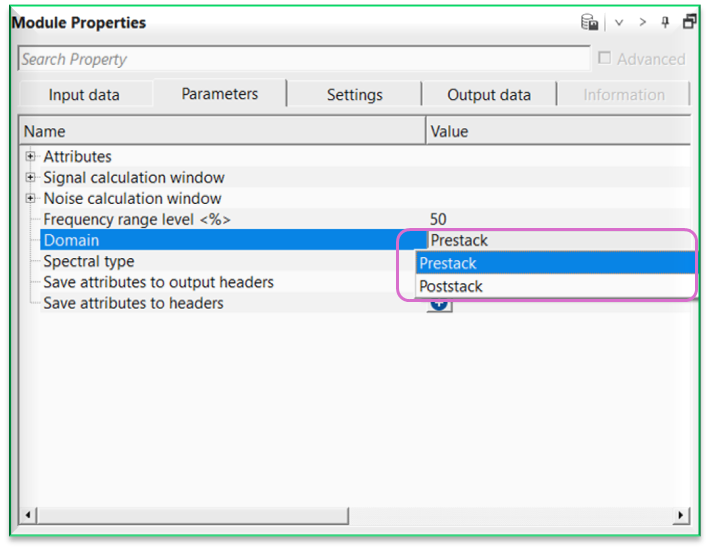
Prestack - attributes computed per trace or gather before stacking. The input gather should be either common source/receiver/mid point gather.
Poststack - attributes computed on stacked seismic sections.
Spectral type { Normalized amplitude, Amplitude, Normalized DB, Normalized energy, Energy, DB } - selects the output scaling and representation of the frequency spectrum. By default, Normalized amplitude.
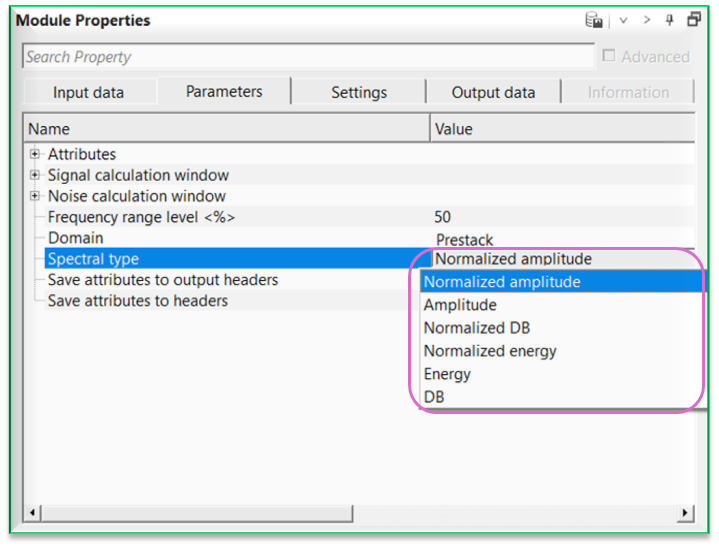
Normalized Amplitude - amplitude spectrum scaled relative to its maximum value.
Amplitude - raw amplitude spectrum.
Normalized DB - decibel spectrum normalized to its peak level.
Normalized Energy - energy spectrum scaled to its maximum value.
Energy - squared amplitude spectrum (power spectrum).
DB - logarithmic amplitude spectrum expressed in decibels.
Save attributes to output headers
this allows the user to save the calculated QC attributes into trace headers that can be used later if required. By default, FALSE (Unchecked).
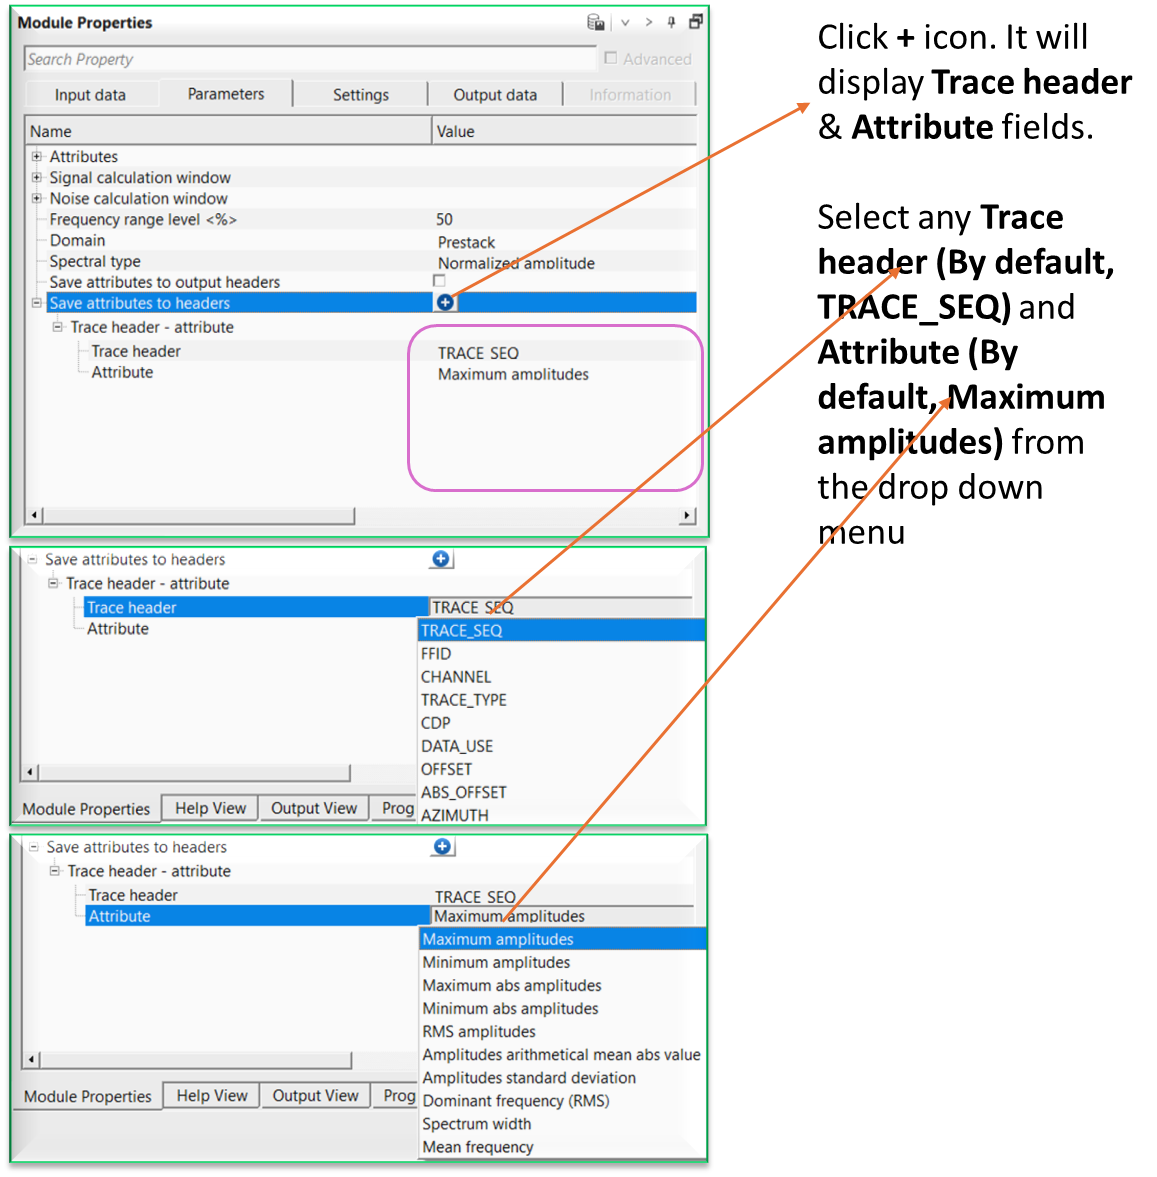
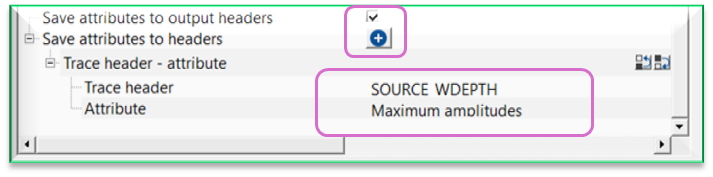
Save attributes to headers - click on  icon. It will allow the user to select the trace headers to save the calculated QC attributes into trace headers.
Settings
SegyReadParams
parameters for setting advanced parameters of reading seismic traces from disk:
Thread count (for SSD)
amount of treads for reading seismic traces from disk.
Bulk size (traces)
size of a chunk (data portion) for reading seismic traces from disk.
Skip
By default, FALSE(Unchecked). This option helps to bypass the module from the workflow.
Output data
Calculated gathers
this displays the QC attributes calculated for total number of gathers of the input data.
Common point gather
outputs a single common point gather as a vista item.
Output trace vector
outputs the Output trace vector that can be considered as an output trace headers.
Information
There is no information available from this module.
Examples
In this example workflow, we are reading a NMO corrected CDP gather dataset as an input data. This gather should be sorted in CDP(Grouping) and Offset (Sorting) by using Sort traces module.
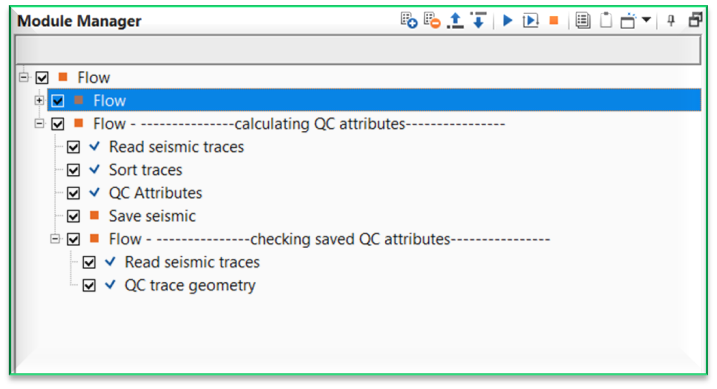
Make the necessary references/connections to the QC attributes module.
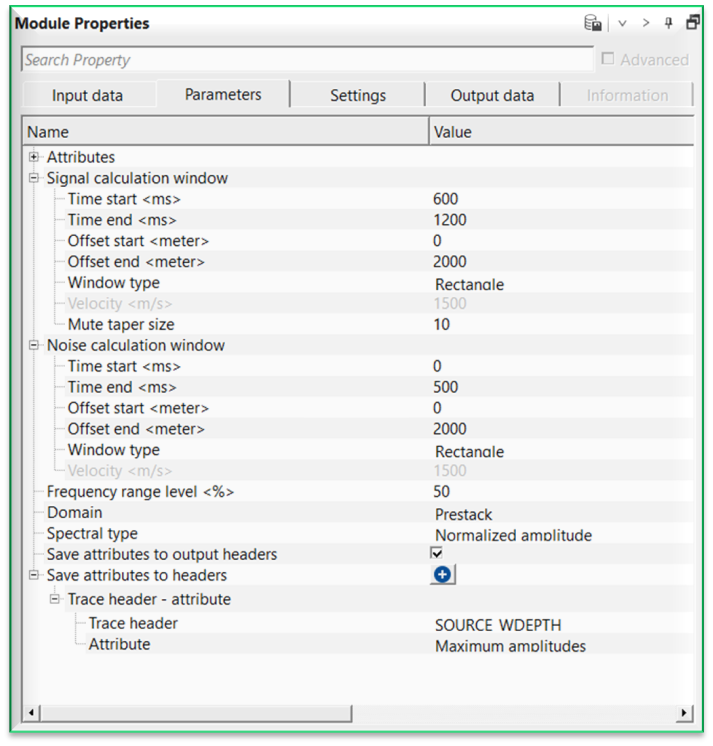
Edit the parameters as per the input data requirements. For this exercise, we've chosen these parameters.
After executing the QC Attributes module, generate the Vista items. Go to Location map and click anywhere on the location map. It will display the Selected point and it's corresponding Common point gather with Signal & Noise windows (It can be Rectangle or Hyperbola as selected by the user in the parameters).
Later, we save the calculated QC attributes by using Save seismic module.
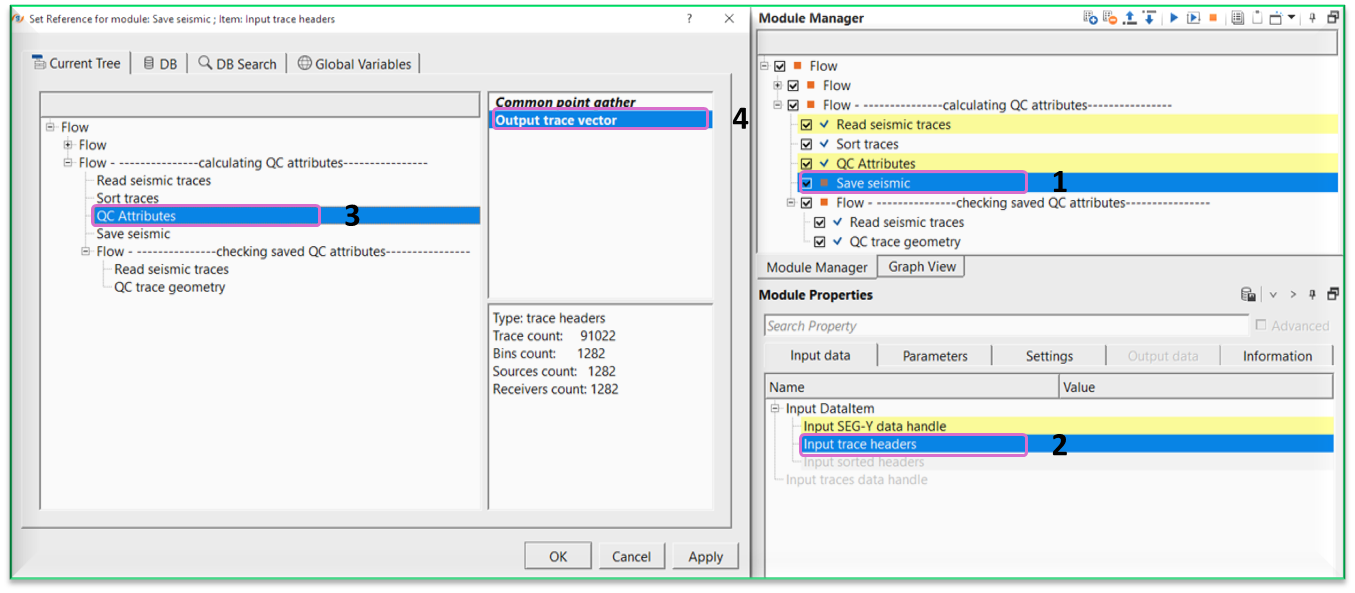
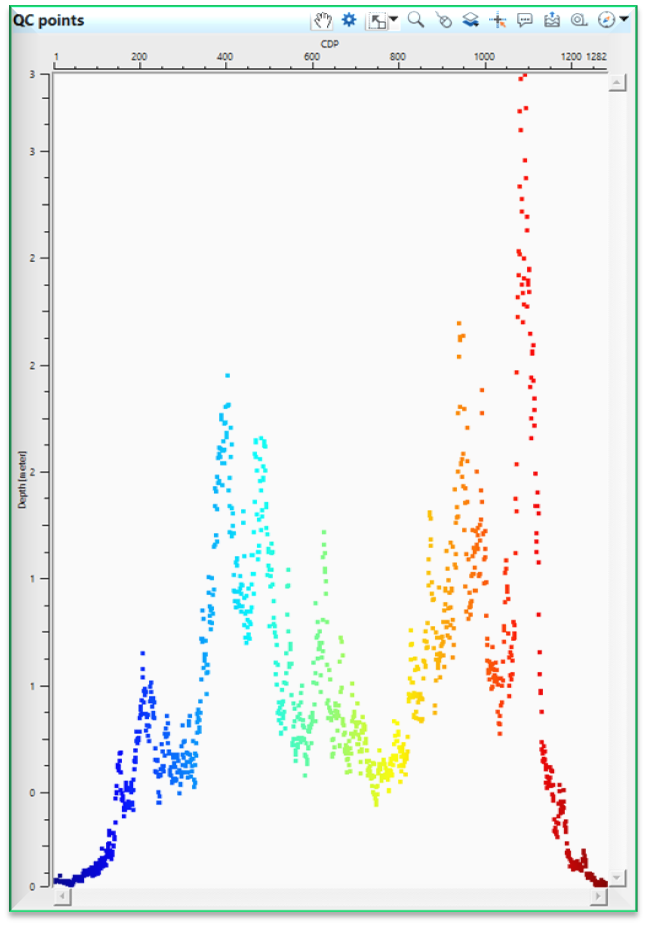
To check the saved QC attributes of the respective Trace headers, we use QC trace geometry module to confirm that the calculated QC attributes are updated/stored/saved in the trace headers.
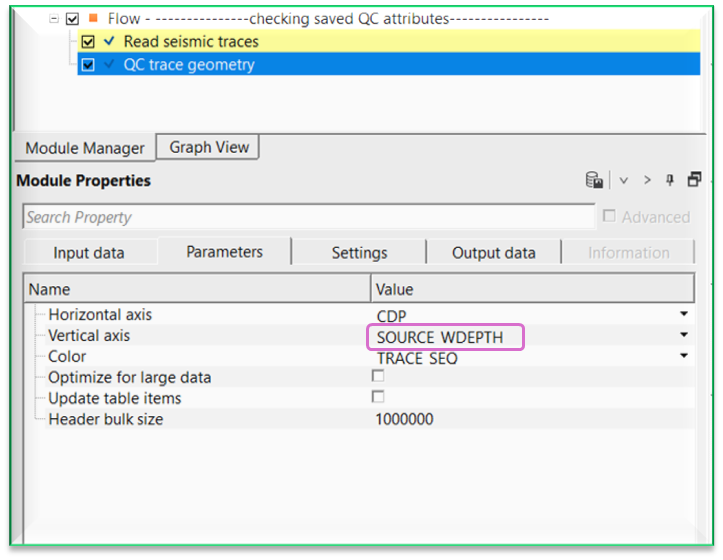
As we saved the Maximum Amplitude attributes into SOURCE_WDEPTH, we selected this trace header as vertical axis and CDP as horizontal axis. For display purpose, we've chosen TRACE_SEQ as display color. Execute QC trace geometry module and generate the Vista items. Look for
Actions
Save attributes to headers
this action item allows the user to save the calculated QC attributes into the trace headers. For this to happen, the user should mark the "Save attributes to headers" option in the Parameters.
Video lesson
YouTube video lesson, click here to open [VIDEO IN PROCESS...]
Related articles
Yilmaz. O., 1987, Seismic data processing: Society of Exploration Geophysicist
 * * * If you have any questions, please send an e-mail to: support@geomage.com * * *

Input data
SEG-Y data handle
SEG-Y Data handle: This module is designed to work on data that has geometry attached
Sorted headers
Parameters
Attributes
L
Maximum amplitudes
Check box to turn on/off maximum amplitudes calculation
Minimum amplitudes
Check box to turn on/off amplitudes arithmetical mean absolute value calculation
Maximum abs amplitudes
Check box to turn on/off Maximum abs amplitudes calculation
Minimum abs amplitudes
Check box to turn on/off minimum abs amplitudes calculation
RMS amplitudes
Check box to turn on / off RMS amplitudes calculation
Amplitudes arithmetical mean abs value
Check box to turn on / off amplitudes arithmetical mean absolute value calculation
Amplitudes standard deviation
Check box to turn on/off amplitudes standard deviation calculation
Dominant frequency (RMS)
Check box to turn on/off dominant frequency calculation
Spectrum width
Check box to turn on/off spectrum width calculation
Mean frequency
Check box to turn on/off mean frequency calculation
Signal/Noise RMS
Check box to turn on/off Signal/Noise RMS calculation
Signal/Noise amplitudes
Check box to turn on/off Signal/Noise amplitudes calculation
Signal calculation window
Window size parameters for calculation for signal
Time start
Start time value
Time end
End time value
Offset start
Start offset value
Offset end
End offset value
Window type
Velocity
Mute taper size
Noise calculation window
Window size parameters for calculation for noise
Time start
Start time value
Time end
End time value
Offset start
Start offset value
Offset end
End offset value
Window type
Velocity
Frequency range level
This parameter is used for spectrum width calculation
Domain
Spectral type
Save attributes to headers