Selecting user specified traces in various ways
![]()
![]()
Seismic data consists millions if not billions of traces in a survey. Choosing right information within short span of time is crucial. Select traces module is a handy tool to the Geophysicist which helps in selecting the user required data from the huge data volumes.
Select traces is a versatile module which works on predefined expressions or selections by the user inputs. It narrows down the data as per user requirement. The main objective of this module is to select specific seismic data i.e. certain trace ranges, shot point ranges, offset ranges etc.
![]()
![]()
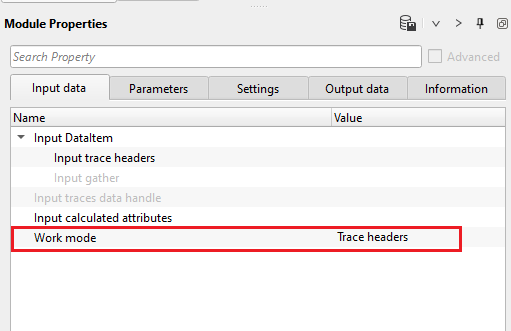
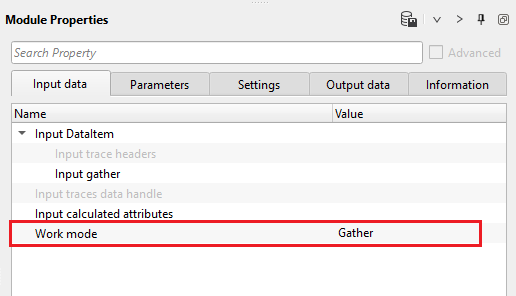
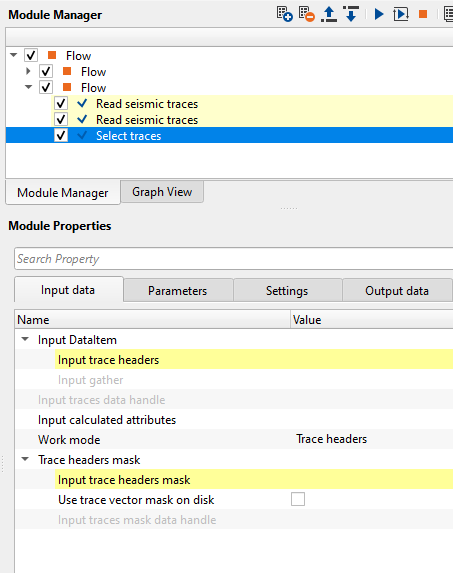
Input DataItem - Depending on the work mode type, different input types need to be provided. As per the work mode type, the relevant options are enabled and the rest are disabled mode.
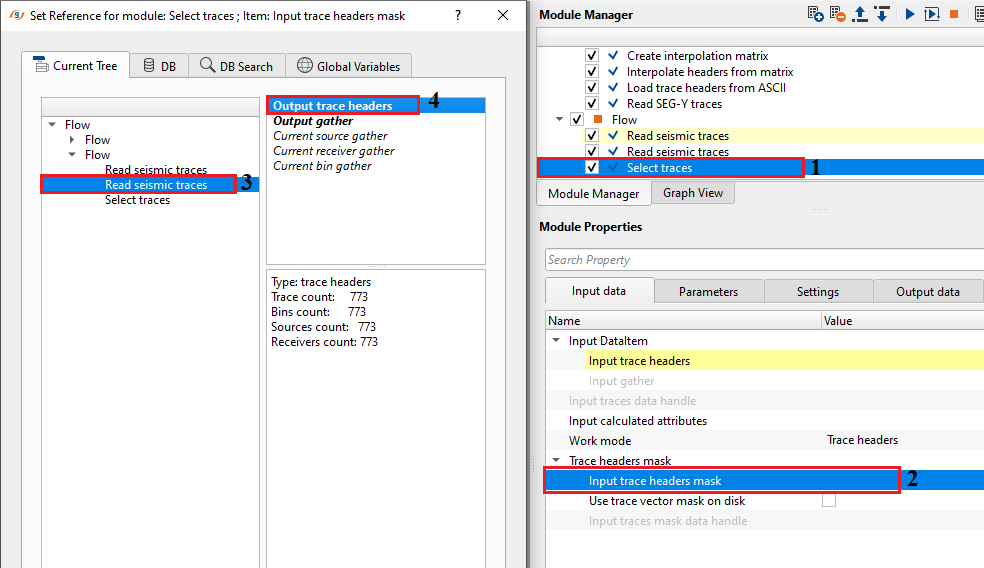
![]() When the trace selection type is "Use trace headers mask" option then "Trace headers mask" input parameters option available.
When the trace selection type is "Use trace headers mask" option then "Trace headers mask" input parameters option available.
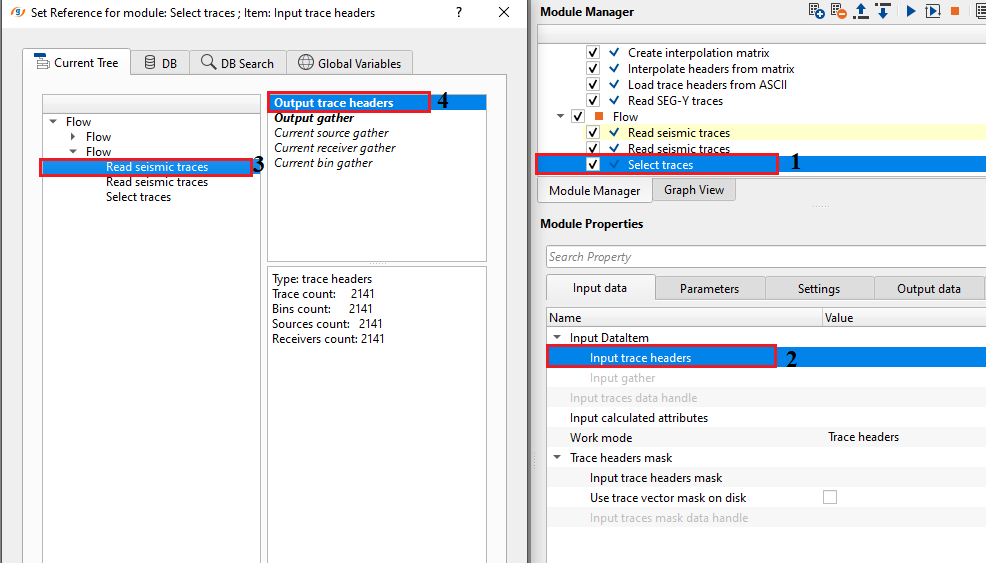
Input trace headers - connect/reference to output trace headers vector.
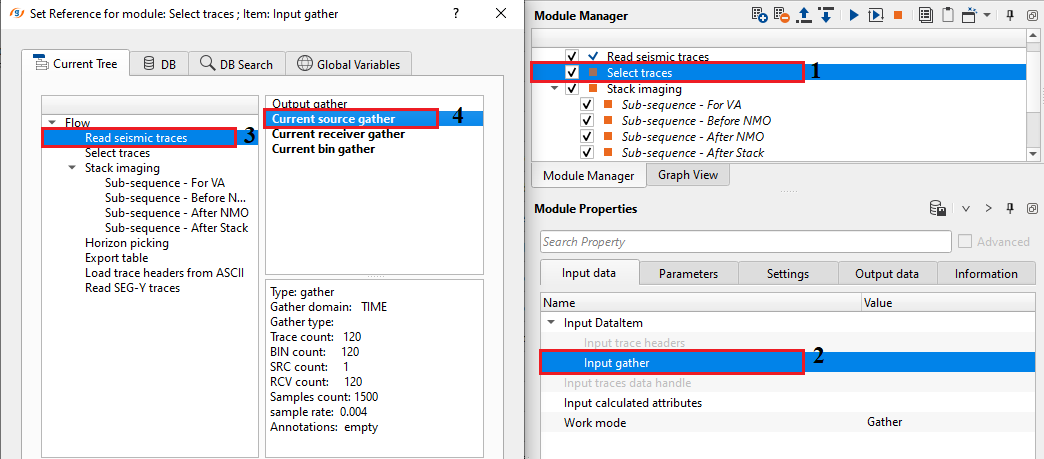
Input gather - connect/reference to output gather vector.
Input calculated attributes - connect/reference to calculated attributes. This is an optional input, provide any calculated attributes. When any calculated attributes are available then the user can use this option to select the traces based on the attributes.
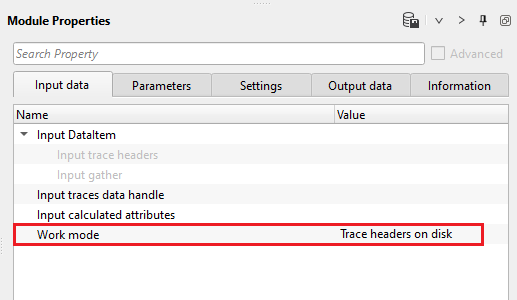
Work mode { Trace headers, Trace headers on disk, Gather } - work mode allows the user to select different types of input data from the drop down menu.
WorkMode - Trace headers - By default, trace headers as the work mode. This allows the user to connect/reference to trace headers of any modules which has trace headers as a vector.
Input trace headers - connect/reference to trace header vector.
WorkMode - Gather - when there is a requirement of gather processing then the user can select this option to reference it to gather.
Input gather - connect/reference to input/output gather vector.
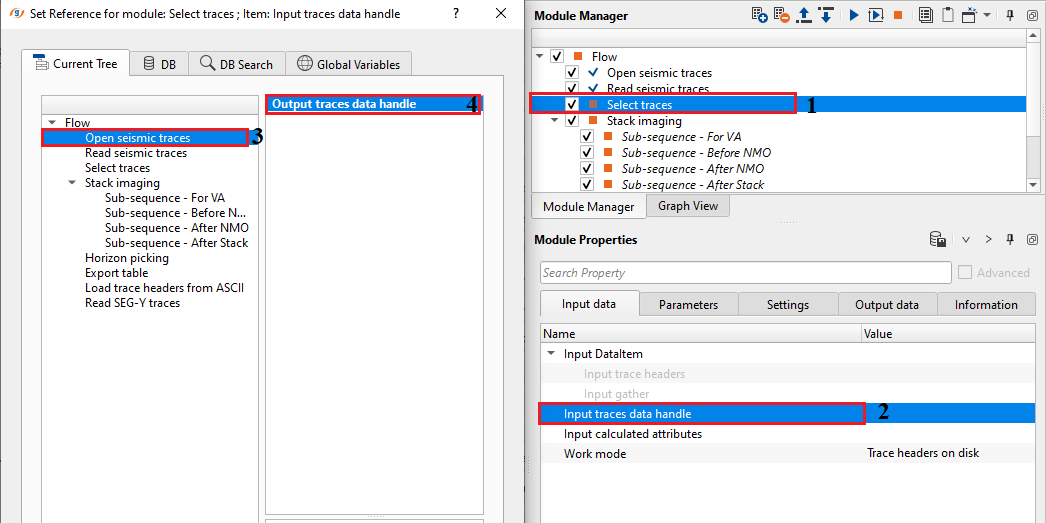
WorkMode - Trace headers on disk - this option is used when the input data size it too big to load. For faster loading/reading of the input data, we use "Open seismic traces" module to read the data.
Input traces data handle - connect/reference to Output traces data handle vector.
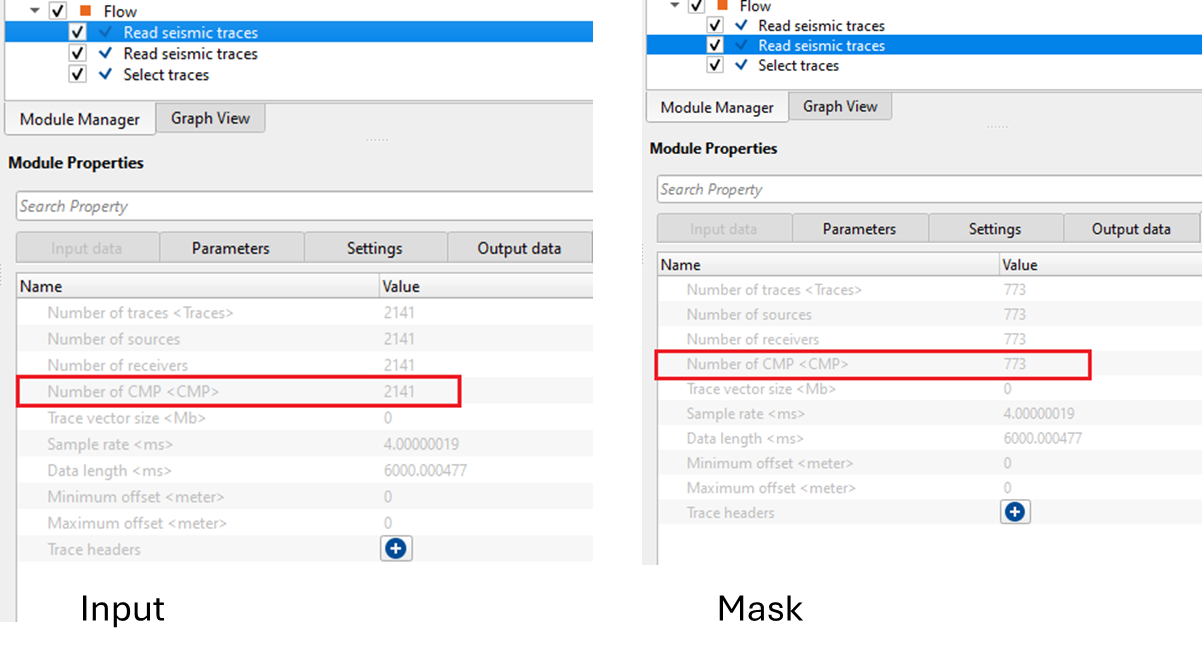
Trace headers mask - this option lets the user to select traces from two different dataset(s). Let's assume that one dataset is having more traces and the second dataset is having less traces. Now, the user wants to select the 1st dataset as per the 2nd dataset (which acts as mask) to make both the dataset(s) as same.
Input trace headers mask - connect/reference to the masked trace headers vector.
Use trace vector mask on disk - this is applicable when the work mode is "Trace headers on disk"
UseInputTraceVectorMaskOnDisk - false
![]()
![]()
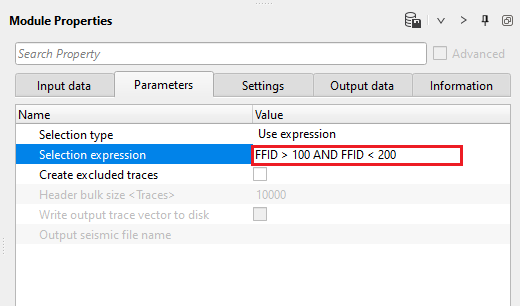
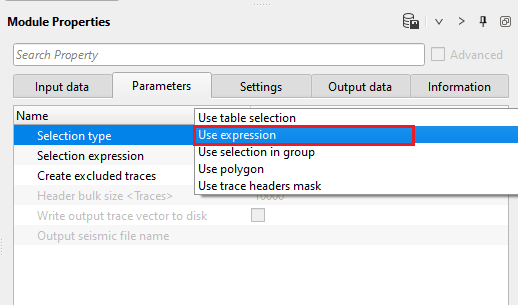
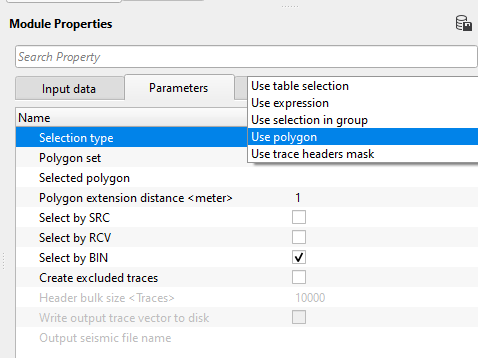
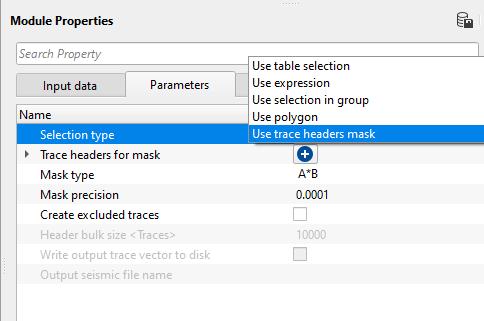
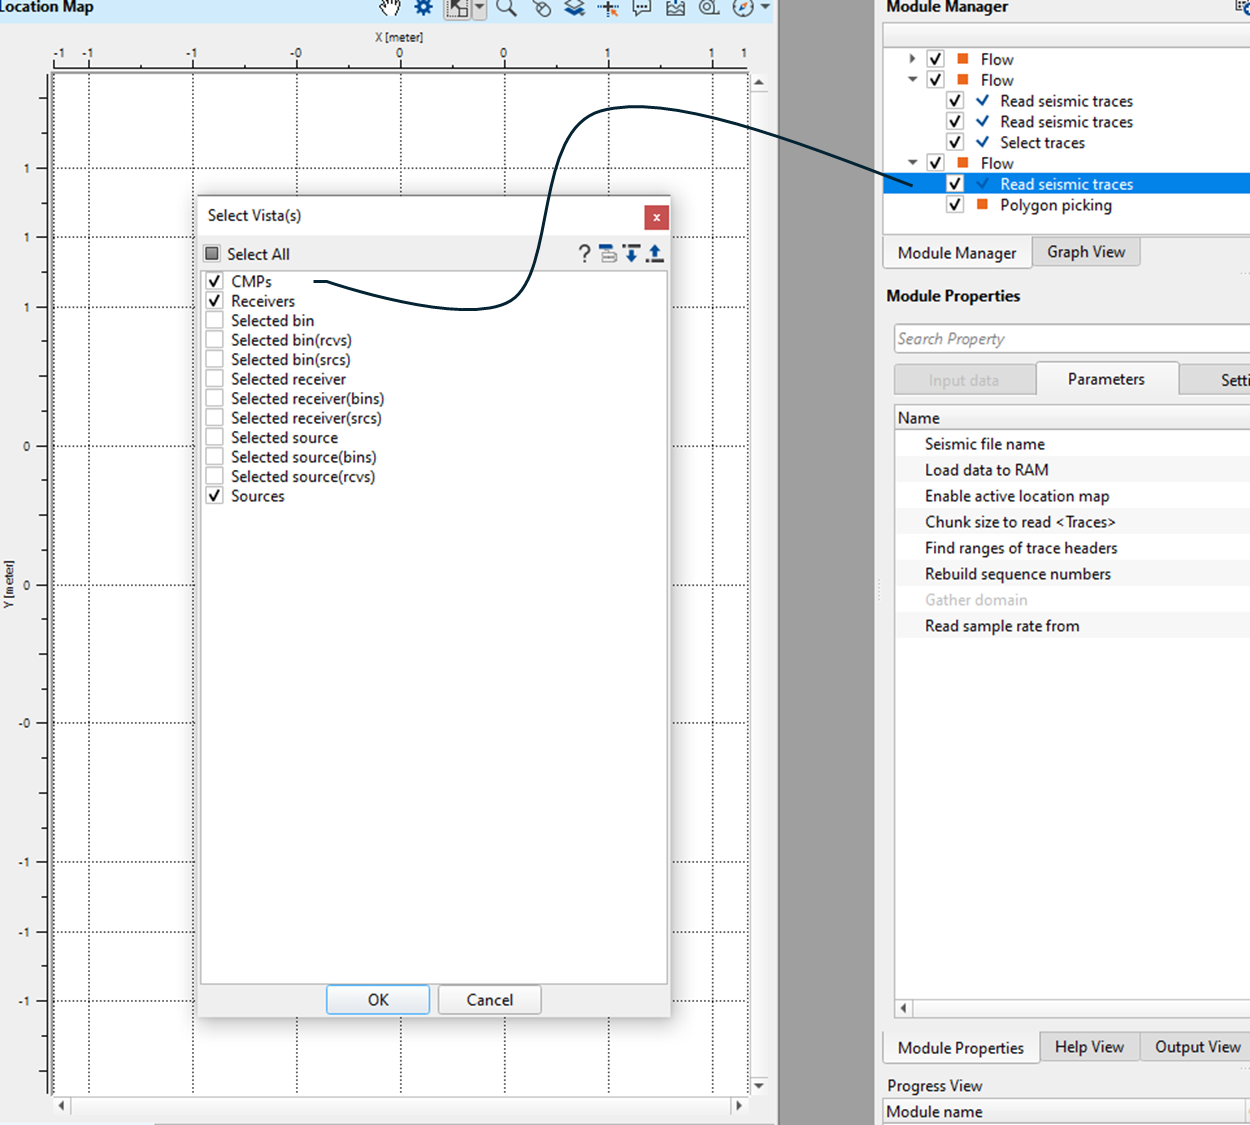
Selection type { Use table selection, Use expression, Use selection in group, Use polygon, Use trace headers mask } - This allows the user to select traces with different set of options. Each selection type brings different parameters.
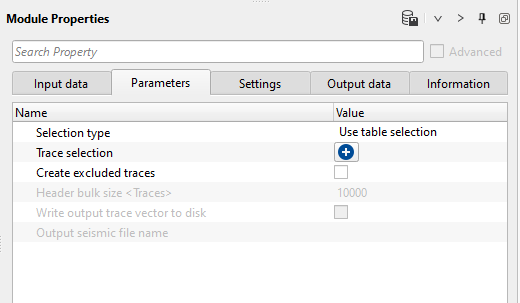
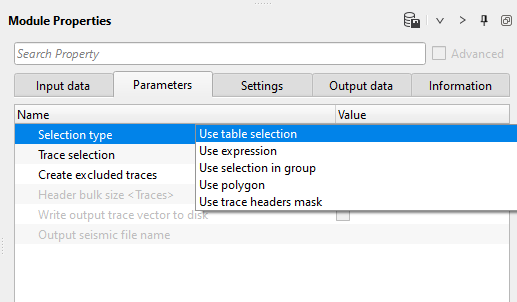
SelectionType - Use table selection
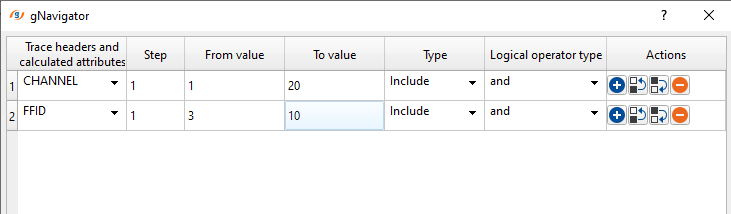
Trace selection - By giving first value, last value and step for a given trace header and then using logical operators 'AND', 'OR', the user can select the desired information from the input data.
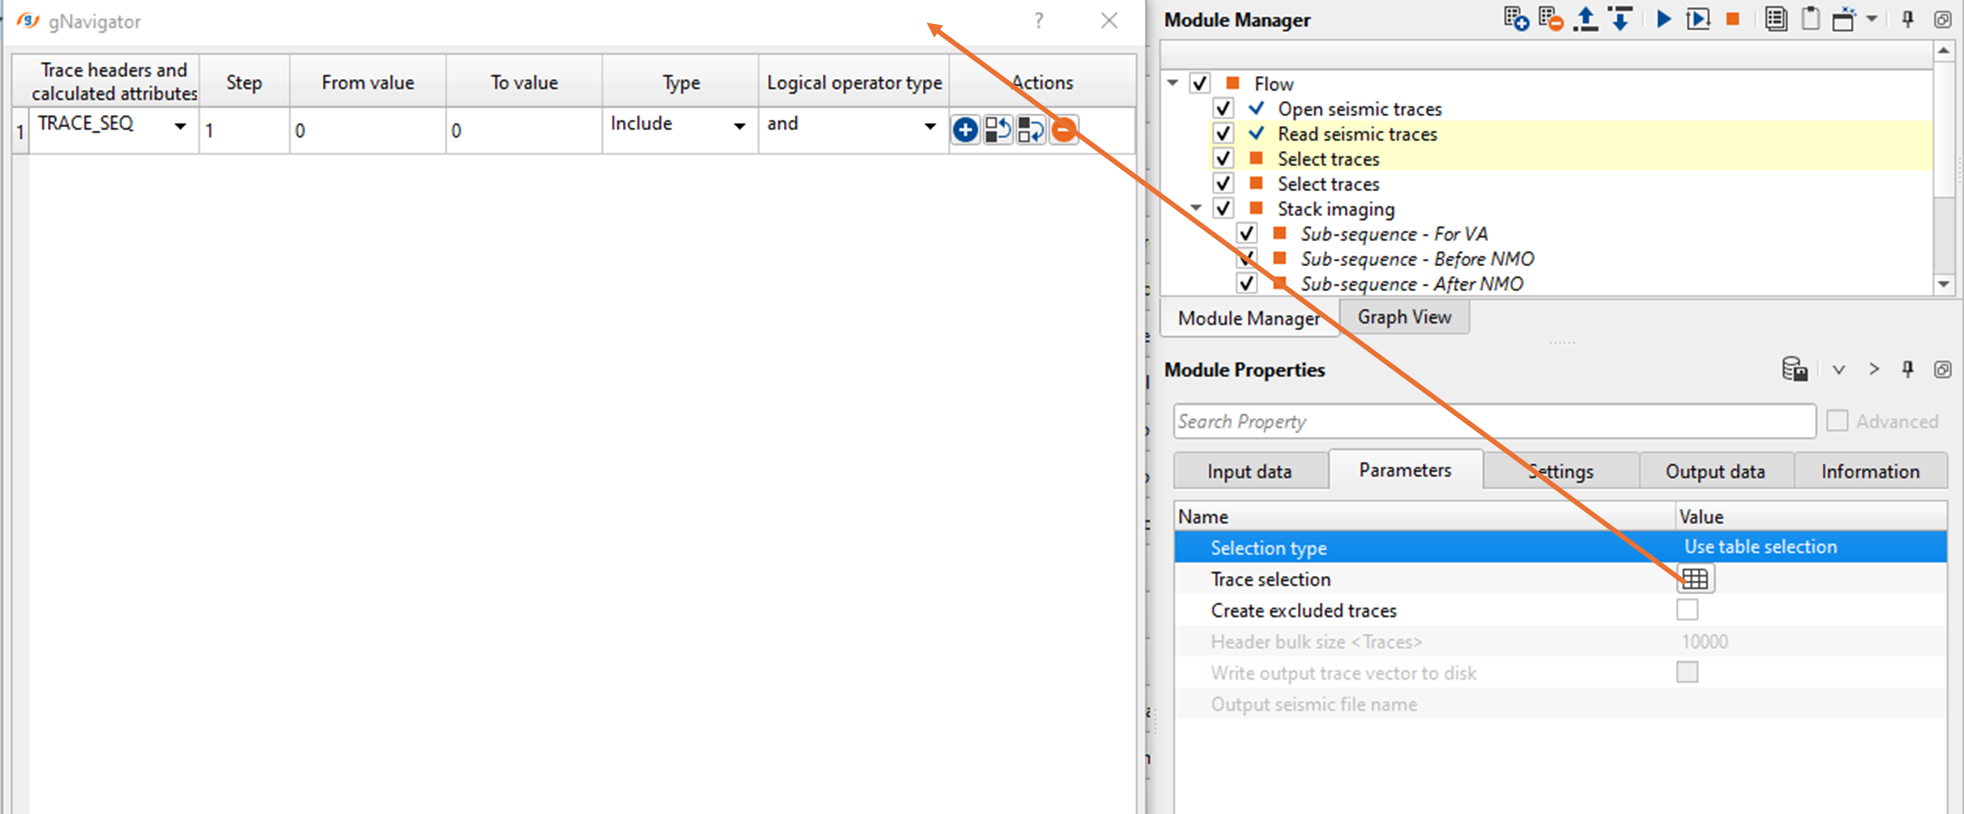
Select the trace header from the drop down menu and specify the Step, From value, T value, Type (Include/Exclude), Logical operator type (and/or). If the user needs more selection, click on  icon and it will add additional row below the existing one.
SelectionType - Use expression
Selection expression - Define an expression that can contain trace headers as operands, mathematical operators, functions and logical operators.
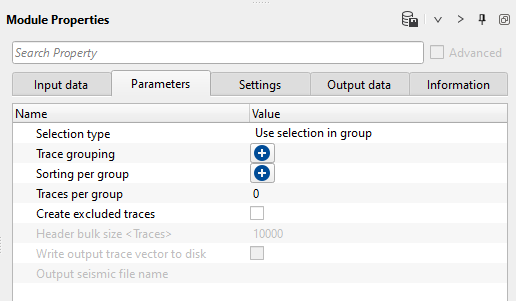
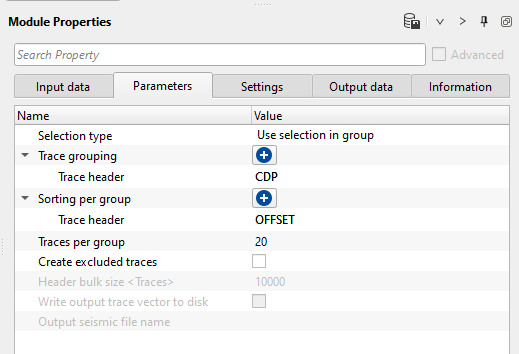
SelectionType - Use selection in group - By selecting the Trace Grouping as primary and defining number of traces per group in Sorting per group as secondary key. Using this option, user can select desired number of traces within the group.
Trace grouping - select the primary key from the drop down menu.
Sorting per group - select the secondary key from the drop down menu.
Traces per group - number of traces should be considered of the sorting group.
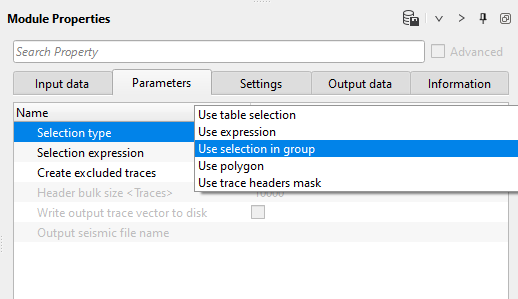
Click on icon. From the drop down menu, select the desired trace headers from the drop down. Similarly, do the same for the Sorting per group. If user wants to group the gather as CDP and wants to select OFFSET as Sorting per group, user can select the data by choosing trace grouping as CDP (SOURCE_SP, RECEIVER_SP, SOURCE_SEQ, RECEIVER_SEQ, CDP etc.) and sorting per group (OFFSET, CHANNEL etc.) and finally mention number of traces per group (20 in this case).
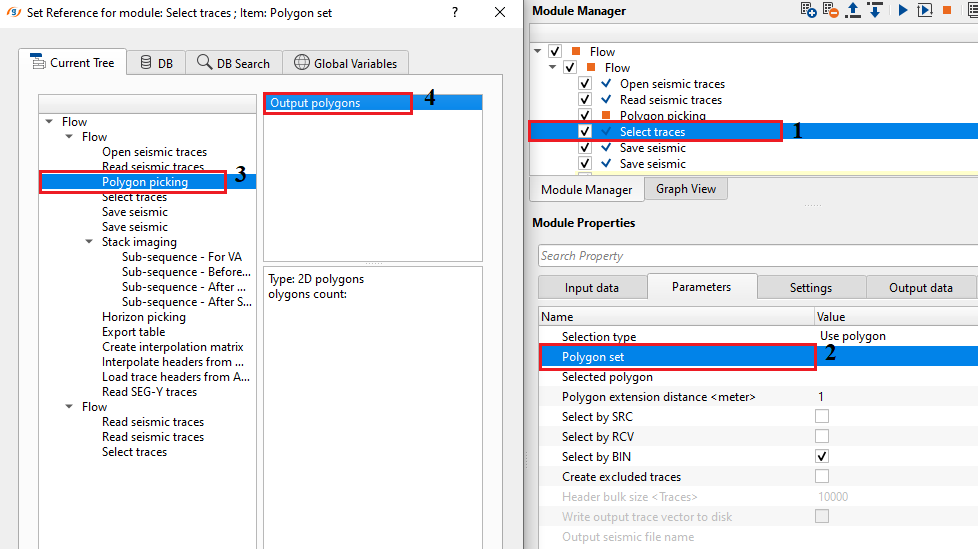
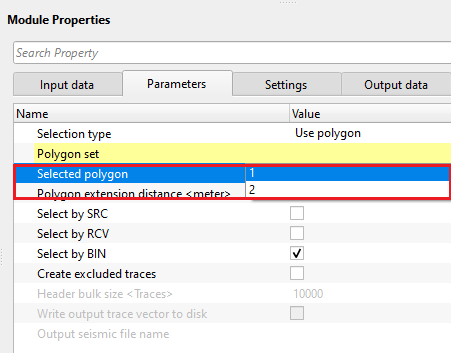
SelectionType - Use polygon - this option allows the user to select the traces based on a polygon. Use a module "Polygon picking" to create a polygon or else import the polygon.
Polygon set - connect/reference to the input polygon set. If there are multiple polygons, it will consider all the polygons.
Selected polygon { } - choose the selected polygon from the drop down menu.
Polygon extension distance - specify the areal extension of the polygon. By default, 1 meter.
Select by SRC - this allows the the traces to be selected by SOURCE.
Select by RCV - this selects the traces by RECEIVER.
Select by BIN - this lets the selection by BIN/CMP/CDP. By default, BIN.
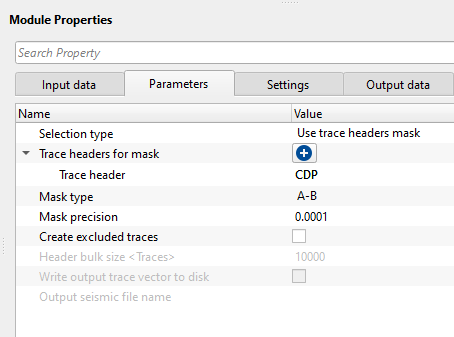
SelectionType - Use trace headers mask
Trace headers for mask - choose the trace header that is common for both the input data sets from the drop down menu.
Mask type { A*B, A-B } - this lets the user to choose two options. A*B option matches both the input trace headers and accordingly selects the data whereas A-B compares both the input trace headers and excludes the traces from the input trace headers mask.
Mask precision - this will make sure have the right number of traces from the selection. Provide the mask precision value. Too less is not ideal.

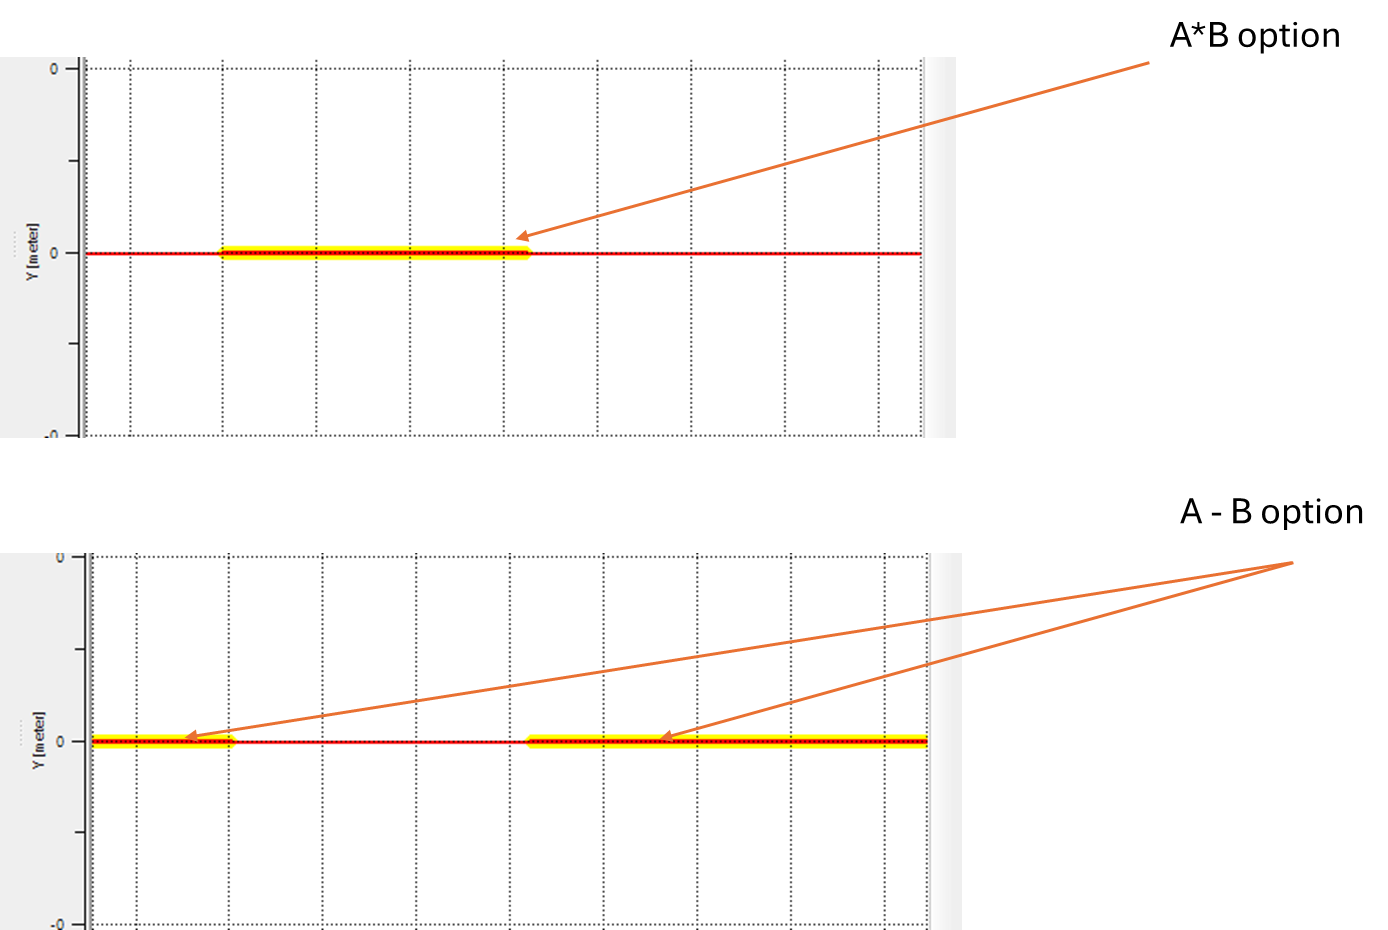
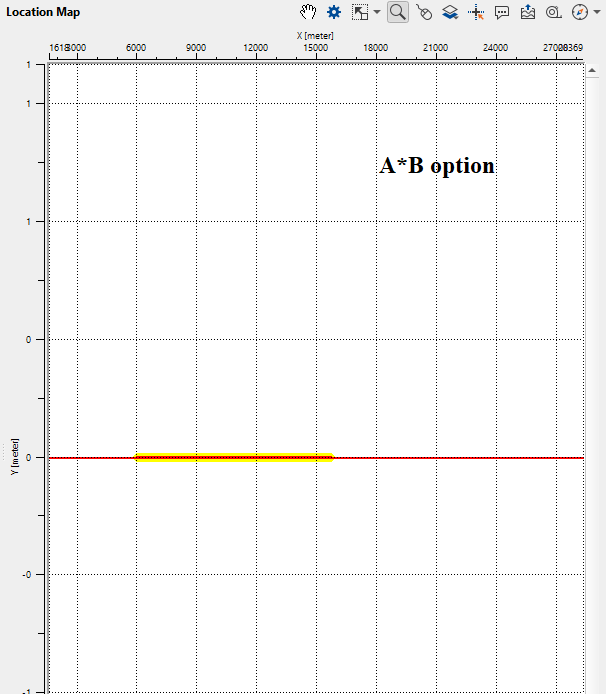
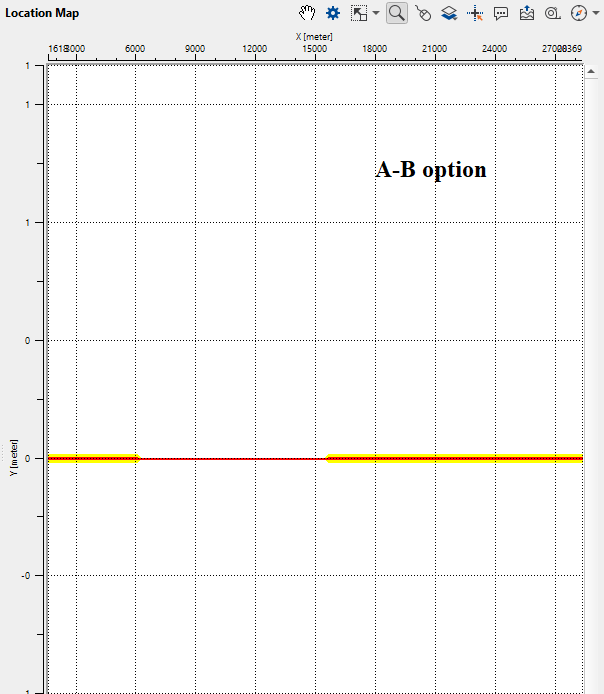
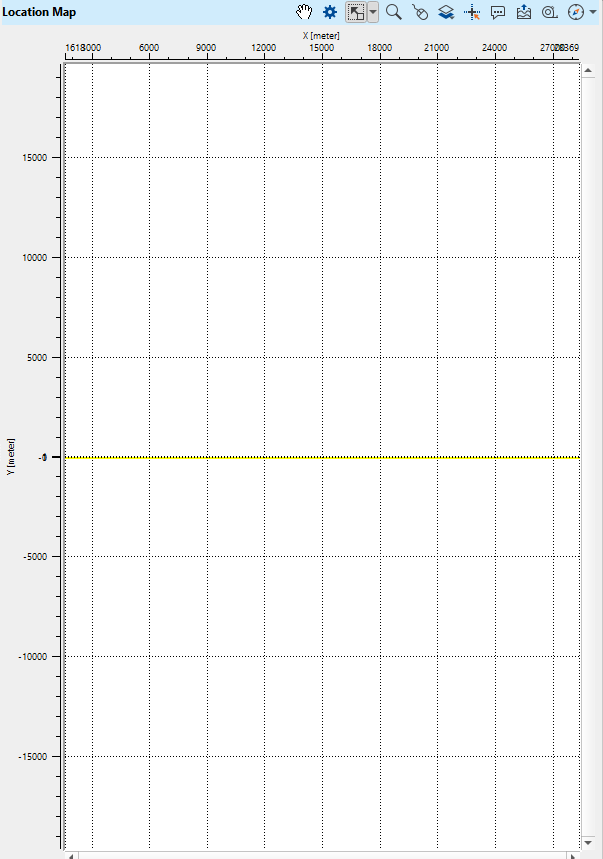
When we launch the location map from Select traces, it displays the CDP positions on the location map. In the below images, yellow color highlighted CDP positions are resultant CDPs of A*B option & A-B option. One works as included traces and other option works as excluded traces.
Create excluded traces - By default, FALSE (Unchecked). This will generate excluded traces based on the user defined selection parameters.
Header bulk size - specify the number of traces to be read as a single bulk.
Write output trace vector to disk - By default, FALSE (Unchecked). If YES (Checked), it will write the output trace vector file into disk.
Output seismic file name - specify the output seismic file name if the input data work mode type is "Trace headers on disk"
![]()
![]()
Auto-connection - By default, TRUE(Checked).It will automatically connects to the next module. To avoid auto-connect, the user should uncheck this option.
Number of threads - One less than total no of nodes/threads to execute a job in multi-thread mode. Limit number of threads on main machine.
Skip - By default, FALSE(Unchecked). This option helps to bypass the module from the workflow.
![]()
![]()
Output DataItem
Included trace headers - generates the included trace headers as an output.
Output gather - generates the output gather if the input work mode option as Gather.
Excluded trace headers - generates the excluded trace headers if the user selects "Create excluded traces" option in the Parameters
Excluded gather - generates excluded gather if the input data work mode option as Gather.
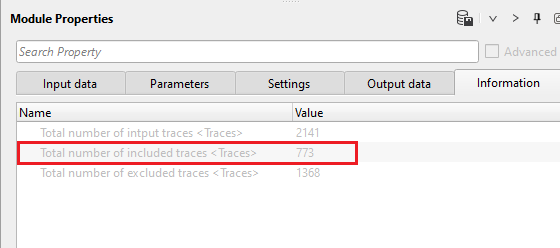
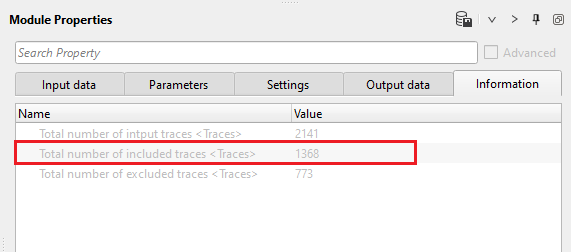
Total number of input traces - displays the total number of input traces of the seismic data
Total number of included traces - displays the information about total number of seismic traces are included based on the selection
Total number of excluded traces - displays the information about total number of seismic traces excluded based on the selection. This information is ONLY available if the user selects the option "Create exclude traces" in the parameters.
![]()
![]()
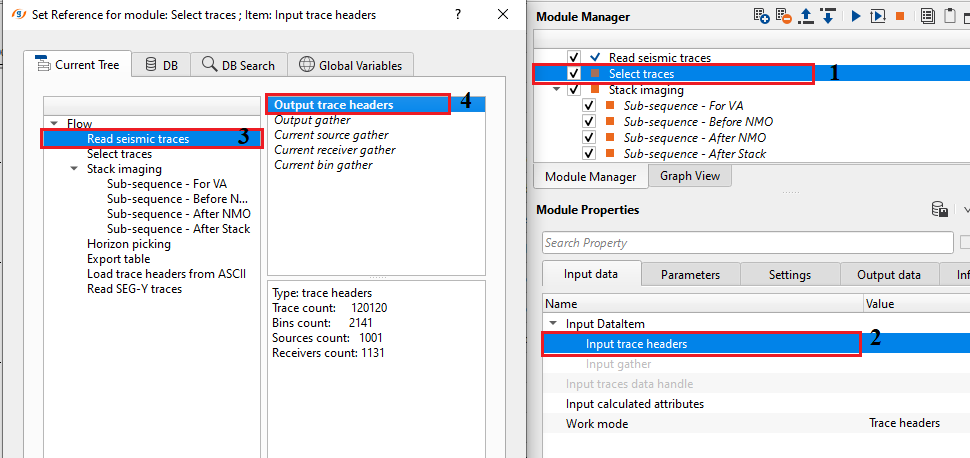
In this example workflow, we are describing how we use "Use trace headers as mask" option to select traces.
•1. Reading a stack section by using ""Read seismic traces" module and load data to RAM as YES option.
•2. Reading another stack section which has less number of traces as 2nd input by using "Read seismic traces" module. This one is also loaded to RAM.
•3. Connect/reference the input trace headers and input trace headers mask to 1st & 2nd read seismic trace modules respectively.
Inside the parameters, we select the "Use trace headers as mask" against the selection type and choose the CDP as trace header against "Trace headers for mask"
Execute the select traces and look at the information tab. This displays the total number of included traces which is equivalent to the masked input trace headers (2nd read seismic traces gather). Also, launch the vista items and look into the location map.
How to pick a polygon?
•Add polygon picking module and launch vista items. It'll have Location map. It will empty at first.
•Select "Read seismic traces" module, hold MB1, drag and drop the source/receiver/bin values from the "Read seismic traces" module into the current empty location map of the Polygon picking module. Now the user can see the source/receiver/bin points on the location map.
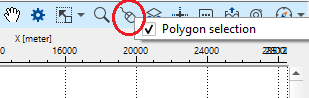
•On the location map, go to "Set Control item" and make sure polygon selection is checked/selected.
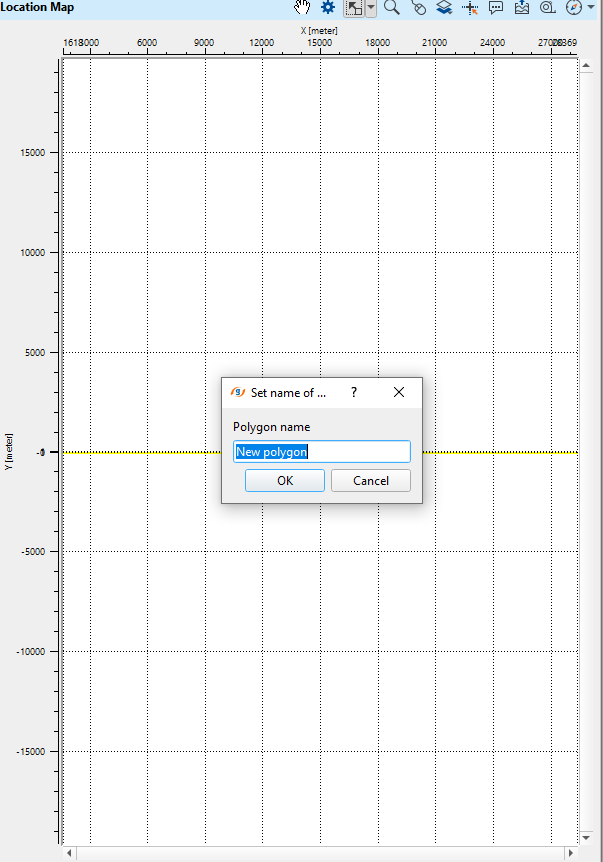
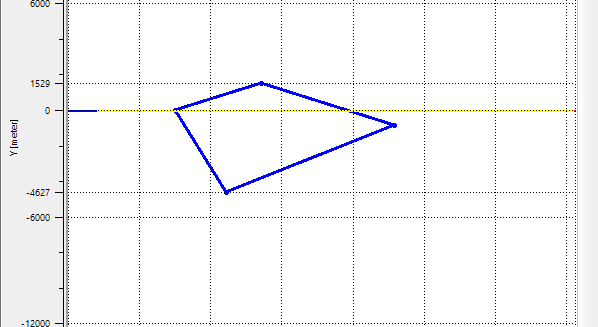
•Now click on the location map where the source/receiver/bins are and draw a polygon by clicking on various locations.
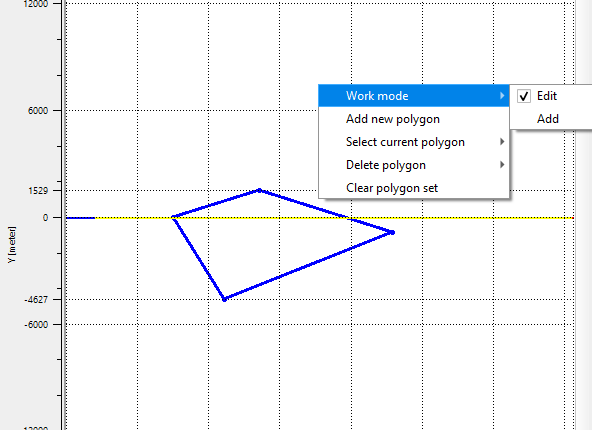
•To edit or add polygon, right click on the location and it will provide the options. Choose the relevant option as per user requirement.
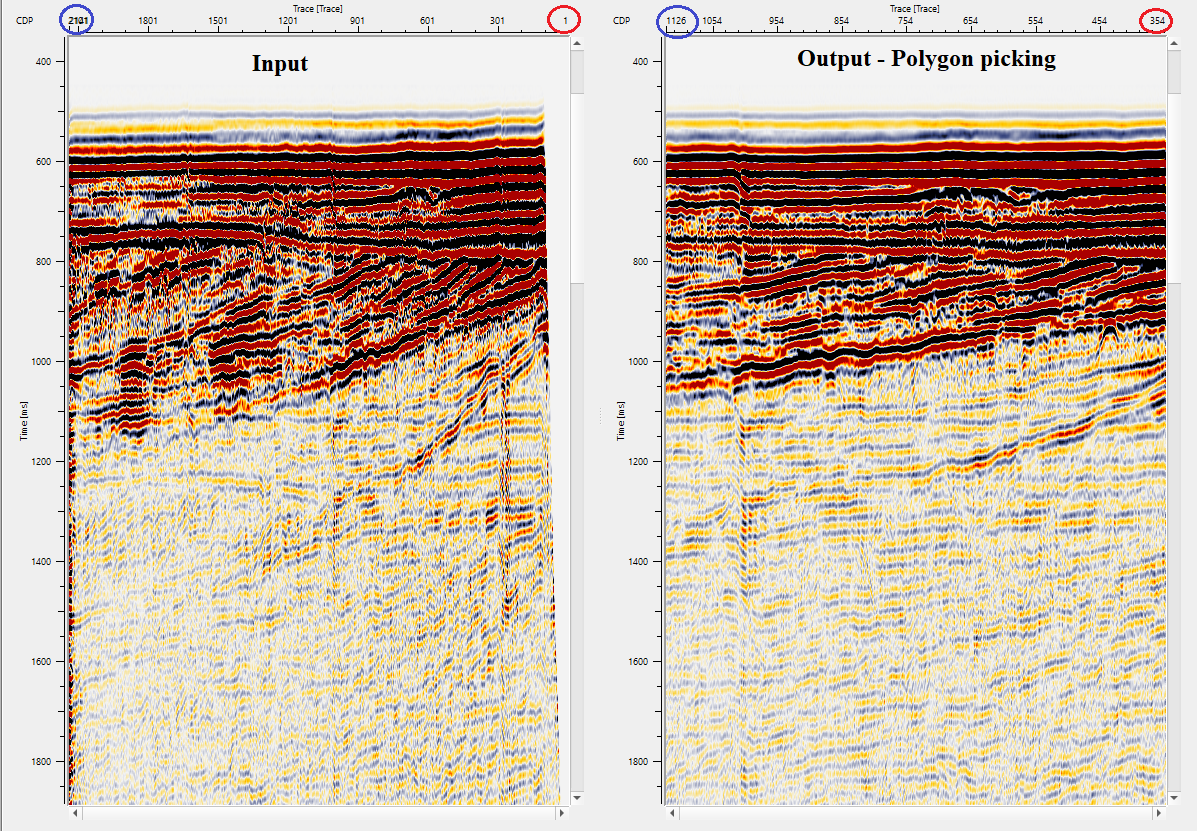
Select traces with Use polygon option gives the included/excluded traces based on the polygon. Select the desired (included/excluded) traces and connect/reference to "Save seismic" module and save the stack. Now compare the input stack against the polygon selected stack. The final output from the polygon as shown below.
![]()
![]()
There are no action items available for this module so the user can ignore it.
![]()
![]()
YouTube video lesson, click here to open [VIDEO IN PROCESS...]
![]()
![]()
Yilmaz. O., 1987, Seismic data processing: Society of Exploration Geophysicist
 * * * If you have any questions, please send an e-mail to: support@geomage.com * * *