Converting raw SEG-D field data into SEGY files
![]()
![]()
g-Platform can read raw SEG-D filed data and converts into SEG-Y or .gsd internal format. g-Platform supports the latest SEG-D revision version 3.1 besides revision version 0.0, 1.0, 2.0 and 3.1
SEG-D standard was first implemented in 1980 and later it was updated in the year 1994 and called as SEG-D Revision 1.0. With the increase in technology SEG-D was revised again in 1996. This revision was called as SEG-D revision 2.0. Later in the year 2006 more changes were implemented and it was known as SEG-D revision 2.1. In the year 2009, few more improvements made into the SEG-D thus results in a new revision named as SEG-D revision is 3.0. Now the latest SEG-D revision 3.1 was introduced in October, 2015. g-Platform can able to read all the SEG-D revisions including the latest revision 3.1
There are many different kinds of SEG-D formats from the beginning. The demultiplexed (or trace sequential) data formats are
8015 |
|
20-bit binary data |
8022 |
|
8-bit quaternary exponent data |
8024 |
|
16-bit quaternary exponent data |
8036 |
|
24-bit 2's complement integer data |
8038 |
|
32-bit 2's complement integer data |
8042 |
|
8-bit hexadecimal exponent data |
8044 |
|
16-bit hexadecimal exponent data |
8048 |
|
32-bit IBM floating point format data |
8058 |
|
32-bit IEEE floating point format data |
Now a days we receive SEG-D data in an external hard disks but less likely on tape cartridges. There is a chief difference in external hard disk writing format and tape cartridge data format. In the case of external hard disks the data appears in a byte stream where as in the case of tape cartridges it will have boundaries between each trace written to tape cartridge.
Demultiplexed SEG-D tape cartridges consists of a header record followed by a number of demultiplexed data records and then a single EOF (End of File) mark. This sequence is repeated for each shot on the line. From SEG-D Rev 2 the writing of single file marks between shots is now optional.
Convert SEGD files into SEGY module will provide the SEGD header information by clicking the Vista Items. The major advantage of all the modules in g-Platform is about interactivity and ease of use in displaying QC items. In this SEGD modules also we can check various parameters by simple click on one tab and interactively look for various available information in the corresponding windows (tabs).
In order to get all the information about various SEGD parameters, one must click the “Read Headers”.
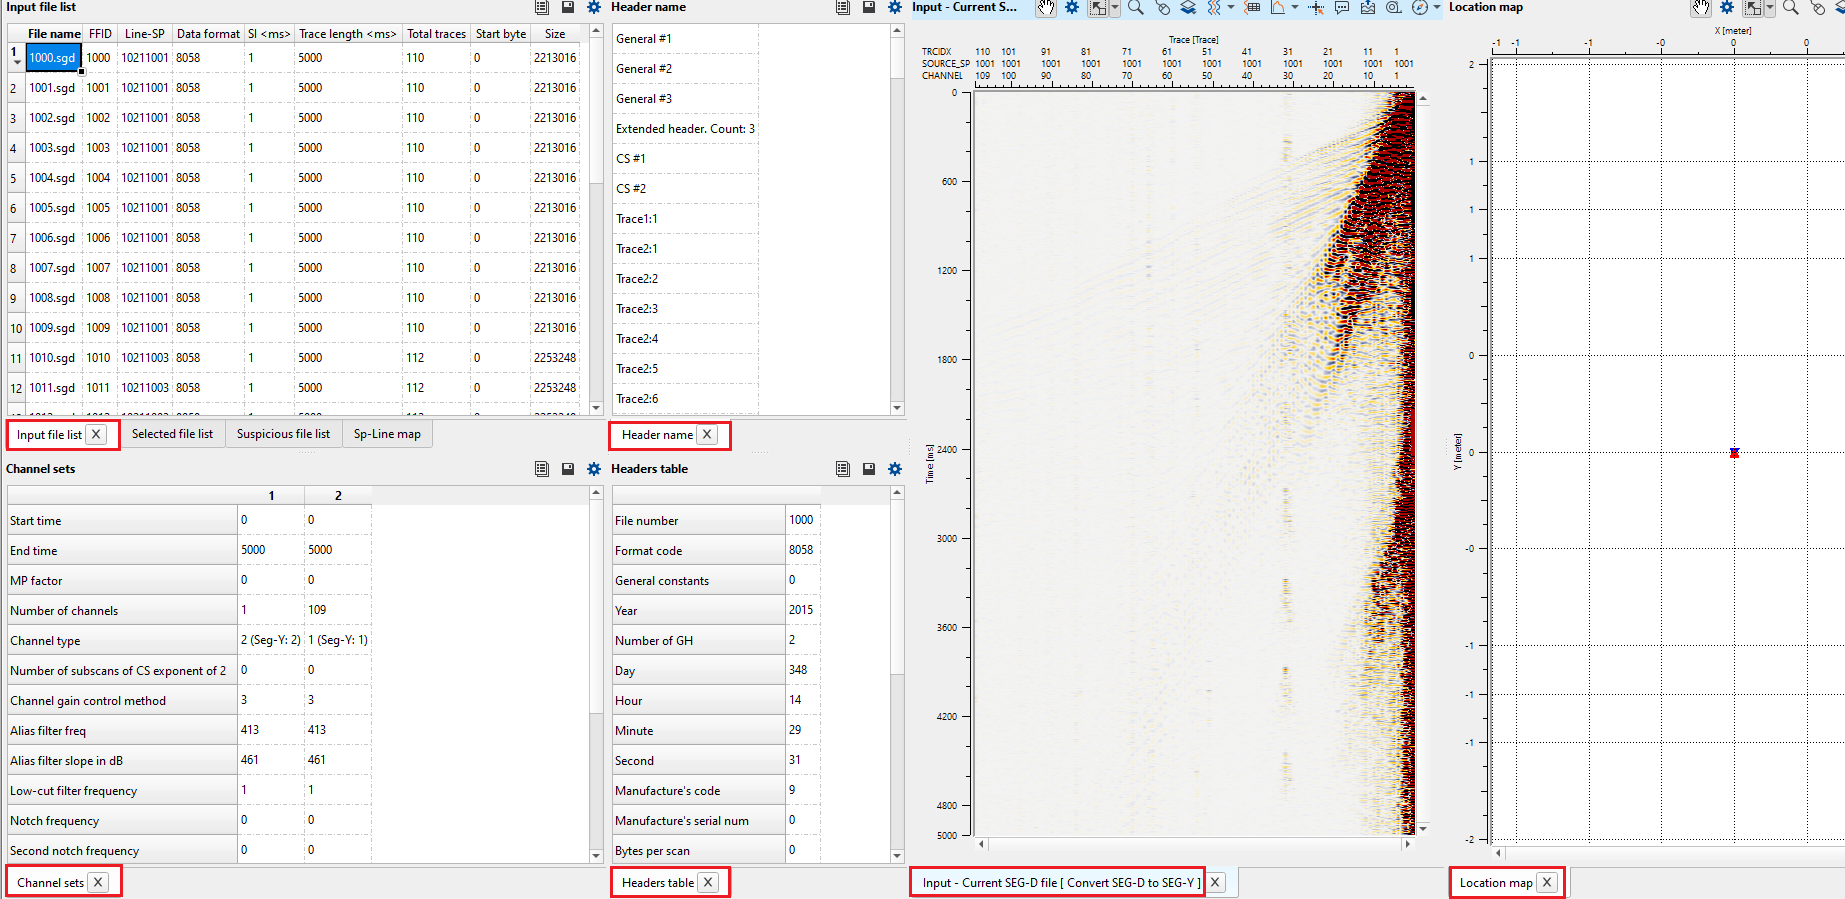
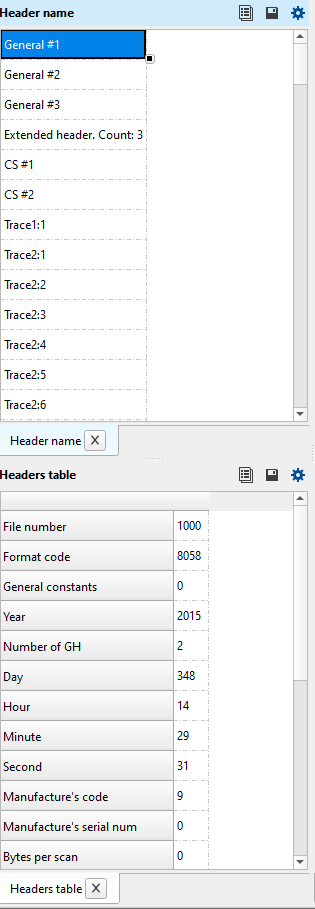
For example if the user is looking for the Acquisition Instrument manufacturers code or manufacturer’s serial number, user can get this information quickly by clicking on the selected shot or FFID in the Input file list tab and the corresponding information about the Manufacturer’s serial number etc will be displayed in the Header Name tab if user selects General #1 in the Headers table tab. There is plenty of information available for each header under the Header Name and the corresponding information will be displayed in the Headers Table Tab. The schematic diagram of the above explanation is shown below.
User can have the following information from the vista items …
•Channel Sets
•Input file list
•Header name
•Headers Table
•SP-Line map
•Suspicious file list
•Location map
•Input - Current SEG-D file
In the Channel Sets, it will provide the information about data channels, auxiliary channels, start and end times and number of channels etc.
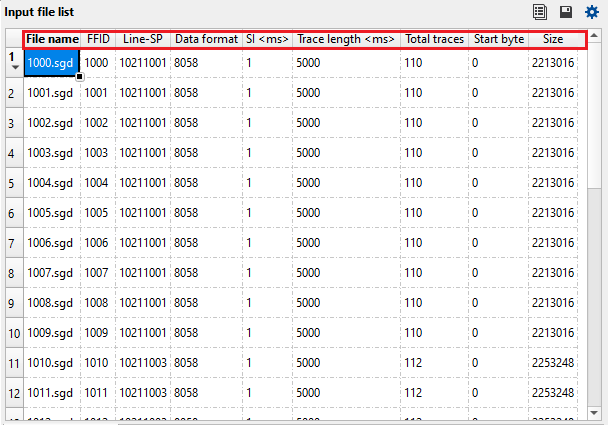
In the Input file list tab, we can get all the information about the Seismic data like the SEGD file name and its corresponding FFID, Shot point, Data format, Sample Interval (ms), Trace Length (ms) and Total Traces.
From the Header Name tab, we can get the information about General Headers, Extended headers and External headers information.
![]()
![]()
Input type { Directory, File list } - there are two options to define the input files. Choose the appropriate option from the drop down menu.
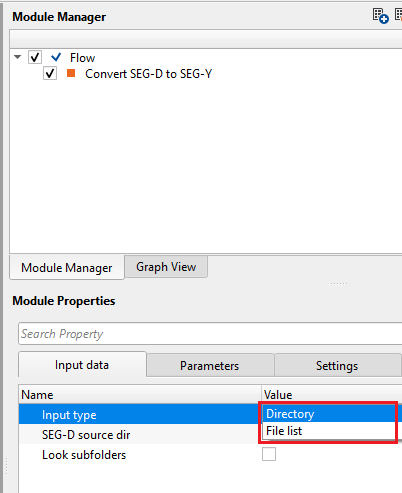
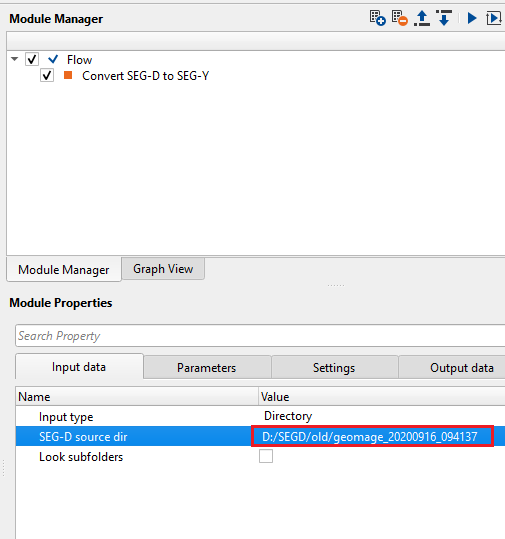
InputType - Directory - this options allows the user to select the input files from a directory.
SEG-D source dir - provide the SEG-D files source directory path.
Look subfolders - it will check for the SEG-D files in case there are sub-directories inside the main source directory
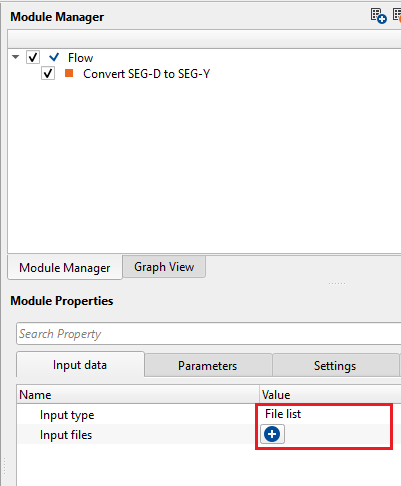
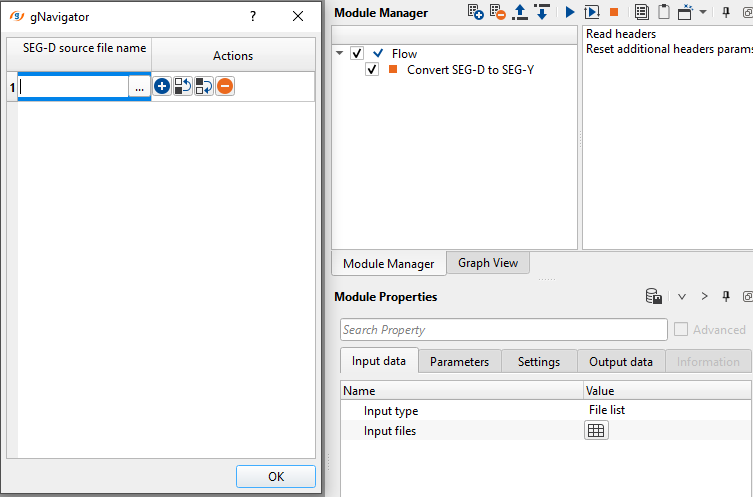
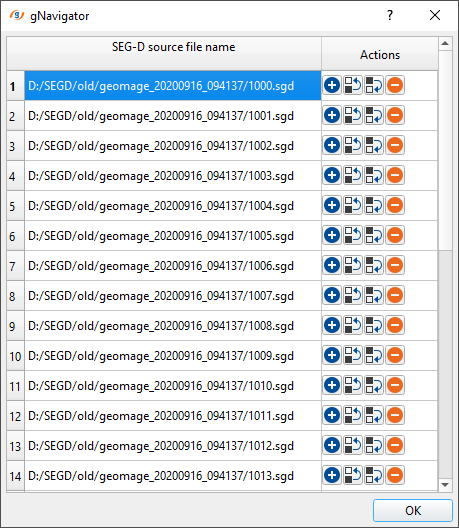
InputType - File list - this allows the user to provide SEG-D input files.
Input files - provide the SEG-D files individually. To add input files, click on  . New pop up window opens. Click on inside the SEG-D source file name and click on "...". To select multiple files, hold Shift and select all the files.
![]()
![]()
Output file - in this section, the user should have various options to generate the output files.
Mode { Create Seg-Y file, Create time stamp file, Create all } - specify what type of output files needs to be generated.
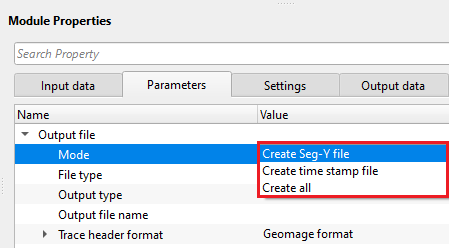
Create Seg-Y file - It converts SEG-D files into SEG-Y files.
Create time stamp file - this option creates the time stamp file which holds all the information about the each and every SEG-D file, it's corresponding FFID and time.
Create all - it generates both SEG-Y and time stamp files.
File type { SEG-Y, GSD } - choose the output file type from the drop down menu.
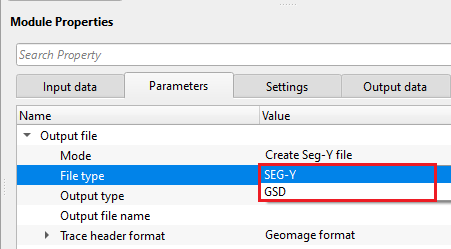
SEG-Y - standard SEG-Y file
GSD - Geomage Standard Data file, which is an internal file.
Output type { Common file, Directory (split files) } - choose whether the output should be a single/combined file or create an individual SEG-Y file of each SEG-D file.
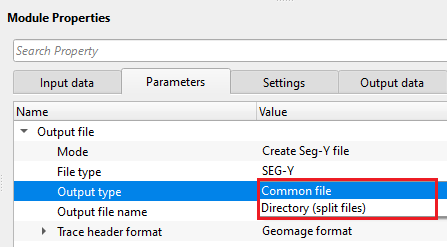
OutputType - Common file - this option allows the user to create a single SEG-Y file from all the input SEG-D files.
Output file name - provide the file and path name of the output SEG-Y file.
OutputType - Directory (split files) - this option generates individual SEG-Y file for each input SEG-D file.
Output directory - specify the output directory path. Inside this directory, all individual SEG-Y files will be saved.
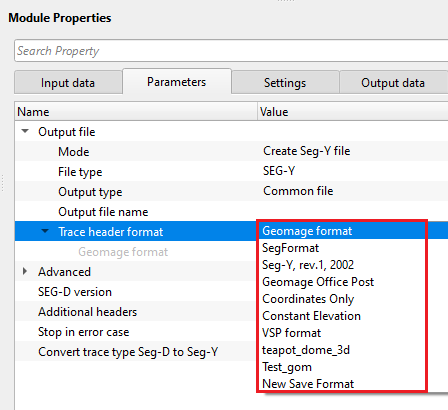
Trace header format - If user selects the File Type as SEGY then user needs to select the appropriate SEGY trace header format. By Default its Geomage's SEGY trace header format.
Geomage format - Geomage trace header format is a SEG-Y rev 1.0 standard trace header format.
Advanced - there are few advanced parameters which may require for certain kind of input data.
Skip - specify how many bytes to skip while reading the input SEG-D files
Skip BOT - specify the how many bytes to skip at the Beginning Of Tape (BOT)
Skip EOT - specify how many bytes to skip at the Ending of Tape (EOT)
Buffer size - specify the buffer size in Mega Bytes (MB) to store the information in the memory
File detection - this section deals with the file detection.
Automatic define file separators - it will let the user to define the parameters required to automatically detect the individual files if the input SEG-D files are written into a single SEG-D file. To separate each individual SEG-D file, often time, we need to provide the file separator parameters. By default, FALSE (Unchecked). If YES (Checked), provide the following parameters
Separator size - specify the separator size. By default, 4 Bytes.
Check year - by checking the recording year, it separates the files. By default, YES (Checked).
Check manufacturer - it checks the recording instrument manufacturer information. By default, YES (Checked).
Automatic define skip size - it will automatically defines the skip size by analyzing the input data. By default, FALSE (Unchecked).
Apply MP factor - when enabled, multiplies each trace sample by 2 raised to the power of the MP (Mantissa/Power) gain exponent value stored in the channel set header of the SEG-D file. This scaling recovers the true amplitude of the recorded signal when the recording instrument applied a binary gain exponent. By default, disabled. Enable this option if the recording system stored data with a binary gain exponent that needs to be removed to obtain true relative amplitudes.
Convert wgs84 to utm - converts the geodetic coordinates from WGS 84 to UTM. By default, FALSE (Unchecked).
Split output Seg-Y - this section deals with splitting of SEG-Y output file. If Split output SEG-Y is TRUE (Checked), it will split the files as per the time tolerance value. Each file has a time stamp, based on the time stamp, it will split the data.
Time tolerance - specify the time tolerance value to split the output SEG-Y file. By default, 60 minutes. In case multiple lines are recorded in the same input file and combined as a single file, this time tolerance will identify the difference between two different sail lines by looking at the time stamp values. In Marine seismic, the vessel/boat makes a turn to start a new sail line. For this, it will take more than 60 minutes some times even more.
Experimental - this group contains experimental options for handling non-standard or corrupted SEG-D files where standard trace detection may fail. These parameters are intended for difficult datasets and should be used with caution.
Automatic detect begin of traces - automatically detects the beginning of the traces.
Number of coincidences - number of bytes that are checked at the beginning of the trace to detect starting positions of the traces
FFID check { Weak (last half bytes), Exact, None } - checks the beginning of the traces by FFID
Weak - it detects/checks the last 2 byte of the FFID as FFID takes 4 bytes.
Exact - it checks/detects the all bytes of the FFID as it is usually done.
None - it won't consider the FFID at all.
SEG-D version - select the appropriate SEG-D revision from the drop down menu. By default, SEG-D Revision 1.

Additional headers - these are additional headers where the user can extract additional headers information by providing the Start byte, Block number, Format, Field (Header). These additional headers are different for different recording instruments. This is NOT a mandatory parameter and the user can ignore it if not required.
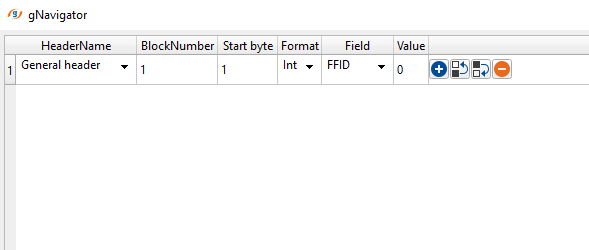
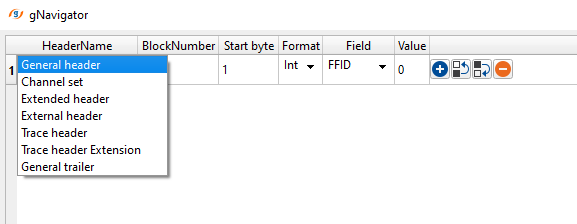
General headers - located at the beginning of the SEGD file. It contains global information like SEG-D revision, acquisition date & time, sample format, no of sample, record length, recording system etc.
Channel sets - contains gain settings, filters types, receiver information (geophone, hydrophone) etc.
Extended headers - these are additional trace headers information beyond general headers information. This contains meta data like survey parameters, navigation information, custom fields defined by the recording instrument etc.
External headers - these are extra headers information which is linked to SEG-D files but in a separate file. This is used when the SEG-D internal header exceeds it's capacity.
Trace header - it contains the trace information such as trace number, trace identification, recording time breaks, source and receiver coordinates, trace gain etc.
Trace header extension - any additional meta beyond the standard trace header information like auxiliary trace information etc.
Stop in error case - when enabled, the conversion process halts immediately if a read error or structural problem is encountered in any input SEG-D file. By default (disabled), the module skips problematic files and continues processing the remaining files in the input list, logging any errors to the output report. Enable this option when you need strict quality control and want to ensure that no data is silently skipped due to file issues.
Convert trace type Seg-D to Seg-Y - When enabled (default: on), the module automatically maps SEG-D channel-set trace type codes to the corresponding SEG-Y trace identification codes (TRID header field). This ensures that seismic data traces, auxiliary traces, and pilot sweep traces are correctly classified in the output SEG-Y file. Disable this option only if you need to preserve the original raw SEG-D trace type values without conversion.
![]()
![]()
Number of threads - Controls how many parallel processing threads are used when converting multiple SEG-D input files simultaneously. When the output type is set to Directory (split files), multiple files can be processed concurrently to speed up conversion. Increase this value on machines with many CPU cores to reduce total processing time for large datasets.
Skip - See the Advanced group parameter of the same name, which specifies the number of bytes to skip at the start of each SEG-D file before reading begins. This is separate from the workflow bypass control.
![]()
![]()
Current SEG-D file - displays the seismic gather from the currently selected SEG-D file in the input file list. Select any file in the Input file list tab to preview its traces in the seismic viewer. This is a QC item — use it to verify the data content and quality before running the full conversion.
After clicking Read headers, right-click the module and select Vista Groups to open all interactive QC panels, including the input file list, channel sets, header tables, and map displays.
Files - a table listing all detected input SEG-D files. Each row shows the file name together with key acquisition parameters read from the file headers, such as the FFID (Field File Identification number), shot point, data format code, sample interval (ms), record length (ms), and total trace count. Use this table to confirm that all expected files have been recognized correctly before executing the conversion.
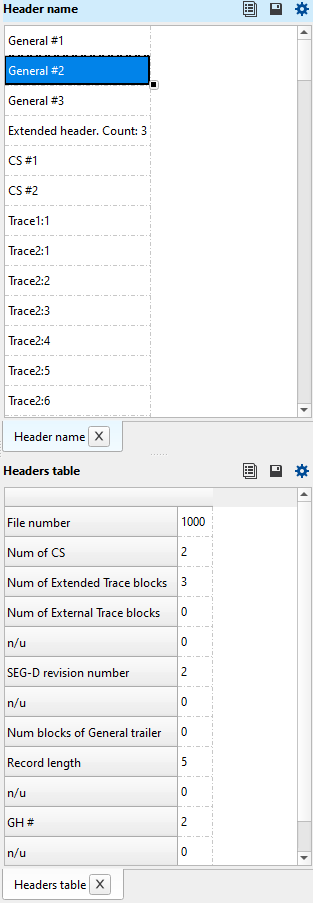
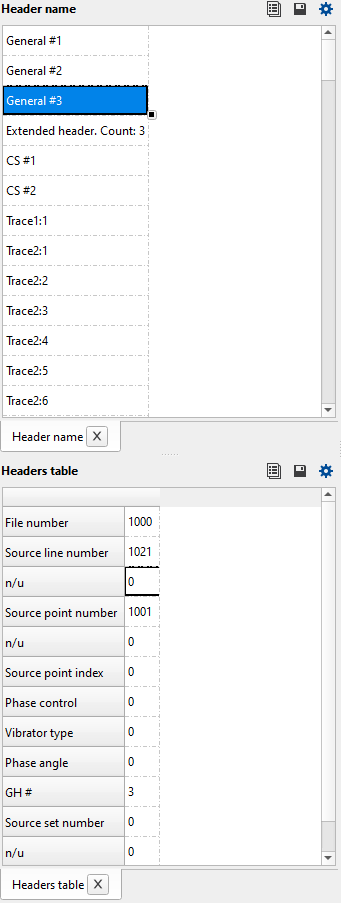
Header name - a table listing the names of all header blocks available in the selected SEG-D file, including General Header 1, General Header 2, General Header 3, Extended Headers, and External Headers. Click a row in this table to display the decoded content of that header block in the Headers table panel.
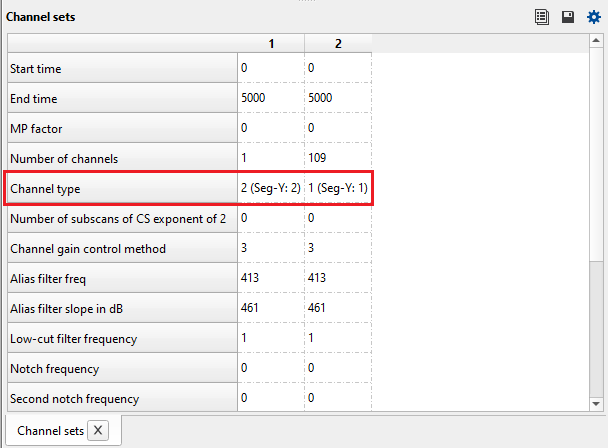
Channel sets - a table showing the channel set definitions for the currently selected SEG-D shot record. Each channel set represents a group of receivers sharing the same acquisition parameters. The table includes the channel set type (seismic data, auxiliary, pilot sweep), number of channels, gain settings, anti-alias filter frequency, recording start and end times, and sample interval. Use this to verify the recording configuration of each channel group.
Headers table - displays the decoded fields from the header block currently selected in the Header name panel. All field names and their values are presented in a two-column table. This is the primary QC tool for inspecting raw acquisition metadata — including instrument manufacturer codes, recording date and time, GPS/navigation fields, and any extended or external header content. Verify these values before choosing the SEG-D version and additional header mapping settings.
Selected files - a table listing the subset of input SEG-D files that will actually be processed in the current conversion run. Files may be excluded from this list if they were rejected during the initial header scan (e.g., unrecognized format or read errors). Compare this list with the Files table to identify any files that have been excluded.
Suspicious files - a table listing input SEG-D files that were read but contain potential issues, such as inconsistent header values, unexpected data format codes, or structural anomalies. Review this list carefully before executing the conversion. Files listed here may still be converted, but the resulting SEG-Y data should be inspected for artefacts or header corruption. If the Stop in error case option is enabled, processing will halt at the first such file.
There is no information available for this module so the user can ignore it.
![]()
![]()
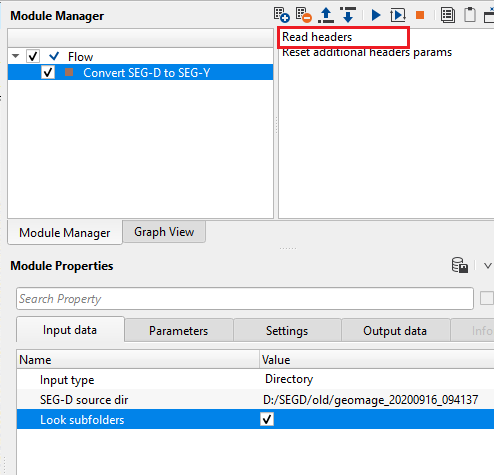
In this example workflow, we read the SEGD files from a directory and convert SEG-D files to SEG-Y and create time stamps. Before executing the module, first read all the headers and check that all information is correct or else change the SEG-D revision and/or any other parameters to make sure that correct information is read. To input the data,
•Select Input type as "Directory". Provide the input SEG-D files directory. Check Look sub-folders option. This ensures if there are any SEG-D files are inside the sub-folders, it considers them as input SEG-D files.
•Click on ""Read headers" action item
•Launch Vista items by right click on Convert SEG-D to SEG-Y -> Vista Groups -> All Groups -> In new window.
To view any SEG-D file, select the Input file name from the Input file list tab and it will display the selected SEG-D file in the Input - Current SEG-D file tab. Similarly, General Header, 1, 2, 3 or extended headers information can be obtained by selecting the respective field and the corresponding information will be available in Headers table.
•In the Parameters tab, select Mode as "Create all". It'll create both SEG-Y files and Time stamp files.
•Provide path to create an output file name
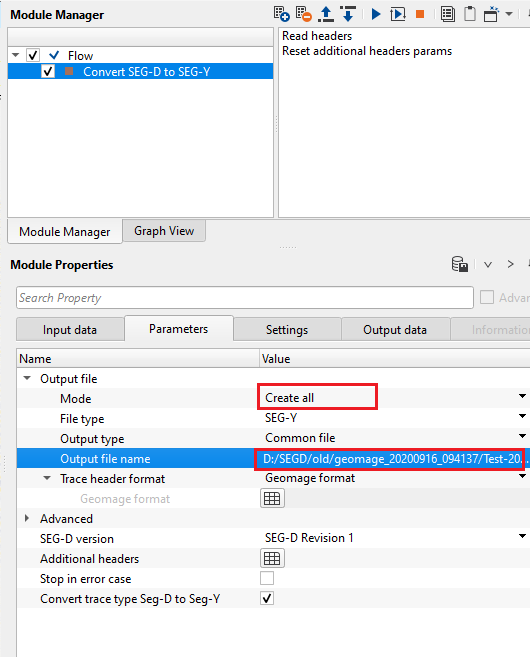
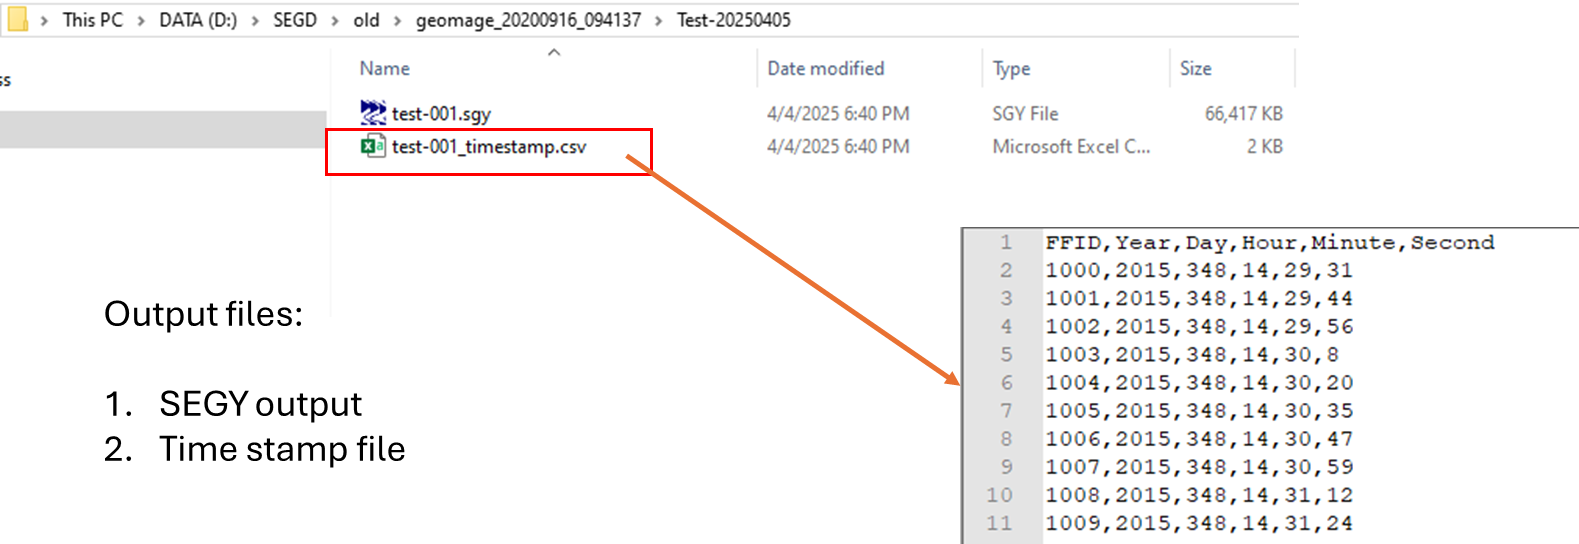
From the output directory, we get two files since our Output mode is Create all option i.e., SEGY output & Time stamp file.
![]()
![]()
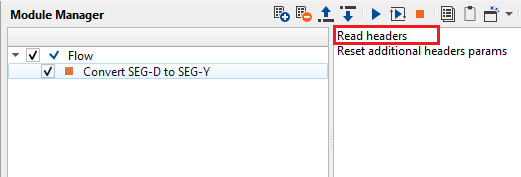
Read headers - Prior to executing the module, the user should click on this option to read all the trace headers of the input SEG-D file(s). Then only the user can able to see the contents of the SEG-D file.
Reset additional headers params - resets the Additional headers collection back to the default mapping for the currently selected SEG-D revision. Use this action if you have manually modified the block number, byte offset, or format settings in the Additional headers table and wish to restore the original defaults. This is useful when switching between different SEG-D revisions or recording instrument types, where the extended and external header layouts differ.
![]()
![]()
YouTube video lesson, click here to open [VIDEO IN PROCESS...]
![]()
![]()
Yilmaz. O., 1987, Seismic data processing: Society of Exploration Geophysicist
 * * * If you have any questions, please send an e-mail to: support@geomage.com * * *