Multi-User mode in g-Space enables collaborative project management by allowing users to work on shared projects using a centralized database.
This mode ensures that multiple team members can connect to the same project database, manage seismic data, and synchronize updates in real-time.
The main functions involved are setting up the database connection, receiving and sending data, and managing synchronization settings.
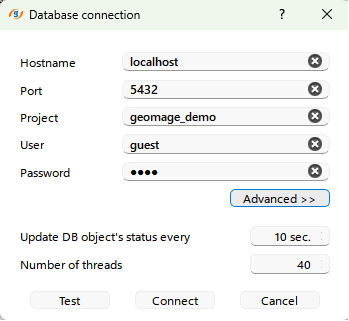
1. Set Connection
To enable multi-user functionality, you first need to establish a connection with the remote database. This can be done via the Set Connection window. The fields that need to be filled include:
•Hostname: The server address (e.g., localhost or a remote server IP)
•Port: Database connection port (e.g., 5432)
•Project: The name of the project within the database.
•User: The username to access the database.
•Password: The user’s password for authentication.
Additionally, advanced options such as Number of Threads and the interval for Updating DB object status can be configured here. Once the details are set, users can Test, Connect, or Cancel the connection.
2. Receive from DB
Once connected to the remote project, the Receive from DB function allows users to pull data from the shared database into their local environment. This ensures that you are working with the latest version of the project's seismic, well, and horizon data, among others.
Data can be received for specific objects such as Volumes, Lines, Horizons, Faults, Wells, Checkshots, and LAS files. It ensures that the local project is synchronized with the latest data on the database.
3. Send to DB
The Send to DB function allows users to push local changes to the database. This includes any modifications or new data added to the local project, such as edited horizons, seismic volumes, or well logs.
This feature is essential for maintaining data integrity across users, ensuring that the latest modifications are available for other team members working on the same project.
4. Sync Settings
The Sync Settings feature provides more granular control over data synchronization. Users can define how often their local project synchronizes with the database and specify which data types or project elements should be included in each synchronization cycle.
5. Delete DB
The Delete DB feature allows users with the necessary permissions to remove the project database entirely. This should be used cautiously, as it will permanently delete all data stored in the shared project database.
6. Data Manager Integration
Within the Data Manager, users can easily see which data files are stored locally and which are part of the shared remote database:
•Local Folders: These are the files saved on your local project and are not synchronized with the database.
•Database Folders: Represent the shared project data stored in the database. Users can perform actions like Receive or Commit by right-clicking for specific data objects such as Volumes, Lines, Horizons, Faults, Wells, Checkshots, and LAS.
These options ensure flexibility and control over how data is managed and shared across multiple users in the project.