Spectral decomposition
Spectral decomposition is a technique in seismic interpretation used to analyze the frequency content of seismic data. By using spectral decomposition, we can visualize how different frequency bands respond to subsurface features, enhancing reservoir characterization.
How to Perform Spectral Decomposition
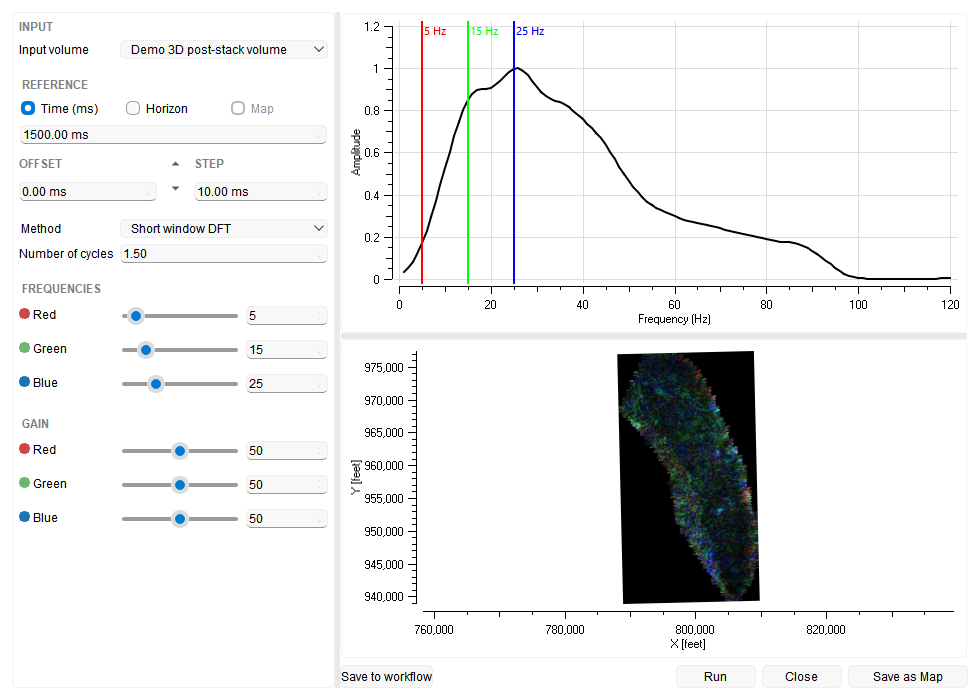
Load a 3D post-stack seismic volume, then open the Attributes Bar. Select Spectral decomposition in Actions to open the wizard. Choose the input volume and a time or depth level, horizon or map as the reference.

g-Space offers four calculation Methods for spectral decomposition. Choose the one that fits your geological objectives. These methods vary in terms of how they transform the signal inside the analysis window, which may affect the resolution and interpretability of the results.
1. Short Window DFT (Discrete Fourier Transform)
The Short Window DFT method performs a Discrete Fourier Transform inside a short analysis window centered on the analyzed time. Like the other methods, it takes its window length from the Number of cycles setting (window = cycles / frequency), so the window is longer at low frequencies and shorter at high ones. Ideal for stable, continuous stratigraphy or thick-bedded sequences where uniform frequency content is expected over short intervals.
2. CWT (Continuous Wavelet Transform)
The CWT method uses wavelets of varying scales to analyze the seismic signal. Each wavelet is stretched or compressed to match its analysis window, so every frequency is examined at its own scale — wider for low frequencies and narrower for high frequencies. Best for resolving thin beds, complex stratigraphy, and fault zones where frequency content changes rapidly over short time periods.
3. S-Transform
The S-Transform combines elements of both the Short Window DFT and CWT. It uses a variable window length, similar to CWT, but retains a direct relationship with Fourier analysis. The S-Transform provides both good time and frequency localization, making it suitable for detecting frequency anomalies at different scales in complex geological environments. Effective for detecting tuning thickness, complex channel systems, and subtle reservoir heterogeneities due to its balance of time and frequency resolution.
4. CCT (Cosine Cross-correlation Transform)
The CCT method first correlates the analysis window with itself, then compares that result with a cosine at each analyzed frequency. Its window length follows the same cycles / frequency rule as the other methods, so it is controlled by Number of cycles. Unlike the other methods, CCT returns a normalized value between 0 and 1 that expresses how well a frequency fits the data rather than how strong the signal is, so the result does not depend on the overall amplitude level. Useful when you want frequency patterns to stand out in intervals where amplitude contrasts dominate the other methods. CCT is available in the Method list of the Spectral decomposition wizard; the Method field on the Attributes Bar offers the other three methods.
Set Frequency and Window Parameters
The following settings on the Attributes Bar apply to Calculate attributes. The interactive wizard has its own method, analysis window, frequency and gain controls.
- Number of Cycles: A dimensionless control of the analysis window length (window = cycles / frequency). Larger values give finer frequency resolution, while smaller values give finer time resolution.
- Noise Level (%): This determines how much noise reduction will be applied during the decomposition process. On the Attributes Bar this field is available only when the Short window DFT method is selected.
- Color Frequencies: Assign specific frequencies to each color (Red, Green, Blue) for visual blending. This helps to emphasize different frequency components in the final output.
- Min, Max, and Step Frequencies: Define the range and increment of frequencies analyzed. The Min frequency represents the lowest frequency to analyze, the Max frequency is the highest, and the Step frequency defines the intervals between frequency bands.
In the wizard, refine the decomposition and use the spectrum and map preview to review the result before saving:
- OFFSET: Shifts the analysis from the reference: positive values move it down, and negative values move it up (ms for time data, m for depth data). The arrows next to it change the offset by one STEP.
- GAIN: The Red, Green and Blue sliders range from 0 to 100; 50 leaves each component unchanged, lower values reduce it and higher values amplify it.
- FREQUENCIES: Set red, green and blue frequencies with the sliders or value fields (5, 15 and 25 Hz by default). The colored markers on the spectrum plot follow these values, and the map preview updates as you change frequency or gain, so you can judge the result before saving it.
- Save to workflow: Stores the selected input and current settings as a task in the active workflow without running the calculation, and leaves the wizard open. When the workflow reaches the task, it calculates the decomposition and saves the map.
- Run: Calculates and saves a map immediately and leaves the wizard open.
- Save as Map: Saves the current preview.
- Close: Closes the wizard.
When a saved task is reopened from the workflow, its settings are restored and the footer shows two buttons instead:
- Save: Updates the task.
- Cancel: Closes the task without changing it.
After processing, a new map folder will appear in the Data Manager under the Maps folder, on the Spectral decomposition maps sublevel. This map represents the spectral decomposition output and can be visualized on the location map and in a time 3D view. The method and the frequencies used in the calculation will be automatically written into the map name.
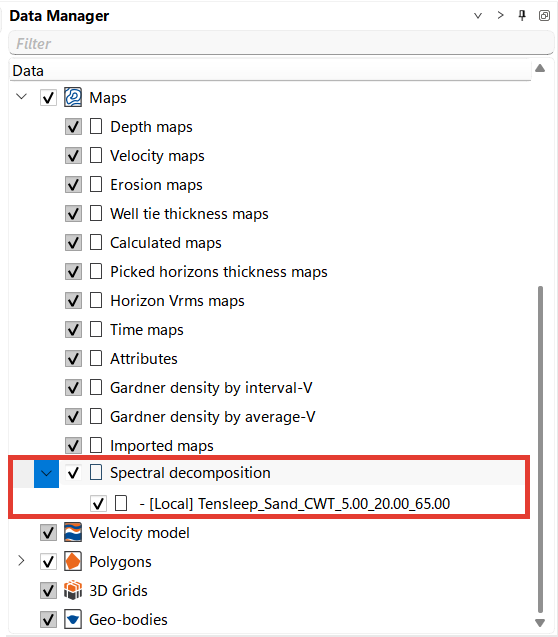
The map is calculated on the seismic bin grid of the selected input volume, so it has the same geometry and resolution as that data: the Step X and Step Y values of the interpolation settings on the Modelling bar do not affect it.
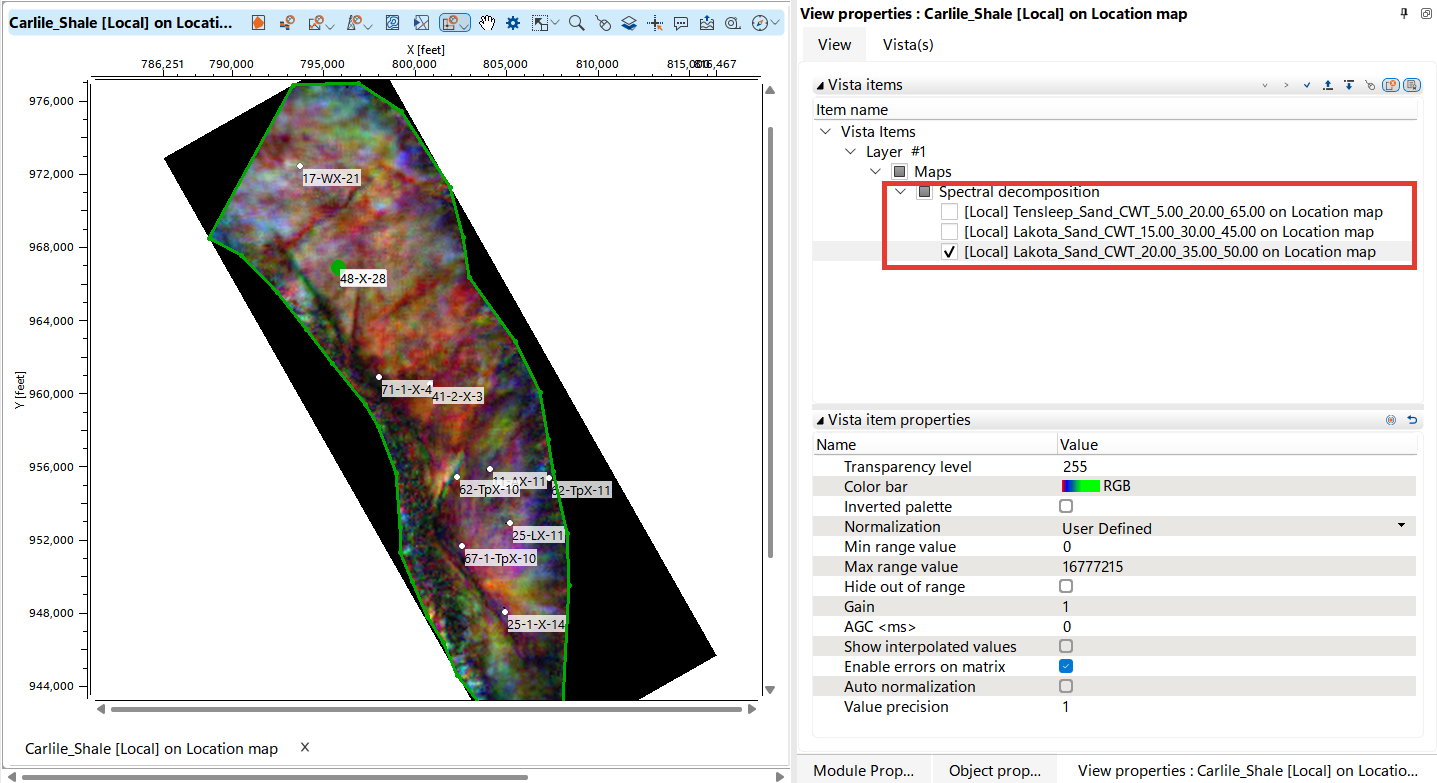
An example of a spectral decomposition map visualization is shown below. Users can customize the visualization in Visual Settings by adjusting the color palette and other available options.
Display the Map in a 3D View
A spectral decomposition map can also be displayed in a time 3D view. Select the check box of the map on the Spectral decomposition maps sublevel of the Maps folder in the Data Manager, and the map is added to the view as Spectral decomposition maps 3D. This is available in time 3D views only.
In 3D the map is drawn on the surface that was selected as the reference in the Spectral decomposition wizard — a Horizon, a Map, or the constant Time (ms) or Depth (m) value — shifted by the OFFSET value. The map cells hold color rather than elevation, so this reference is what gives the map its position in 3D. In Visual Settings the 3D surface has a read-only Direct RGB colors property: the cells store the red, green and blue codes produced by the decomposition, so the surface is drawn in those colors and the color palette does not apply to it.
Maps calculated in an earlier version, and maps whose reference horizon or map has since been removed, have no stored reference and cannot be displayed in 3D. Their row in the Data Manager shows the tooltip Recalculate to enable 3D display, and selecting the check box opens an information message with the same text, titled 3D display unavailable. Recalculate the map in the Spectral decomposition wizard to make it available in 3D.