Extract seismic trace
Extract seismic trace writes the seismic trace nearest to a well into a new LAS curve on that well, resampled along the wellbore at a step you choose. The result is an ordinary log curve, so the seismic amplitudes can be displayed and compared with the other logs of the well. The same settings can also be stored as a task in a project workflow and re-run later. The command also works on a whole scope of wells: started on the Wells folder or on one of the well folders inside it, it extracts a trace for every well below that node in one run.
Requirements
- A well with a trajectory in the Wells folder of the Data Manager.
- Seismic data lying within the Nearest seis distance search radius of the well head, set in the Module properties. Only the geometries and seismic data found inside that radius are offered, and the dialog does not open when nothing is found - increase the value when the nearest seismic lies further away.
- Checkshots on the well when the selected seismic is in the time domain, so that seismic times can be converted to depth along the well.
Extracting a trace for one well
- In the Data Manager, right-click a well under Wells and choose Extract seismic trace.
- Set the parameters described below.
- Press Run to extract the trace now, or Save to workflow to keep the settings as a workflow task instead.
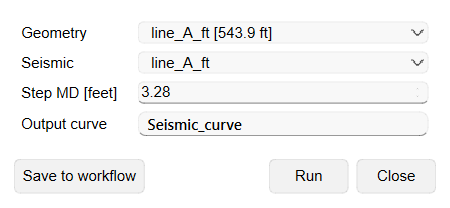
Parameters
- Geometry - the seismic geometry the trace is taken from. The list holds the geometries found near the well, each entry showing its distance from the well.
- Seismic - the seismic data set to sample. The offered list follows the selected geometry.
- Step MD (shown with the current depth unit) - the sampling interval of the resulting curve along measured depth.
- Output curve - the name of the curve written to the well. The default name is Seismic_curve; the name cannot be empty.
Buttons and workflow support
- Save to workflow - stores the selected well together with Geometry, Seismic, Step MD and Output curve as an Extract seismic trace task in the current workflow. Nothing is extracted at this point - the trace is produced when the workflow runs. The dialog stays open and keeps the entered values, so several tasks can be saved in turn.
- Run - extracts the trace immediately with the current settings and keeps the dialog open, so the settings can be adjusted and the extraction repeated. If the well already holds a curve with the output name, you are asked whether to overwrite it.
- Close - closes the dialog.
If the project contains no workflow yet, Save to workflow asks for a name and creates one. Reopening the task from the workflow restores the dialog with its saved settings so they can be reviewed and edited; Save writes the changes back to the task and Cancel closes the dialog. When the workflow runs, the trace is extracted with the stored settings, and an existing curve with the same name is replaced without a prompt.
The task refers to the geometry and the seismic data by name. If the saved geometry is no longer present in the project, the task reports it as unavailable and no curve is produced. See Workflows for how workflows are built, ordered and executed.
Extracting traces for several wells
The same command is available on the Wells folder itself and on any well folder inside it, including the folders you created. It then covers the whole scope below that node, wells in nested folders included, and extracts a trace for all of them in one run. Only 3D seismic volumes are offered for such a run, because the wells of a scope usually lie all over the survey.
- In the Data Manager, right-click Wells or one of the well folders under it and choose Extract seismic trace.
- Choose the 3D seismic volume to sample. The list holds the volumes of every 3D geometry that reaches at least one well of the scope within the Nearest seis distance radius; when the same volume name occurs in more than one geometry, that geometry is added to the entry in brackets. The dialog also states how many wells the selected scope holds.
- Set Step MD and Output curve as for a single well, then press OK to start the extraction or Cancel to leave the wells unchanged.
Every well takes its trace from the part of the selected volume nearest to its own well head, so one run can cover wells spread over the entire volume. A well the volume does not reach within the search radius is skipped, and with a volume in the time domain a well without checkshots is skipped as well, because its times cannot be converted to depth. The remaining wells are processed one after another - a skipped or failing well does not stop the others - while a progress window shows how far the run has come and lets you stop it.
If a well already holds a curve with the output name, you are asked whether to replace it. Yes and No answer for that well only, Yes to All and No to All apply the same answer to the wells that follow, and Abort stops the run.
A summary closes the run. It reports for how many wells of the scope the curve was extracted and lists them by name, followed by the wells that were skipped - because the well has no time-depth relation, because the selected volume is out of reach, or because the curve already exists - the wells left unprocessed when the run was stopped, and the wells that failed, each with its reason. If the scope holds no well with a trajectory, if no 3D volume lies near it, or if none of its wells can be processed with the chosen volume, the command reports that and nothing is calculated; a volume you expect but do not find in the list usually lies further away than Nearest seis distance allows.
A batch run is always carried out immediately and cannot be kept as a workflow task - Save to workflow is offered for a single well only.
Result
The extracted trace is added to the well as a LAS curve named after Output curve and appears under that well in the Data Manager. It behaves like any other LAS curve on the well - see Wells for how log curves are displayed. If none of the well depths map onto the selected seismic - for example when the checkshots do not overlap the seismic, or Step MD is too large - the extraction reports this and no curve is created.
See Also