Import well log images
Well log images are scanned or digitised raster pictures of paper well logs. g-Space imports these rasters and attaches them to a well over a measured-depth interval so that the image can be displayed alongside digital curves. Supported image formats are .png, .jpg, .jpeg, .tif, .tiff, .bmp and .xpm. This topic covers importing them and adjusting the depth range of a raster that is already loaded; there is no export back to raster.
Purpose
Load scanned well-log rasters and pin each one to a well between an MD begin and MD end value, so the image lines up with the well track. One image or a whole batch can be loaded into a single well: the wizard reads the depth interval of every image from its file name and lists them all in an editable table, so the depths can be checked and corrected before the import runs. Many images can also be loaded in bulk from XML manifest files that carry the well identifier, image file name and depth calibration.
Launching the import
Open the Data manager and use the well context menu. There are two entry points:
- Right-click a single well and choose Load raster to import one image or a batch of images into that well with the Open raster wizard.
- Right-click the Wells root node and choose Import > Rasters to import many images at once from XML manifests with the Open rasters wizard.
[image: placeholder_Data_manager_well_context_menu_with_Load.png]
Step-by-step: images for one well
- In the Open raster wizard, press Select files... and choose one or several images (filter Images (*.png *.jpg *.jpeg *.tif *.tiff *.bmp *.xpm)), or press Select folder... to add every image lying directly in a folder. Files that are already listed are skipped, and the label beside the buttons reports how many images are selected.
- In General settings, set Depth unit to the unit the depths in the file names are written in, m or ft. It starts from the project measurement system, and feet are converted automatically when the rasters are stored. Depth type is MD.
- Leave Filename pattern on Auto (detect from filename), which reads the last pair of numbers joined by a hyphen in the file name, so Core_10819-10822.png gives MD begin 10819 and MD end 10822. For other naming conventions, choose or type a pattern such as %DepthTop%-%DepthBottom%, where the two placeholders mark the depths and * stands for any other text. Changing the pattern re-reads the file names, except for depths that were typed by hand.
- Check the Verify and adjust depths table, which lists every image with its Import tick box, File name, MD begin, MD end, Rotation and Status. The two depth headers carry the selected depth unit, and both depth cells can be edited to supply or correct a value the file name did not give.
- Use Select all, Deselect all and Remove selected to decide what is imported, and Sort by MD begin to put the images in depth order.
- Click a row to show that image in the Preview panel. Correct the orientation with the rotate buttons (↺ 90°, 180°, ↻ 90°) or Reset, and use Apply rotation to to send the rotation to the current image, the selected rows or all images. Every image keeps its own rotation, and rotating an image clears the crop it already had.
- Zoom with the mouse wheel and pan with the middle mouse button. Drag the edges or corners of the crop rectangle to trim the previewed image to the useful log strip; the crop is kept per image.
- Read the summary line under the panels, which reports how many images are listed, how many are marked for import, how many depths were recognized, the depth interval they cover and the size of the source files. Then press Load to add the marked images to the well. The wizard refuses to load while a marked row still has an unrecognized or invalid depth, and names the rows to correct or untick.
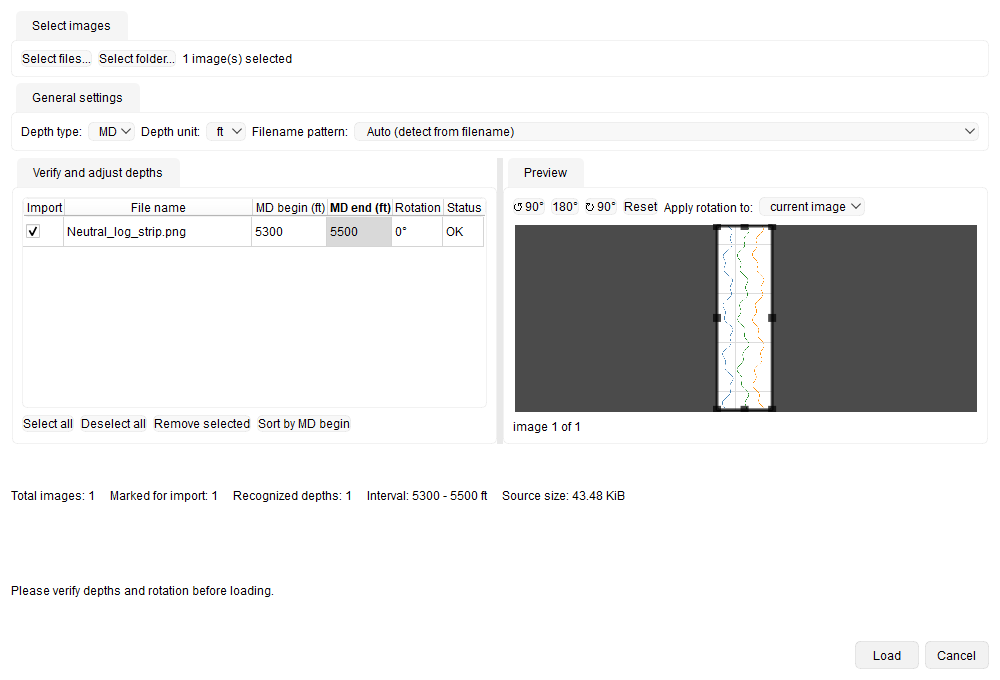
The Status column reports what the wizard made of each image:
- OK — the image has a usable depth interval.
- Depth is not recognized — no depths could be read from the file name, so they have to be typed into the two depth cells. The row is highlighted and blocks the import while it stays marked.
- MD begin >= MD end — the interval runs backwards. The row is highlighted and blocks the import while it stays marked.
- Outside the well depth range — the interval lies outside the depths the well covers. This is a warning, not a blocker.
- Overlapping interval — the interval overlaps another image marked for import. This is a warning, not a blocker.
Step-by-step: bulk import from XML
- In the Open rasters wizard, press Browse XML files and select one or more .xml manifest files (filter XML files (*.xml)).
- Each valid manifest is added to the table, showing the XML file, API, Min MD and Max MD read from the file. Remove a row with its minus button.
- Each manifest names the image file to load (resolved next to the XML), the well identifier (API / UWI) used to match the well, and depth calibration points. Depths given in feet are converted to metres automatically.
- Press OK to import all listed rasters. Wells whose identifier is not found in the project are skipped and reported; if no files were added the wizard warns No files were selected.
Change the depth range of a loaded raster
The measured-depth interval of a raster that is already attached to a well can be corrected without removing the image and importing it again. In the Data manager, expand the well down to its Raster group, right-click the raster and choose Edit. The same menu also holds Rename and Remove for that raster.
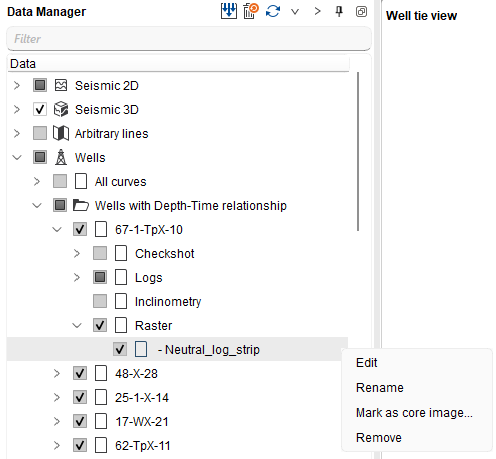
The Edit raster dialog opens. Its title also names the raster, and the Position group shows the values the raster currently uses:
- Change MD begin and MD end. Both labels carry the project distance units, m in a metric project and ft in an imperial one.
- Press OK to apply the new interval, or Cancel to leave the raster as it was.
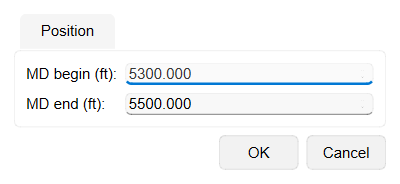
MD begin must be smaller than MD end; otherwise the dialog reports MD begin must be less than MD end. and stays open so the values can be corrected. Only the depth interval changes: the stored image and its cropping are kept, and the raster is repositioned and rescaled to the new interval wherever it is shown beside the well curves.
Notes
- Supported image formats are PNG, JPG, JPEG, TIF, TIFF, BMP and XPM. The cropped raster is stored inside the project as PNG.
- In the Open raster wizard the depth interval is read from the image file name and can be corrected in the table; in the XML bulk wizard it is taken from the manifest calibration and the raster is cropped to that calibrated range.
- Each imported raster is named after its image file. If two images would give the same name, a number is added so the names stay unique inside the well.
- Import is one-way: rasters cannot be exported back to image files.
See Also