Markers
Markers - contains well marker data with other attributes
Right mouse button on the icon allows to:
- Add marker set
- Clear
- Receive marker sets
- Commit marker sets
- Add folder
Right mouse button on a marker set additionally allows to:
- Import markers struct
- Import markers ages
- Auto-create Zones
- Create Zones manually...
Showing marker data as tables
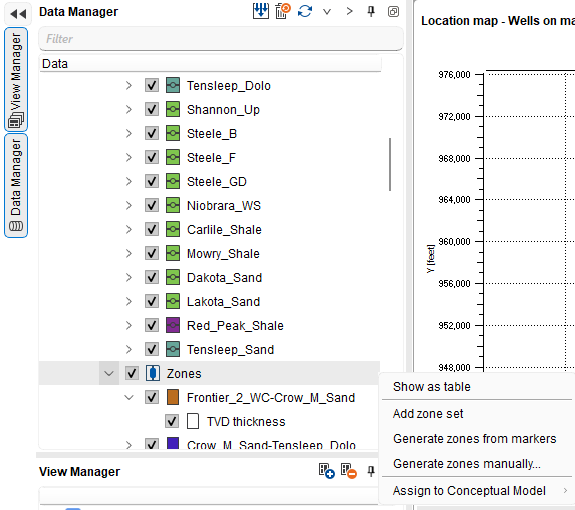
Right-click the Tops subsection, an individual top marker, the Zones subsection or an individual zone and choose Show as table. The command is the first menu item and opens the matching data in the Table view. A subsection shows all of its rows; an individual item filters the same table to that marker or zone.
- Tops - the Properties table: Marker tops - <marker set> table contains one row for every picked marker in every well. Its columns are Well name, Marker, MD, TVD, TVDSS, TWT (s), X, Y, Age and Type, followed by one column for each custom marker attribute defined in the set. Type is Marker, Fault or Intrusion. TWT (s) is Undefined when a well has no checkshot, and a custom attribute is Undefined where that marker does not carry it. Wells with no pick from the set are omitted. From an individual marker, the filtered table is titled Marker top - <marker set> - <marker>.
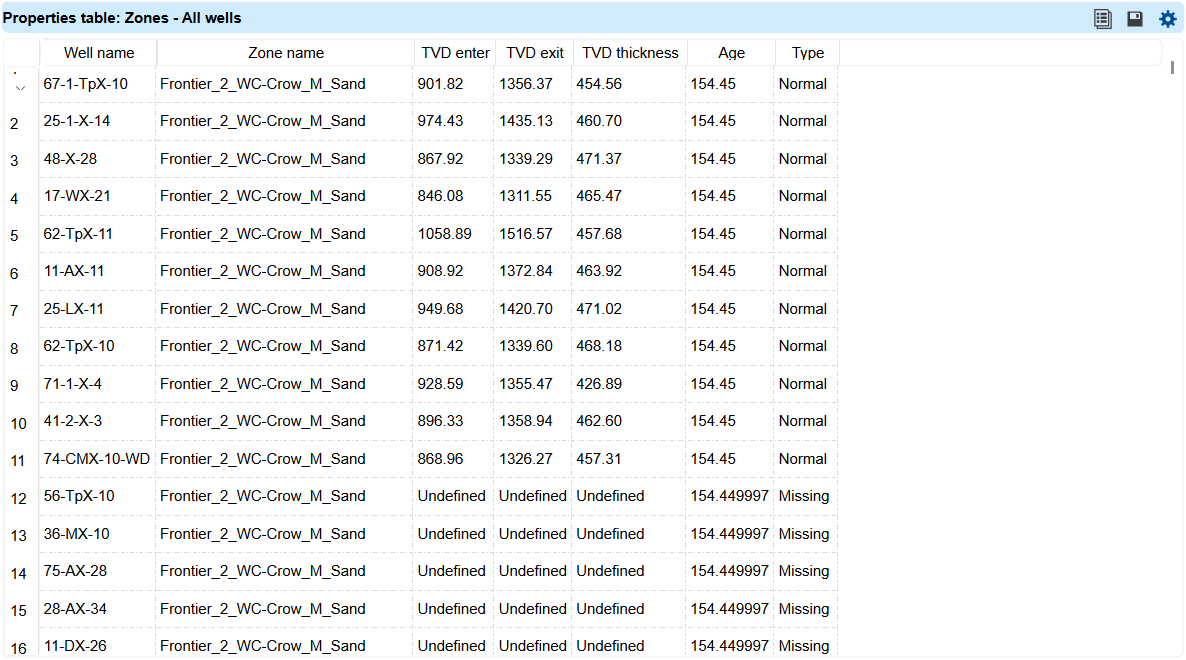
- Zones - the Properties table: Zones - <marker set> table contains one row per zone for every well in the project and includes every zone whose top or base refers to this marker dataset, across all zone sets. Its columns are Well name, Zone name, TVD enter, TVD exit, TVD thickness, Age and Type. Age is the average age of the top and base markers. Type is Normal, Inverted when the base is above the top, or Missing when either pick is absent. Inverted rows have an Undefined thickness; Missing rows have Undefined enter, exit and thickness values. From an individual zone, the filtered table is titled Zone - <marker set> - <zone>.
The Marker tops table is editable. Marker, MD, Age, Type and the custom attribute columns accept new values, while Well name, TVD, TVDSS, TWT (s), X and Y are calculated from the pick and stay read-only on a grey background. Marker, Age and Type belong to the marker itself, so a new value there applies to that marker in every well of the set and a new name renames it everywhere, whereas a new MD or custom attribute value changes the edited row only. Type accepts only Marker, Fault or Intrusion. Edits are held in the table until Save edits writes them to the marker set; see Table view for how held values are checked, saved or discarded.
The Zones table is read-only. Its values are derived from the marker tops the zones are built from, so edit those tops instead.
Creating zones from markers
A zone is the interval between two marker tops of the same marker set. Auto-create Zones and Create Zones manually... stay disabled until the marker set holds at least two tops. Zones created from a marker set are listed under it, in its Zones subsection.
The Zones subsection offers the same two actions under different names, Generate zones from markers and Generate zones manually..., disabled under the same condition. Its menu also holds Add zone set, which asks for a name in the Set name of the zone set dialog, proposes New zone set and refuses a name that another zone set already carries. Zones belong to a zone set: new zones go to the current zone set, and when the project holds no zone set yet, g-Space creates one named Default and places them there.
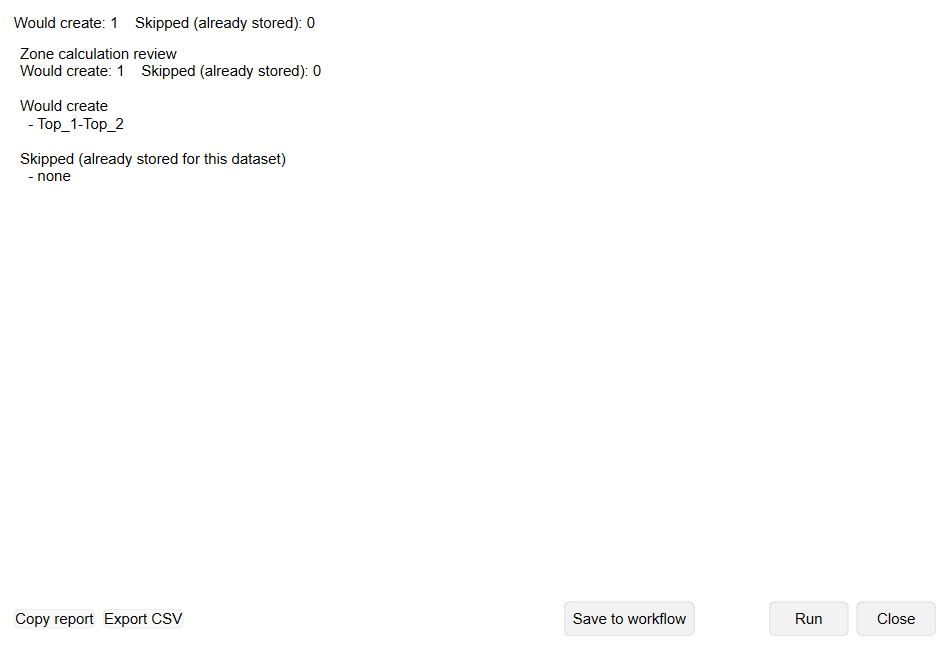
Auto-create Zones pairs the tops in their current top-to-bottom order and opens the Zone calculation review dialog before anything is created. The report states how many zones would be created and which pairs are skipped because they are already stored for this marker set. Click Run to create them, Save to workflow to add the calculation to the current workflow instead, or Close to leave the data unchanged. Copy report and Export CSV keep the report for later use.
The workflow job saved from this report keeps the automatic pairing rule rather than the pairs listed in it. Each time the job runs it pairs the tops of the marker set in their current top-to-bottom order, covers every well in the project, skips the pairs already stored for that set and never replaces an existing zone, then opens the Zone calculation review dialog with the TVD thickness obtained for each zone and well. Running the job again after a top has been added therefore creates the zones that are missing, while running it when nothing is missing creates nothing and lists the pairs as skipped. The job is listed in the workflow as Create zones from markers.
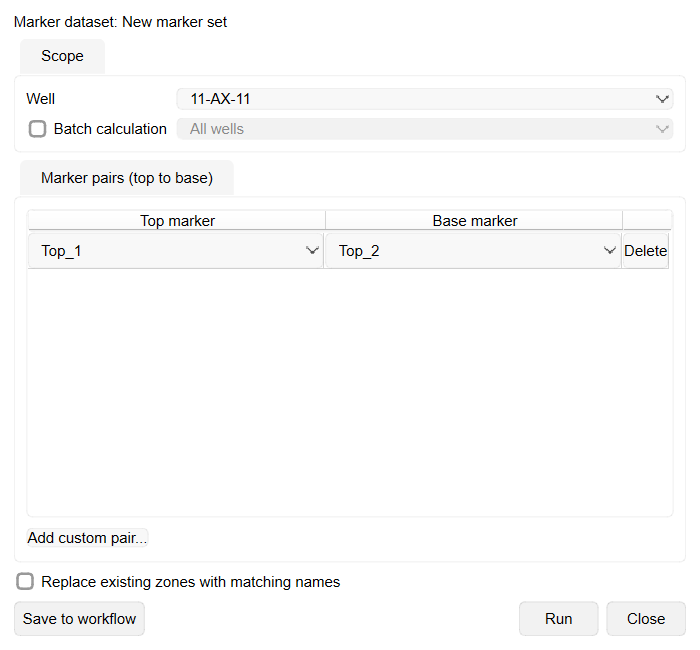
Create Zones manually... opens the Create zones from markers dialog, where the wells and the marker pairs are set before the zones are built:
- Scope - the wells the calculation covers: choose one Well by name, or select Batch calculation and pick a group of wells from the list beside it: All wells to process every well in the project, or a well filter, a Data Manager well folder, or a well section to limit the calculation to that group.
- Marker pairs (top to base) - the pairs derived from the order of the tops are listed with a Top marker and a Base marker. Change a pair in the drop-down lists, remove a row with Delete, or add one with Add custom pair....
- Replace existing zones with matching names - overwrite zones that already carry the same name instead of adding a numbered copy.
Run creates the zones and then opens the Zone calculation review dialog with the TVD thickness obtained for each zone and well. The dialog summarises the run as Full, Missing, Inverted and Skipped, and lists the wells behind each of these counts. Save to workflow stores the same settings as a workflow job instead of running them now.
A negative thickness is never stored. If a well has no pick for the top or the base marker, its TVD thickness is stored as None. If the base marker of a well resolves above its top marker, the zone is still created, but the TVD thickness for that well is also stored as None and the well is listed in the report under Inverted intervals (stored as None). A negative TVD would indicate a fault repeat or a mis-pick, so these wells are left as None instead of passing a negative thickness on to the tools that use the zone.
Each created zone keeps its result as a TVD thickness item beneath it in the Zones subsection. To reopen the report for a single zone later, right-click that zone or its TVD thickness item and choose Show TVD values. The Zone calculation review dialog then lists every well of that zone with its TVD thickness and the TVD of its top and base marker; Copy report and Export CSV are available there as well.
A zone built from a pair of marker tops is named <top marker>-<base marker>, with a numbered suffix when the zone set already holds that name. The name follows the markers and cannot be edited: the menu of such a zone holds Show as table, Show TVD values, Change color and Remove but no Rename, and renaming its top or base marker under Tops renames the zone to match the new marker names. An attempt to rename it anyway is refused with a message explaining that zone names are derived from marker names and cannot be changed manually. Only a zone that is not built from a pair of marker tops can still be renamed.
Removing a marker that zones are built from removes those zones as well, so g-Space asks for confirmation first and lists the dependent zones as <zone set>/<zone>. Cancel keeps both the markers and the zones. The same confirmation appears when several markers, a marker group or the whole marker set is removed.
When a time or depth 3D view is active, selecting the TVD thickness check box shows the zone as an interval along each eligible well trajectory between its top and base markers, drawn in the colour of the zone itself; a well with either marker missing shows no interval, and a time 3D view also requires checkshot data for the well.
Displaying zones
Select the check box of a zone's TVD thickness item in the Data Manager to show the zone in the active view, and clear it to hide the zone. The matching check box on the Visual Settings Object(s) tab carries the same state, so changing either check box changes the other.
On a Location map, the zone is a point at every well where both its top and base markers are picked. The point value is that well's TVD thickness, so enabling value labels places the thickness beside the well. The point is drawn in the colour of the zone itself, which Change color sets in the Data Manager. A well with either marker missing, or a well cleared in the marker dataset's Wells subsection, has no point for that zone.
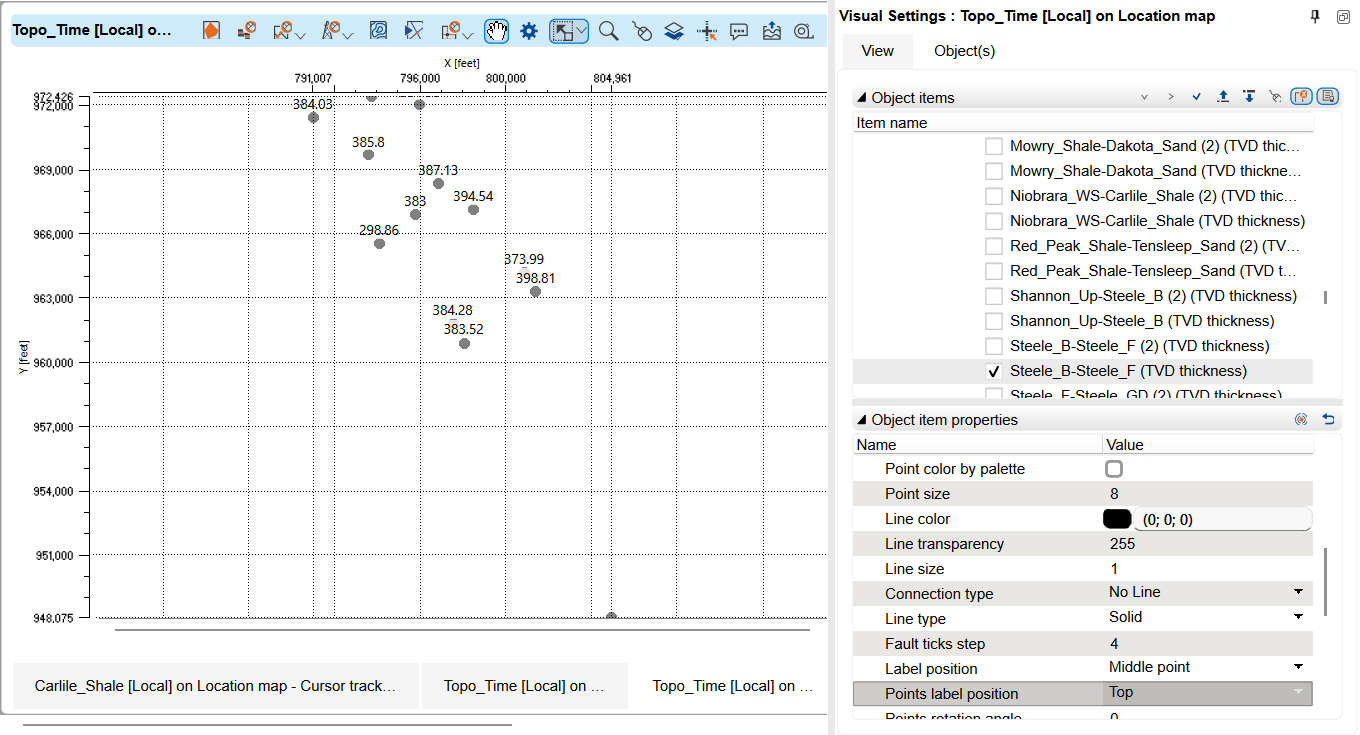
On the Object(s) tab, open Zones for a Location map or Zones 3D for a 3D view. Each entry is named <zone name> (TVD thickness). On a Location map, the usual object settings include point type, point size, colour and labels. The colour of the entry follows the zone: Point color under Zones, and Color under Zones 3D, hold the colour the zone carries in the Data Manager, while Point color by palette and Color by palette stay cleared, so the zone is drawn in that single colour instead of being coloured by its thickness values.
Change color on a zone sets that colour once for every view. The zone is repainted immediately in every open view - the points on a Location map and the intervals along the well trajectories in a time or a depth 3D view - so the colour never has to be set again view by view. The colour belongs to the zone, so it is still there after the views and the project have been closed and opened again.
The link works in this direction only: a colour chosen on the Object(s) tab repaints the object in that view alone and leaves the colour of the zone in the Data Manager, and in every other view, unchanged.
Filtering marker displays by well
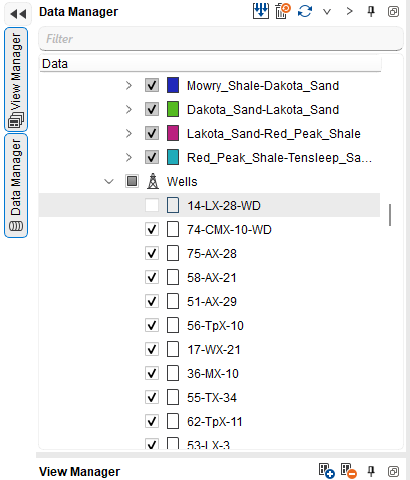
Every marker dataset has a Wells subsection that lists, by well name, every well containing markers in that dataset. Each well is selected by default. Clearing a well is a visualization filter: it hides that well's Tops and Zones from Location maps and 3D views and clears the corresponding Visual Settings entries. In Well correlation, Depth tie and Well log views, including the Well log view in the Wells data workspace, it also hides that well's marker lines without hiding markers in other wells. Selecting the well restores the hidden displays. The marker and zone data are not deleted or changed, and the check state is saved with the project.
See Also